
Related Manuals for Extraflame KLAUDIA 5.0


Summary of Contents for Extraflame KLAUDIA 5.0
- Page 1 PeLLet StoveS USeR MANUAL KLAUDIA 5.0 - KLAUDIA PLUS 5.0 MADE ITALY design & production 004281433 - Rev 002...
- Page 2 APPLY TECHNICAL DATA LABEL ENGLISH...
-
Page 3: Table Of Contents
SafEty ..........................................5 routINE MaINtENaNcE ....................................7 INStaLLatIoN ........................................8 PREPARATIONS FOR MAINTENANCE ........................................8 KLauDIa 5.0 DEtaILS ....................................10 KLauDIa pLuS 5.0 DEtaILS ..................................11 Hot aIr DuctING (KLauDIa pLuS 5.0) ..............................12 AddITIONAl ThERMOSTAT TO CONTROl ThE duCT MOTOR ...............................12 bulb ThERMOSTAT REACTIvATION ........................................12... -
Page 4: English
italiano EnGliSH FRanÇaiS ATTENZIONE TASSATIVO WArNINg ATTENTION ImPÉrATIf PrImA dI mOVImENTArE lA STufA BEfOrE hANdlINg ThE STOVE, ThE AVANT dE dÉPlAcEr lE POêlE, TOglIErE Il rIVESTImENTO cOVErINg INdIcATEd muST BE rE- rETIrEr lE rEVêTEmENT INdIquÉ INdIcATO PEr EVITArE dANNI. mOVEd TO AVOId dAmAgE. POur ÉVITEr TOuT dOmmAgE. -
Page 5: Warnings
We thank you for having chosen our company; our product is a great heating solution developed from the most advanced technology with top quality machining and modern design, aimed at making you enjoy the fantastic sensation that the heat of a flame gives, in complete safety. Warnings This instructions manual is an integral part of the product: make sure that it always accompanies the appliance, even if transferred to another owner... - Page 6 RECEIVED INSTRUCTIONS ON SAFE USE OF THE APPLIANCE AND THAT THEY UNDERSTAND THE INHERENT DANGERS. Š THE GENERATOR MUST NOT BE USED BY PERSONS (INCLUDING CHILDREN) WITH REDUCED PHYSICAL, SENSORY AND MENTAL CAPACITIES OR WHO ARE UNSKILLED PERSONS, UNLESS THEY ARE SUPERVISED AND TRAINED REGARDING USE OF THE APPLIANCE BY A PERSON RESPONSIBLE FOR THEIR SAFETY.
-
Page 7: Routine Maintenance
(STRONG WIND, FREEzING) SAFETY SYSTEMS MAY INTERVENE THAT SWITCH THE GENERATOR OFF. IF THIS OCCURS, CONTACT THE TECHNICAL AFTER-SALES SERVICE AND ALWAYS DISABLE THE SAFETY SYSTEMS. Š IN THE EVENT THE FLUE CATCHES FIRE, USE SUITABLE SYSTEMS FOR SUFFOCATING THE FLAMES OR REQUEST HELP FROM THE FIRE BRIGADE. -
Page 8: Installation
InstallatIOn general The flue gas exhaust and hydraulic connections must be carried out by qualified personnel who must issue installation conformity documentation compliant with national standards. The installer must provide the owner or person acting for him, according to the legislation in force, with the declaration of conformity, supplied with: 1) the use and maintenance manual of the appliance and of the system components (such as for example, the smoke ducts, chimney, etc.);... - Page 9 In the presence of type B gas appliances with intermittent operation not intended for heating, they must have their own aeration and/or ventilation opening. The air inlets must meet the following requirements: Š they must be protected with grids, metal mesh, etc., but without reducing the net useful section; Š...
-
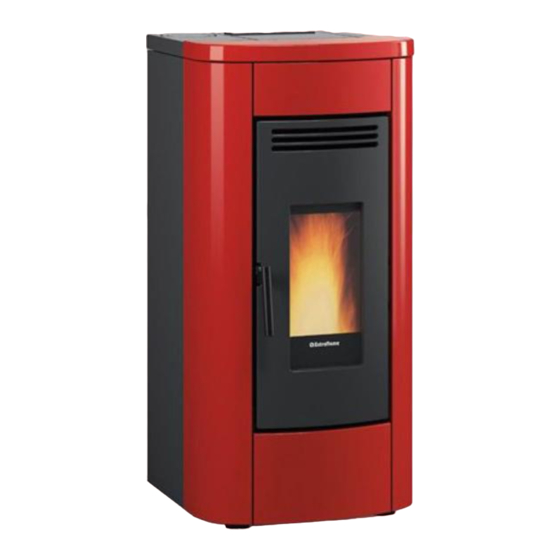
Page 10: Klaudia 5.0 Details
KLAUDIA 5.0 DEtAILs Room air outlet Pellet hopper Bulb thermostat reactivation Access to combustion chamber Display Rear flue gas outlet and ash drawer Room probe Additional thermostat input Combustion air inlet On/Off Upper fumes exhaust fuse 230 V power supply... -
Page 11: Klaudia Plus 5.0 Details
KLAUDIA pLUs 5.0 DEtAILs Room air outlet Pellet hopper Bulb thermostat reactivation Access to combustion chamber Display Rear flue gas outlet and ash drawer Additional thermostat input Room probe Combustion air inlet Additional ducting thermostat input On/Off Upper fumes exhaust fuse Ducting outlet 230 V power supply... -
Page 12: Hot Air Ducting (Klaudia Plus 5.0)
Hot AIr DUCtInG (KLAUDIA pLUs 5.0) The pipe used for ducting the hot air must have an internal diameter of 80 mm and it must also be insulated or at least be protected against heat dispersion. features: Š possibility to thermostat the ducting Š... -
Page 13: Stove Positioning
stovE posItIonInG To ensure the stove works correctly, it should always be positioned so that it is perfectly level, using a spirit level. notE For CorrECt opErAtIon Pellet hopper lid DURING START-UP: The generator performs a check on the combustion air flow during the START phase. -
Page 14: Pellets And Loading
PELLETS AND LOADING Pellets are made by subjecting wood shavings i.e. the rejects of pure unpainted wood from sawmills, carpentry products and products from other activities connected to wood working and transformation, to very high pressures. This type of fuel is fully ecological as no glues are used for its compaction. In fact, pellet compactness is guaranteed over time by a natural substance found in wood: lignin. -
Page 15: Remote Control
Remote contRol The remote control can be used to adjust the main stove functions. Transmitter Select air mode Display Lock keyboard On/off stove (hold for 3 seconds) Degrees Celsius / Fahrenheit Set power Press the button once to enable or disable the chrono Set switch-off delay: The button allows to set the switch- off delay. -
Page 16: Remote Control Icons
Remote contRol Icons Air mode selected: Enable chrono Flashing QUIET Light on = activated On REGULAR Light off = deactivated Indicates the transmission of the radio signal Set switch-off delay On = during all radio communication Off = radio communication absent Battery low Keys locked Set power level. -
Page 17: Control Board
Control Board ViewiNg OF VariOus tO aCCess ON/OFF text messages tHe meNu ON/OFF OPeratiNg POwer temPerature ICon key indicates the presence of an alarm. indicates the status of the weekly programming Off: indicates that there are no alarms Off: deactivated. On: indicates the presence of an alarm On: activated. -
Page 18: General Menu
General menu go back - exit scroll parameters: next (3); previous (2) Change settings data: increase (4); decrease (5) Confirm - access menu MODES VENTILATION *AIR DUCTING **TEMPERATURE *AIR ZONE CONTROL EASY SETUP CHRONO ENABLING CHRONO MODE PRG1 SETTINGS DATE-TIME PRG2 LANGUAGE PRG3... -
Page 19: First Ignition Settings
FIrst IGnItIon settInGs after connecting the power cord at the back of the generator, turn the switch (if any) to position (i). the switch is used to power the heat generator board. date-tIme this menu allows the date and time to be set. CONtrOLs PrOCeDure Š... -
Page 20: Operation And Logic
FLame guarD It Is ForBIdden to use tHe devICe wItHout tHe Flame Guard (see FIGure to tHe sIde). removal wIll ComPromIse tHe saFety oF tHe ProduCt and result In tHe ImmedIate nullIFICatIon oF tHe warranty PerIod. In tHe event oF wear or deterIoratIon, ask tHe aFter-sales servICe to rePlaCe tHe Parts (rePlaCement does not Fall wItHIn tHe ProduCt warranty as tHe Part Is suBjeCt to wear). -
Page 21: Mode
mode this menu is used to set the operating logic of the machine for the power used. range: (maNuaL, set temPerature, aux) By selecting maNuaL mode, the user can choose the heat output level delivered and the type of VeNtiLatiON, according to his/her preferences. -
Page 22: Air Zone Control (Klaudia Plus 5.0)
aIr Zone Control (klaudIa Plus 5.0) this menu allows you to enable the air ZONe CONtrOL mode range: (ON, OFF) if ON is selected, the stove will optimise the adjustments so that the heat is sent to the ducting when the main room temperature set is reached. -
Page 23: Enabling
enaBlInG allows the chrono and the different stove time slots to be enabled/disabled. CONtrOLs PrOCeDure Š Press key 6. Š Press 3 until CHrONO appears and confirm by pressing key 6. Š Confirm eNaBLiNg by pressing 6. Š use keys 4 -5 to enable (ON) or disable (OFF) Š... -
Page 24: Example
eXamPle CHrono tIme slot 02:00 08:00 16:30 23:00 MANUAL 02:00 08:00 16:30 23:00 Power start 02:00 time slot 1 Power 5 stop 23:00 start 08:00 02:00 08:00 16:30 23:00 time slot 2 Power 1 02:00 08:00 16:30 23:00 stop 16:30 22°C stove setting 02:00... -
Page 25: Settings
settInGs • DATE-TIME • LANGUAGE See chapter: firSt ignition SettingS • DEGREES dIsPlay this menu allows you to adjust the brightness of the display. the values range from OFF, 1 to 20. if set to OFF, the display backlighting is set to maximum brightness and turns off after a 60 second delay. -
Page 26: Delta-T
delta-t this function allows the hysteresis thresholds to be set for stove ignition (DeLta-t ON) and switch-off (DeLta-t OFF), used as a room temperature adjustment interval if not managed by an external thermostat. the possible values for DELTA-T go from: 0.5 - 5°C CONtrOLs PrOCeDure Š... -
Page 27: Additional Functions
addItIonal FunCtIons addItIonal tHermostat InstallatIon (oPtIonal) the stove can control the room temperature through an additional thermostat (optional). after ignition (by pressing key 6 or in chrono mode), the stove will work to reach the set value on the thermostat, displaying wOrK (closed contact) on the screen. -
Page 28: Cleaning And Maintenance
TO FIND OUT WHERE YOUR NEAREST SERVICE CENTRE IS, CONTACT YOUR DEALER OR VISIT THE WEBSITE: WWW.LANORDICA-EXTRAFLAME.COM Cleaning and maintenanCe always follow the instruCtions in Complete safety! Š Make sure that the power cord is unplugged because the generator may have been programmed to switch on. - Page 29 burn pot and Combustion Chamber: Š Vacuum the residue in the burn pot Š Remove the burn pot completely from the relevant compartment; Š Vacuum the ash from the burn pot slot, ignition plug pipe holder and combustion chamber. Š Clear/clean all the holes in the burn pot. Š...
- Page 30 removable ash drawer: Š Remove the ash drawer and empty it in a dedicated container. PARTS FREQUENCY IN DAYS* 1 - 2 BURN POT (USER) COMBUSTION CHAMBER (USER) REMOVABLE ASH DRAWER** (USER) T-SHAPED FITTING / SMOkE DUCT (QUALIFIED TECHNICIAN) * Average use 8h at max. nominal power. ** How often the ash drawer is emptied depends on a number of factors: the type of pellets, the stove output, the use of the stove and the type of installation.
-
Page 31: Routine Maintenance Performed By Qualified Technicians
TO FIND OUT WHERE YOUR NEAREST SERVICE CENTRE IS, CONTACT YOUR DEALER OR VISIT THE WEBSITE: WWW.LANORDICA-EXTRAFLAME.COM routine maintenanCe performed by Qualified teChniCians routine maintenance must be performed at least once a year. Since the generator uses pellets as solid fuel, it requires annual routine maintenance, which must be performed by a Qualified technician, using only original spare parts. - Page 32 TO FIND OUT WHERE YOUR NEAREST SERVICE CENTRE IS, CONTACT YOUR DEALER OR VISIT THE WEBSITE: WWW.LANORDICA-EXTRAFLAME.COM klaudia 5.0 THE IMAGES ARE FOR ILLUSTRATIVE PURPOSES. Fumes motor (dismantle and clean the smoke duct and "T"), new seal where required Gaskets, pellet hopper, inspections, ash drawer and door (replace and apply silicone where indicated) Combustion chamber &...
- Page 33 TO FIND OUT WHERE YOUR NEAREST SERVICE CENTRE IS, CONTACT YOUR DEALER OR VISIT THE WEBSITE: WWW.LANORDICA-EXTRAFLAME.COM klaudia plus 5.0 THE IMAGES ARE FOR ILLUSTRATIVE PURPOSES. Fumes motor (dismantle and clean the smoke duct and "T"), new seal where required Gaskets, pellet hopper, inspections, ash drawer and door (replace and apply silicone where indicated) Combustion chamber &...
-
Page 34: Displays
Displays Display Reason Generator off sTaRT The start-up phase is in progress pelleT loaDinG Continuous pellet loading is in progress during the ignition phase iGniTion The ignition phase is in progress pRepaRaTion The preparation phase is in progress WoRk The normal work phase is in progress MoDulaTion The generator is working at minimum final cleaninG... - Page 35 Turn the stove off using key 6 and repeat the procedure No power during the ignition described in the "iGniTion" chapter. iGniTion - black ouT phase. Other reset operations should be performed by an authorised technician. coMManD auGeR Abnormal pellet loading. Contact after-sales centre alaRM Differential pressure transducer faulty or...
-
Page 36: Disposal
Disposal InformatIon for management of electrIc and electronIc applIance waste contaInIng batterIes or accumulators This symbol, which is used on the product, batteries, accumulators or on the packaging or documents, means that at the end of its useful life, this product, the batteries and the accumulators included must not be collected, recycled or disposed of together with domestic waste. Improper management of electric or electronic waste or batteries or accumulators can lead to the leakage of hazardous substances contained in the product. - Page 37 ENGLISH...
- Page 38 ENGLISH...
- Page 39 ENGLISH...
- Page 40 CONTACT YOUR DEALER OR CONSULT THE SITE WWW.LANORDICA-EXTRAFLAME.COM The manufacturer reserves the right to vary the characteristics and the data reported in this pamphlet at any moment and without notice, in order to improve its products. 18/09/2024 004281433-002 MAN.UT. KLAUDIA 5.0 KLAUDIA PLUS 5.0...
Need help?
Do you have a question about the KLAUDIA 5.0 and is the answer not in the manual?
Questions and answers