Advertisement
Table of Contents
Advertisement
Table of Contents

Related Manuals for Kogan KAMN133TFDEB


Summary of Contents for Kogan KAMN133TFDEB
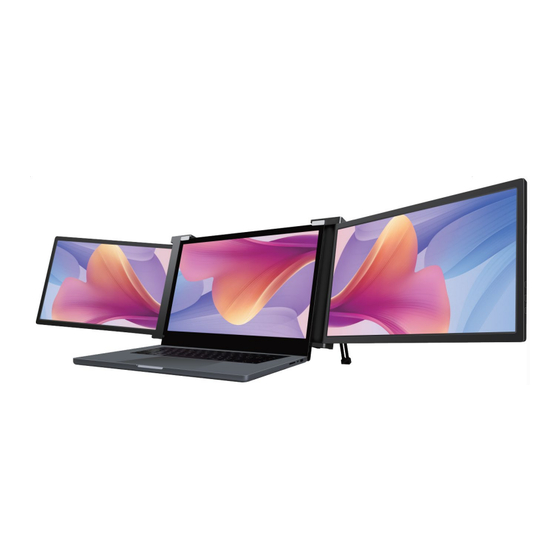
- Page 1 FHD PRO DUAL SCREEN TRI- FOLD PORTABLE MONITOR 13.3" KAMN133TFDEB...
-
Page 3: Safety And Warnings
SAFETY & WARNINGS • Handle the tri-screen with care and do not press the screens to avoid damage. • Do not exceed its maximum turning angle showing as below: Turning angle of screens Left screen (0° - 235°) Right screen (0° - 180°) - Page 4 COMPONENTS Monitor USB-C - USB-C (90-degree) Cables (x2) Mini HDMI - HDMI Cables (x2) USB-C - USB-A Cables (x2) Carry Bag Velcro Fastener Protective Caps (x6)
-
Page 5: Operation
OPERATION Inputs and Buttons Press the Menu to enter the OSD (On-Screen Display) menu Increase the brightness, enter menu and press it to turn to the next selection, increase the parameter value Decrease the brightness/decrease the parameter value x2 USB-C (Type C) Ports: fully functional, power supply, video signal transmission Mini HDMI Port (No Power Supply);... - Page 6 Selecting the Right Cables • To determine which cables you will use, first identify your laptop’s ports using the pictures below or reference your laptop’s user manual. • If your laptop has two Thunderbolt3/4 / USB-C with DP ports, the simplest way to use the tri-screen is with the two USB-C to USB-C cables provided.
- Page 7 Protective Caps Using the protective cap if your laptop is an ultra-thin style (laptop screen thickness ≤6mm), this helps keep your laptop in place.
-
Page 8: Installation
INSTALLATION Unpack the monitor. Open the two screens in the direction shown. Place the bracket at the back of the laptop screen and install it well with the bracket clamping the screen. Lift up the stand and stretch to its end. Press and hold the button to retract the stand. (The stand is embedded in the rear of the triple monitor, which can offer extra support to the monitor.) Using the necessary cables, plug one end of the cable into the triple monitor and the... - Page 9 CONNECTIVITY Two USB-C or Thunderbolt 3/4 Ports If there are 2 full-functioned USB-C or 2 Thunderbolt 3/4 ports on the laptop, use the 2 included USB-C cables to connect the laptop to the monitors. USB-C USB-C USB-C Note: Ensure that the laptop USB-C ports support power & data transmission and has enough power supply above 5V/2A.
- Page 10 Notes: • Ensure the USB-C port of your laptop is a full-functioned USB-C port (supports both video & data transmission). • Ensure 5V/2A or above power can be supported through USB-C port. An external power supply of 5V/2A or above is needed for normal use (adjust brightness above 50).
- Page 11 Laptop Display Configuration PC / WINDOWS Go to your Display Settings (Start > Settings > System > Display) Click and drag screens to configuration shown If you need to set different display modes for multiple screens, please click 1/2/3 (click the "Identify"...
- Page 12 OSD (on screen display) Press the “ ” Menu button to activate the OSD menu. Press “+” button to choose your settings. Press Menu “ ” button to confirm. Long press the “ ” button to return to previous page.
- Page 13 OSD Settings Brightness: The adjusting range is from 0 to 100. Contrast: The adjusting range is from 0 to 100. Black Level: The adjusting range is from 0 to 100. Sharpness: The adjusting range is from 0 to 100. Image ECO: Preset display settings for various modes (Standard/ Game/ Movie/ Text/ FPS/ RTS Modes)
- Page 14 OSD Setting Language: Select OSD language. The selections are: English, French, German, Simplified Chinese, Italian, Spanish, Portuguese, Turkish, Polish, Netherlands, Japanese, Korean OSD Timer: Sets time-out for monitor settings menu (10-60 seconds) Transparency: Sets transparency of monitor settings menus Reset Selects RESET to revert all settings to the factory default mode Other...
-
Page 15: Specifications
SPECIFICATIONS Two 13.3inch (diagonal) 1920*1080, Full HD LCD IPS Panels 16:9 aspect ratio Display Adjustable brightness Power consumption: 5V 2A (Per screen) Thunderbolt 3/4 / USB-C 3.1 input Video and Power Thunderbolt 3/4 / USB-C 3.1 input Inputs and connectivity (per screen) Video and Power Mini-HDMI input Video Only... - Page 16 Need more information? We hope that this user guide has given you the assistance needed for a simple set-up. For the most up-to-date guide for your product, as well as any additional assistance you may require, head online to help.kogan.com...
Need help?
Do you have a question about the KAMN133TFDEB and is the answer not in the manual?
Questions and answers