Lumens VC-TR60A User Manual
Auto tracking camera
Hide thumbs
Also See for VC-TR60A:
- User manual (36 pages) ,
- Quick installation manual (2 pages) ,
- Firmware update manual (4 pages)
Table of Contents
Advertisement
Quick Links
Advertisement
Table of Contents

Related Manuals for Lumens VC-TR60A


Summary of Contents for Lumens VC-TR60A
- Page 1 VC-TR60A Auto Tracking Camera (PTZ Video Camera) User Manual - English Version VRK100a To download the latest version of Quick Start Guide, multilingual user manual, software, or driver, etc., please visit Lumens https://www.MyLumens.com/support...
-
Page 2: Table Of Contents
Contents Chapter 1 Package Contents .............. 2 Chapter 2 Product Appearance ............3 2.1 I/O interface ........................ 3 2.2 LED Indicator ....................... 3 Chapter 3 Installation Instructions ............ 4 3.1 Scenario ........................4 3.2 Preparation before installation................4 3.3 I would like to install the camera on the ceiling/wall/TV stand ....5 3.4 Camera Size ......................... -
Page 3: Chapter 1 Package Contents
Chapter 1 Package Contents 3-PIN to 2-PIN Camera Power Adapter Power Cord connector (Appearance may vary (For Japan only) depending on country/ region) USB cable - 2M Remote Control (Type B to Type A) English... -
Page 4: Chapter 2 Product Appearance
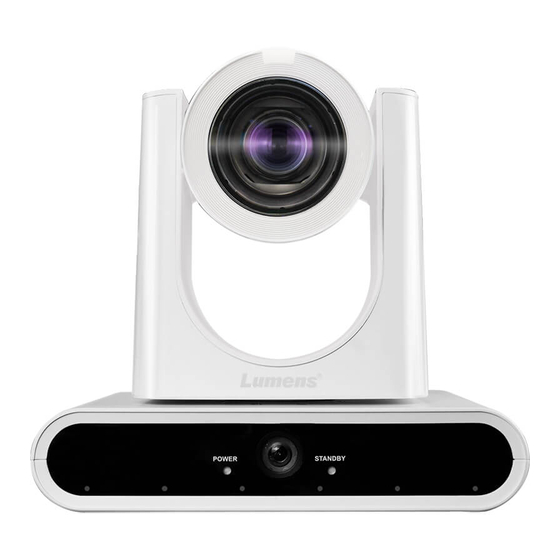
Chapter 2 Product Appearance 2.1 I/O interface Front Back Item Function Descriptions Main camera lens 12x camera lens Panoramic lens Panoramic camera lens LED indicators Display the camera status, please refer to 2.2 LED Indicator HDMI Out HDMI output (Audio output supported) Connecting to the USB port of the computer and providing USB USB3.0 Out signal images... -
Page 5: Chapter 3 Installation Instructions
Chapter 3 Installation Instructions 3.1 Scenario 3.1.1 VC-TR60A supported distance range: Auto Tracking, Auto Framing: 6-12m Voice Tracking: 2-8m 3.1.2 Installation Guidelines 3.1.2.1 We recommend installing the camera on top of a display or suspending it from the ceiling. -
Page 6: I Would Like To Install The Camera On The Ceiling/Wall/Tv Stand
3.3 I would like to install the camera on the ceiling/wall/TV stand Lumens offer following optional accessories. VC-WM14 3 in 1 Folding Bracket VC-WM15 Ceiling Mounted Bracket For installation of brackets, please download Quick Installation Guide from Lumens website ... -
Page 7: Camera Size
3.4 Camera Size Length x Width x Height: 190 x 144x 179mm Weight: 1.5Kg 3.4.1 Dimensions of the base unit The camera can be mounted on a 1/4”-20 UNC PTZ tripod head by using the lock holes on the bottom. -
Page 8: Connecting Devices
3.5 Connecting Devices 3.5.1 Connecting devices Ethernet port supporting PoE+ (IEEE802.3at) 3.5.2 RS-232/ RS-422 Pin Definition RJ45 Series RJ45 Series RX_IN- RS422 RS232 RX_IN+ RS422 Detection TX_IN- RS422 RS232 TX_IN+ RS422 English... -
Page 9: Chapter 4 Remote Control And Setting Menu
Chapter 4 Remote Control and Setting Menu Remote Control Item Description ➊ ⓫ Power on/ off Power 0-9: Click to call the preset ➋ Preset: Assign a preset number(0~9) to save the current position data Preset Reset: Select a preset number(0~9) to clear the its position data ➌... -
Page 10: Setting Menu
Setting Menu Press [MENU] on the remote control. Default is indicated in bold. Layer 1 Layer 2 Layer 3 Description Full Auto/ Shutter Pri/ Iris Mode Exposure mode setting Pri/ Manual/ White Board Spot Light On/ Off Turn on/ off Spot Light Spot Light Adjustable after Spot Light is activated X(0~5)Y(0~3) - Page 11 Layer 1 Layer 2 Layer 3 Description Adjustable when Image Mode set to Brightness 0~C~14 Custom Adjustable when Image Mode set to 0~C~14 Custom Adjustable when Image Mode set to Saturation 0~C~14 Custom Adjustable when Image Mode set to Gamma 0~C~4 Custom Adjustable when Image Mode set to...
- Page 12 Layer 1 Layer 2 Layer 3 Description Audio In Line In Audio Volume 0~C~10 Volume Setting When the audio is not synchronized with Audio Delay On/ Off the video, enable this function to set the audio delay time Audio Delay -10~-500ms Set audio delay time Time(ms)
- Page 13 Layer 1 Layer 2 Layer 3 Description Activate PiP, set the sub-screen size and position. On/ Off Motionless Switch cannot be activated when PIP is enabled Auto Switch is only available when Voice Auto Switch/ PTZ / Mode Select Panoramic Tracking is enabled.
- Page 14 Layer 1 Layer 2 Layer 3 Description 2160P 60/50/30/25 1080p 60/50/30/25 Output Mode Set the output resolution 720p 60/50 1080i 60/50 Factory Reset On/ Off Resume the factory default setting Status Display the current setting information English...
-
Page 15: Chapter 5 Network Setting And Web Interface
Chapter 5 Network setting and Web interface Connecting Camera to Network 5.1.1 Connection Two common connection methods are shown below 1. Connect via switch or router Cat5e cable Cat5e cable Camera Ethernet Switch 2. Connect directly via an Ethernet cable, and the computer's IP address must be modified to match the network segment used by the camera. - Page 16 Lumens IP Camera Account: admin Password: 9999 (Default) 5.1.3 Use a RTSP Player to View Images Free software can be used for RTSP connection, such as VLC, Quick Time and PotPlayer. RTSP connection address formats are as follows: RTSP Stream 1 =>...
-
Page 17: Web Interface Functions
Web interface functions 5.2.1 Login Item Function Descriptions User name Enter user login account (default: admin) Enter user password (default: 9999) For the first-time login, please refer to 5.2.10 System-User Password change the default password Save user name and password. When you log in next time, there is Remember Me no need to re-enter them. - Page 18 5.2.2 Live View Item Function Descriptions Display camera ID/ Location Camera ID/ Location Please refer to 5.2.7 System-Output Preview screen Display the current view of the camera Preset setting Select the number first and then select Store or Load Pan/Tilt Adjust the Pan/Tilt position of the camera Zoom Zoom In/Zoom Out...
- Page 19 5.2.3 Live View - Camera Setting Item Function Descriptions Mode: Exposure mode (Full Auto/ Shutter Pri/ Iris Pri/ Manual/ White Board) Gain Limit: Adjust gain limit (adjustable under “Manual”mode.) Exposure Comp. Level: Select exposure compensation level WDR: Set the level to change the dynamic range of the picture. ...
- Page 20 Pan/Tilt limit: Enable to set the pan/tilt range limit Preset Speed: Set the rotation speed when a Preset executed Pan Tilt Zoom Initial Position: Set the camera go to the Last MEM or 1st Preset position after POWER ON 1st Preset = Preset 0 ...
- Page 21 5.2.4 Tracking Item Function Descriptions Camera ID/Location Display camera ID/ location. Please refer to 5.2.7 System-Output PTZ preview screen Display the current view of the main lens. Panoramic preview Display the current view of the panoramic lens screen People Count Display the calculated number of people in the screen.
- Page 22 Everywhere Tracking/ Stage Tracking/ Partition Auto Tracking: Tracking Center Stage Auto Framing: Auto Framing/ Partition Framing Sensitivity Set tracking sensitivity Tracking Speed Set tracking speed Target Lost Time Set a delay to take action after a tracking target is lost Target Lost Action Set the action after a tracking target is lost After a person enters the area for 3 seconds, tracking/ framing will...
- Page 23 Body Size: Set Full/ Half Body 19.2 Stage Tracking Head Position: Set the head position of the person in the screen Block Area: Click the left mouse button to draw a frame on the panoramic view to set a block area. Tracking Zone: Click the left mouse button to draw a frame on the ...
- Page 24 Block Area: Click into the Edit mode, frame by holding the left mouse button and set the block area Block Area: Click the left mouse button to draw a frame on the panoramic view to set a block area. Framing Size: Set the framing size.
- Page 25 5.2.5 Audio Item Function Descriptions Select to enable Audio function Audio In: Set Line In Audio Enable Encode sample rate: Encode type and sample rate (48KHz(AAC) Volume: Adjust Audio Volume Audio Delay Check to set the audio delay time (10 ~ -500 ms) Apply/Cancel Apply/ Cancel Audio Settings English...
- Page 26 5.2.6 Stream Item Function Descriptions Streaming 1/ 2 Supporting 2 streaming outputs Streaming Please refer to 5.2.6.1 Streaming Parameter Setting. parameter settings Select to enable RTSP Enable/ Disable Multicast Multicast is recommended when the stream is being watched by more than 4 viewers..
- Page 27 Latency can be set between 20-8000 microseconds. (Default is 120 microseconds 5.2.6.1 Streaming parameter setting Function Streaming 1 Streaming 2 Encode Format H.264 H.264 Resolution 4K/ 1080p / 720p 720p Bit rate 2,000~20,000 2,000~20,000 Bit rate Default 7,000 3,000 Rate Control CBR / VBR Frame Rate/ Group of Pictures...
- Page 28 5.2.7 System - Output Item Function Descriptions Name camera ID/ Location Supporting 1 - 32 characters for the camera ID/ location Supporting English, Chinese and numbers. Special symbols such as Camera ID/ “/” and “space” cannot be used Location Modifying this field will also update the ONVIF device name/location.
- Page 29 used simultaneously. Once PIP is enabled, [Motionless Switch] will be automatically disabled. Apply/ Cancel Apply/ Cancel Setting 5.2.7 System - Network Item Function Descriptions Camera network settings. Modifications can be made when DHCP DHCP is disabled. HTTP Port Set HTTP port. The default Port value is 80 HTTPS Port Set HTTPS port.
- Page 30 5.2.8 System - Date & Time Description Display the current camera/PC date/time, and set the display format. Manually set [Time Settings], Date & Time or synchronize with your PC. 5.2.9 System - User Description Add/Modify/Delete user account Supports 4 - 32 characters for user name and password ...
- Page 31 5.2.10 System - Control Item Function Descriptions Protocol Supports VISCA protocol Baud Rate Select the transmission speed of the control signal VISCA address The camera ID address 1 ~ 7 can be assigned. When enabled, LED on the front panel will flash green while Tracking LED status the camera is tracking.
- Page 32 Save setup parameters as a Profile, and users can download and Configuration upload camera setup parameters. If the camera operates abnormally, please export event log and Event Log provide it to Lumens for investigation. 5.2.12 About Description Display the firmware version, serial number, and other related information of the camera For technical support, please scan the QR code at the bottom right.
-
Page 33: Chapter 6 Troubleshooting
Chapter 6 Troubleshooting This chapter describes problems you may encounter while using VC-TR60A. If you have questions, please refer to related chapters and follow all the suggested solutions. If the problem still occurrs, please contact your local distributor or Lumens. -
Page 34: Chapter 7 Safety Instructions
Chapter 7 Safety Instructions Always follow these safety instructions when setting up and using PTZ Video Camera: 1 Operation 1.1 Please use the product in the recommended operating environment, away from water or source of heat 1.2 Do not place the product on an uneven surface. 1.3 Ensure the power plug is free of dust prior to usage. - Page 35 IC Warning This digital apparatus does not exceed the Class A limits for radio noise emissions from digital apparatus as set out in the interference-causing equipment standard entitled “Digital Apparatus,” ICES-003 of Industry Canada. Cet appareil numerique respecte les limites de bruits radioelectriques applicables aux appareils numeriques de Classe A prescrites dans la norme sur le material brouilleur: “Appareils Numeriques,”...
-
Page 36: Copyright Information
Lumens is a trademark registered by Lumens Digital Optics Inc. Copying, reproducing or transmitting this file is not allowed if a license is not provided by Lumens Digital Optics Inc. unless copying this file is for the purpose of backup after purchasing this product.
Need help?
Do you have a question about the VC-TR60A and is the answer not in the manual?
Questions and answers