Table of Contents
Advertisement
Available languages
Available languages
Quick Links
P1 P2 S1 S2
RUNRST
ETH1
ETH2
1
2
3
4
5
6
7
8
S1
S2
DYNAMIC CONNECTIVITY PLATFORMS
DYNAMISCHE KONNEKTIVITÄTSPLATTFORMEN
PLATEFORMES DE CONNEXION DYNAMIQUE
動的接続プラットフォーム
Quick Start Guide
Quick Start Anleitung
Guide de Démarrage Rapide
クイックスタートガイド
C1 C3 C5 C7
C2 C4 C6 C8
V1.0
LINE
N/A
OSC -TX
OSC -RX
DC P9 20- D0 8P
A
Advertisement
Table of Contents

Subscribe to Our Youtube Channel
Related Manuals for FS DCP920-D08PA


Summary of Contents for FS DCP920-D08PA
- Page 1 P1 P2 S1 S2 RUNRST ETH1 ETH2 C1 C3 C5 C7 C2 C4 C6 C8 LINE OSC -TX OSC -RX DC P9 20- D0 8P DYNAMIC CONNECTIVITY PLATFORMS DYNAMISCHE KONNEKTIVITÄTSPLATTFORMEN PLATEFORMES DE CONNEXION DYNAMIQUE 動的接続プラットフォーム Quick Start Guide V1.0 Quick Start Anleitung Guide de Démarrage Rapide クイックスタートガイド...
- Page 2 P1 P2 S1 S2 RUN RST ETH1 ETH2 C1 C3 C5 C7 LINE C2 C4 C6 C8 OSC-TX OSC-RX DCP920-D08PA DCP920-D08PA/DCP920-D08PB P1 P2 S1 S2 RUNRST ETH1 ETH2 C1 C2 C3 C4 LINE OSC-TX OSC-RX...
-
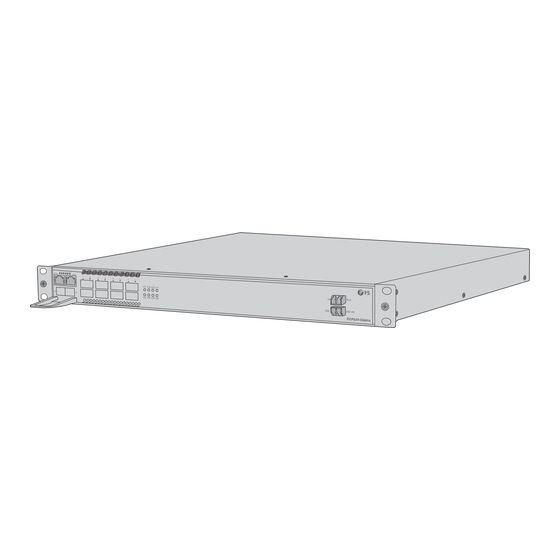
Page 3: Hardware Overview
Hardware Overview Front Panel Ports DCP920-D08PA/DCP920-D08PB QSFP28 (1~8) LINE P1 P2 S1 S2 RUN RST ETH1 ETH2 C1 C3 C5 C7 LINE C2 C4 C6 C8 OSC-TX OSC-RX DCP920-D08PA DCP920-D04PA/DCP920-D04PB QSFP28 (1~4) LINE P1 P2 S1 S2 RUN RST ETH1... -
Page 4: Front Panel Button
The port is not linked. On or Blinking The corresponding port is linked. C1~C4 or C1~C8 The corresponding port is not linked. Front Panel Button DCP920-D08PA/DCP920-D08PB Reset P1 P2 S1 S2 RUN RST ETH1 ETH2 C1 C3 C5 C7 LINE... -
Page 5: Installation Requirements
Installation Requirements Before the installation, make sure that you have the following conditions ready: Phillips screwdriver, related screw sets and ESD tools. Screw and washers for installing the grounding cable. Standard-sized, 19" wide rack with a minimum of 1U height available. Category 5e or higher RJ45 Ethernet cables, optical transceivers, and ber optic cables. -
Page 6: Grounding The Device
Grounding the Device P1 P2 S1 S2 RUNRST ETH1 ETH2 C1 C3 C5 C7 C2 C4 C6 C8 LINE OSC -TX OSC -RX DC P9 20- D0 8P 1. Connect one end of the grounding cable to a proper earth ground, such as the rack in which the device is mounted. -
Page 7: Connecting The Power
Connecting the QSFP28 Ports P1 P2 S1 S2 RUNRST ETH1 ETH2 C1 C3 C5 C7 C2 C4 C6 C8 1. Connect one end of an Ethernet cable to the RJ45 port of the switch and the other end to a network device. - Page 8 Con guring the Device Step 1: Connect the device to a computer with the Ethernet cable. Step 2: Set the IP address of the computer to 192.168.1.x ("x" is any number from 2 to 254). Set the subnet mask of the computer to 255.255.255.0. LINE OSC -TX OSC -RX...
-
Page 9: Troubleshooting
Product Warranty FS ensures our customers that for any damage or faulty items due to our workmanship, we will o er a free return within 30 days from the day you receive your goods. This excludes any custom-made items or tailored solutions. - Page 10 Sie sie in Ihrem Netzwerk einsetzen können. P1 P2 S1 S2 RUN RST ETH1 ETH2 C1 C3 C5 C7 LINE C2 C4 C6 C8 OSC-TX OSC-RX DCP920-D08PA DCP920-D08PA/DCP920-D08PB P1 P2 S1 S2 RUNRST ETH1 ETH2 C1 C2 C3 C4 LINE OSC-TX OSC-RX...
-
Page 11: Leds An Der Vorderseite
Hardware-Übersicht Ports an der Vorderseite DCP920-D08PA/DCP920-D08PB QSFP28 (1~8) LINE P1 P2 S1 S2 RUN RST ETH1 ETH2 C1 C3 C5 C7 LINE C2 C4 C6 C8 OSC-TX OSC-RX DCP920-D08PA DCP920-D04PA/DCP920-D04PB QSFP28 (1~4) LINE P1 P2 S1 S2 RUN RST ETH1... - Page 12 Der Port ist nicht verbunden. An oder blinkt Der entsprechende Port ist verbunden. C1~C4 oder C1~C8 Der entsprechende Port ist nicht verbunden. Taste an Vorderseite DCP920-D08PA/DCP920-D08PB Reset P1 P2 S1 S2 RUN RST ETH1 ETH2 C1 C3 C5 C7 LINE...
-
Page 13: Montage Des Geräts
Installationsvoraussetzungen Vergewissern Sie sich vor der Installation, dass Sie über Folgendes verfügen: Kreuzschlitzschraubendreher, entsprechende Schraubensätze und ESD-Werkzeuge. Schrauben und Unterlegscheiben für die Installation des Erdungskabels. Ein 19"-Rack in Standardgröße mit einer Mindesthöhe von 1 HE. RJ45-Ethernet-Kabel der Kategorie 5e oder höher, optische Transceiver und Glasfaserkabel. Betriebsumgebung Stellen Sie sicher, dass die Betriebstemperatur bei -40°C~45°C gehalten wird. - Page 14 Erdung des Geräts P1 P2 S1 S2 RUNRST ETH1 ETH2 C1 C3 C5 C7 C2 C4 C6 C8 LINE OSC -TX OSC -RX DC P9 20- D0 8P 1. Schließen Sie ein Ende des Erdungskabels an eine geeignete Erdung an, z. B. an das Rack, in dem das Gerät montiert ist.
-
Page 15: Anschließen Der Stromversorgung
Anschließen der QSFP28-Ports P1 P2 S1 S2 RUNRST ETH1 ETH2 C1 C3 C5 C7 C2 C4 C6 C8 1. Schließen Sie ein Ende eines Ethernet-Kabels an den RJ45-Port des Switches und das andere Ende an ein Netzwerkgerät an. 2. Verbinden Sie den kompatiblen QSFP28-Transceiver mit dem QSFP28-Port. Schließen Sie ein LWL-Kabel an den optischen Transceiver an. - Page 16 Kon guration des Geräts Schritt 1: Schließen Sie das Gerät mit dem Ethernet-Kabel an einen Computer an. Schritt 2: Stellen Sie die IP-Adresse des Computers auf 192.168.1.x ein ("x" ist eine beliebige Zahl von 2 bis 254). Setzen Sie die Subnetzmaske des Computers auf 255.255.255.0. LINE OSC -TX OSC -RX...
-
Page 17: Fehlerbehebung
Produktgarantie FS garantiert seinen Kunden, dass wir im Falle von Schäden oder fehlerhaften Artikeln, die auf unsere Verarbeitung zurückzuführen sind, eine kostenlose Rückgabe innerhalb von 30 Tagen nach Erhalt der Ware anbieten. Dies gilt nicht für Sonderanfertigungen oder maßgeschneiderte Lösungen. - Page 18 à son déploiement. P1 P2 S1 S2 RUN RST ETH1 ETH2 C1 C3 C5 C7 LINE C2 C4 C6 C8 OSC-TX OSC-RX DCP920-D08PA DCP920-D08PA/DCP920-D08PB P1 P2 S1 S2 RUNRST ETH1 ETH2 C1 C2 C3 C4 LINE OSC-TX OSC-RX DCP920-D04PA...
-
Page 19: Aperçu Du Matériel
Aperçu du Matériel Ports du Panneau Frontal DCP920-D08PA/DCP920-D08PB QSFP28 (1~8) LINE P1 P2 S1 S2 RUN RST ETH1 ETH2 C1 C3 C5 C7 LINE C2 C4 C6 C8 OSC-TX OSC-RX DCP920-D08PA DCP920-D04PA/DCP920-D04PB QSFP28 (1~4) LINE P1 P2 S1 S2 RUN RST... - Page 20 Allumé ou Clignote Le port correspondant est relié. C1~C4 ou C1~C8 Éteint Le port correspondant n'est pas relié. Bouton du Panneau Frontal DCP920-D08PA/DCP920-D08PB Reset P1 P2 S1 S2 RUN RST ETH1 ETH2 C1 C3 C5 C7 LINE C2 C4 C6 C8...
-
Page 21: Conditions D'installation
Conditions d'Installation Avant l'installation, assurez-vous que vous disposez des éléments suivants : Tournevis Phillips, jeux de vis et outils ESD. Vis et rondelles pour l'installation du câble de mise à la terre. Rack standard de 19" de large avec une hauteur minimale de 1U disponible. Câbles Ethernet RJ45 de catégorie 5e ou supérieure, émetteurs-récepteurs optiques et câbles à... - Page 22 Mise à la Terre de l'Appareil P1 P2 S1 S2 RUNRST ETH1 ETH2 C1 C3 C5 C7 C2 C4 C6 C8 LINE OSC -TX OSC -RX DC P9 20- D0 8P 1. Connectez une extrémité du câble de mise à la terre à une terre appropriée, telle que le rack dans lequel l'appareil est installé.
-
Page 23: Connexion De L'alimentation
Connexion des Ports QSFP28 P1 P2 S1 S2 RUNRST ETH1 ETH2 C1 C3 C5 C7 C2 C4 C6 C8 1. Connectez une extrémité d'un câble Ethernet au port RJ45 du commutateur et l'autre extrém té à un périphérique réseau. 2. Branchez l'émetteur-récepteur QSFP28 compatible dans le port QSFP28. Connectez un câble à... - Page 24 Con guration de l'Appareil Étape 1 : Connectez l'appareil à un ordinateur à l'aide du câble Ethernet. Étape 2 : Réglez l'adresse IP de l'ordinateur sur 192.168.1.x (""x"" est un nombre quelconque compris entre 2 et 254). Réglez le masque de sous-réseau de l'ordinateur sur 255.255.255.0.
-
Page 25: Dépannage
Garantie du Produit FS garantit à ses clients que tout article endommagé ou défectueux en raison de sa fabrication pourra être retourné gratuitement dans un délai de 30 jours à compter de la date de réception de la marchandise. Cette garantie ne s'applique pas aux articles fabriqués sur mesure ou aux solutions personnalisées. - Page 26 この度は、動的接続プラットフォームをお選びいただき、誠にありがとうございます。このガ イドでは、プラットフォームのレイアウトを理解し、ネットワークに導入する方法を説明する ためのものです。 P1 P2 S1 S2 RUN RST ETH1 ETH2 C1 C3 C5 C7 LINE C2 C4 C6 C8 OSC-TX OSC-RX DCP920-D08PA DCP920-D08PA/DCP920-D08PB P1 P2 S1 S2 RUNRST ETH1 ETH2 C1 C2 C3 C4 LINE OSC-TX OSC-RX DCP920-D04PA DCP920-D04PA/DCP920-D04PB アクセサリー...
- Page 27 ハードウエア概要 フロントパネルポート DCP920-D08PA/DCP920-D08PB QSFP28 (1~8) LINE P1 P2 S1 S2 RUN RST ETH1 ETH2 C1 C3 C5 C7 LINE C2 C4 C6 C8 OSC-TX OSC-RX DCP920-D08PA DCP920-D04PA/DCP920-D04PB QSFP28 (1~4) LINE P1 P2 S1 S2 RUN RST ETH1 ETH2 C1 C2 C3 C4...
- Page 28 閉じた状態/接続されていない状態です。 緑色点灯(左) & ポートがリンクされています。 黄色点滅(右) オフ ポートはリンクされていません。 点灯または点滅 対応するポートがリンクされます。 C�~C�また はC�~C� オフ 対応するポートがリンクされていません。 フロントパネルボタン DCP920-D08PA/DCP920-D08PB Reset P1 P2 S1 S2 RUN RST ETH1 ETH2 C1 C3 C5 C7 LINE C2 C4 C6 C8 OSC-TX OSC-RX DCP920-D08PA DCP920-D04PA/DCP920-D04PB Reset P1 P2 S1 S2 RUN RST...
- Page 29 設置要件 設置する前に、次の条件が整っていることを確認してください: プラスドライバー、関連するネジセット、ESDツール。 接地ケーブルを取り付けるためのネジとワッシャー。 �U以上の高さが利用可能な標準サイズの��インチ幅のラック。 カテゴリー�e以上のRJ��イーサネットケーブル、光トランシーバー、光ファイバケーブル。 設置環境 使用温度は-��℃~��℃に保ってください。 使用湿度は�%~��%に保ってください。 設置場所には、水漏れ、水滴、多露、湿気がないことが必要です。 設置場所は埃のない状態に保ってください。 設置場所は換気が十分である必要があります。デバイスの周囲に適切な空気の流れがある ことを確認してください。 ラックまたは作業台が適切に接地されていることを確認してください。 デバイスの取り付け ラック取り付け P1 P2 S1 ETH 1 S2 RUNR ETH 2 C1 C3 C5 C2 C4 C6 LIN E N/ A OS C-T X OS C-R X DC P9 20 -D 08 P M�ネジセットを使用してデバイスをラックに取り付けます。...
- Page 30 デバイスの接地 P1 P2 S1 S2 RUNRST ETH1 ETH2 C1 C3 C5 C7 C2 C4 C6 C8 LINE OSC -TX OSC -RX DC P9 20- D0 8P �. 接地ケーブルの一端を、デバイスが搭載されているラックなど、適切なアースグラウンドに 接続します。 �. ネジとワッシャーを使用して、アースラグを取り付けブラケットのアースポイントに固定し ます。 ご注意: すべての電源接続が切断されていない限り、アース接続を取り外さない でください。 SFPポートの接続 P1 P2 S1 S2 RUNR ETH 1 ETH 2 C1 C3 C5 C7...
- Page 31 QSFP��ポートの接続 P1 P2 S1 S2 RUNRST ETH1 ETH2 C1 C3 C5 C7 C2 C4 C6 C8 �. イーサネットケーブルの一端をスイッチのRJ��ポートに接続し、もう一端をネットワーク デバイスに接続します。 �. 互換性のあるQSFP��モジュールをQSFP��ポートに差し込みます。光ファイバモジュールに 光ファイバケーブルを接続します。次に、ケーブルのもう一方の端を別のファイバデバイスに 接続します。 電源の接続 LIN E OS C-T X OS C-R X DC P9 20 -D 08 �. AC電源コードをデバイスのバックパネルの電源ポートに差し込みます。 �. 電源コードのもう一方の端をAC電源に接続します。 警告: 電源が入っている状態で電源コードを取り付けないでください。...
- Page 32 デバイスの設定 ステップ�: イーサネットケーブルを使用してデバイスをコンピュータに接続します。 ステップ�: コンピューターのIPアドレスを���.���.�.x(「x」は� ~ ���の任意の数字)に設定し ます。コンピューターのサブネットマスクを���.���.���.�に設定します。 LINE OSC -TX OSC -RX DC P9 20- D0 8P I nte r n et Proto co l Version 4 ( TCP/IP v4) Prop e r t ie s General Yo u c a n g e t I P s e t t i n g s a s s i g n e d a u t o m a t i c a l l y i f y o u r n e t w o r k s u p p o r t s t h i s c a p a b i l i t y.
- Page 33 RX電力が低すぎる 光ケーブルが正常か、回線損失が大きくないか確認してください。 PRIインターフェイスの接続を確認してください。 光パワーメーターを使用して、光ケーブルの受信範囲をテストしてください。RX dBm信号 が��dBm以上であることが必要です。 電源構成と、構成後の減衰が大きすぎないかを確認してください。 自動分散調整に失敗 OSC通信が正常であることを確認してください。IPを使用してデバイスにpingを実行し、 パケット損失や通信の中断がないかどうかを観察します。 接続が正常であること、およびPAM�受信電力が適切な範囲内にあることを確認してく ださい。 オンラインリソース ダウンロード https://www.fs.com/jp/products_support.html ヘルプセンター https://www.fs.com/jp/service/fs_support.html お問い合わせ https://www.fs.com/jp/contact_us.html 製品保証 FSは、 お客様が弊社の仕上がりに起因する損傷または不良品について、 製品を受け取った日から�� 日以内に無料で返品できることを保証します。 これには、 カスタムメイドのアイテムやカスタマイズさ れたソリューションは含まれません。 保証: この製品には、 材料または製造上の欠陥に対する�年間の限定保証が付いています 。 保証の詳細については、 以下のサイ トをご参照ください: https://www.fs.com/jp/policies/warranty.html 返品: 返品を希望される場合は、 以下のサイ トで返品方法に関する情報をご確認ください: https://www.fs.com/jp/policies/day_return_policy.html...
-
Page 34: Compliance Information
2014/35/EU, 2011/65/EU und (EU)2015/863 konform ist.Eine Kopie der EU-Konformität- serklärung nden Sie unter www.fs.com/de/company/quality_control.html. FS.COM GmbH déclare par la présente que ce dispositif est conforme à la Directive 2014/30/EU, 2014/35/EU, 2011/65/EU et (EU)2015/863. Une copie de la Déclaration de Conformité de l'UE est disponible à l'adresse suivante https://www.fs.com/fr/company/quality_control.html... - Page 35 - 3 (a) / nmb - 3 (a). UKCA Hereby, FS.COM Innovation Ltd declares that this device is in compliance with the Directive SI 2016 No. 1091, SI 2016 No. 1101 and SI 2012 NO. 3032.
- Page 36 Q.C. PASSED Copyright © 2023 FS.COM All Rights Reserved.
Need help?
Do you have a question about the DCP920-D08PA and is the answer not in the manual?
Questions and answers