WhisperKool EXTREME Series Owner's Manual
Hide thumbs
Also See for EXTREME Series:
- Owner's manual (49 pages) ,
- Owner's manual (37 pages) ,
- Owner's manual (42 pages)

Related Manuals for WhisperKool EXTREME Series


Summary of Contents for WhisperKool EXTREME Series
- Page 1 EXTREME SERIES 240V (METRIC) OWNER’S MANUAL Extreme ti 3500 Extreme ti 5000 Extreme ti 8000...
- Page 2 WhisperKOOL. Every effort has been made to ensure that the information in this manual is accurate. WhisperKOOL is not responsible for printing or clerical errors.
-
Page 3: Table Of Contents
TABLE OF CONTENTS Introduction ............2 Before You Start . -
Page 4: Introduction
How Does the WhisperKOOL Extreme Series Work? The WhisperKOOL unit is especially designed to maintain optimal conditions for wine storage and aging. The unit is fully self- contained and can be installed through most walls. The unit is also capable of a more flexible ducted application, which allows the unit to be placed in an indoor remote site, resulting in a quiet airflow. -
Page 5: Before You Start
WhisperKOOL’s authorization. This will void your warranty. If you encounter a problem with your WhisperKOOL system, please refer to the Troubleshooting Guide. If you have any further questions or concerns, or need assistance, please contact MacPhee’s Customer Service at info@ macphees.com.au. Please be sure all testing has been completed prior to contacting Customer Service. -
Page 6: Receiving & Inspecting The Unit
Customer Service immediately. Please leave the WhisperKOOL unit in its original box until you are ready for installation. This will allow you to move the product safely without damaging it. When you are ready to remove the product from the box, refer to the installation instructions. -
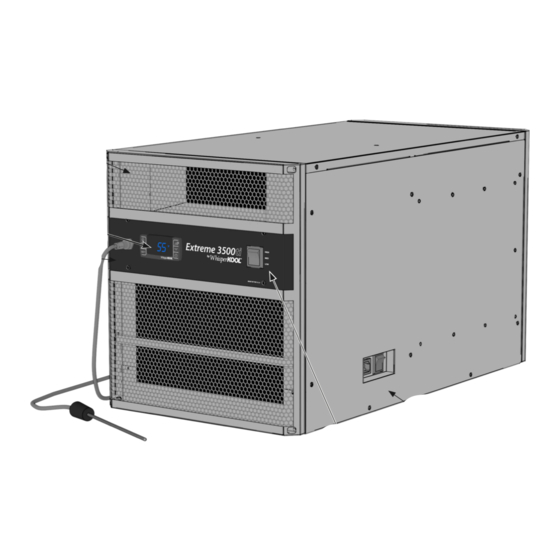
Page 7: Quick Reference Guide
Digital controller Bottle probe input Control panel (see page 12 for details) Bottle probe Fan speed control Rear / Side View Evaporator grille w/ filter UV power outlet UV/Access panel Rear power inlet Drain port www.whisperkool.com | Page 5... -
Page 8: Controller Layout
CONTROLLER LAYOUT 14 14 14 14 Refer to page 18 for complete listing of buttons and symbols. Menu Navigation Power On/Off and Value Increase (hold for approx. 3 seconds) (Press and hold to manually enter Anti-Frost mode.) and Escape SET (ENTER) Menu Navigation (Press and hold and Value Decrease... -
Page 9: Fan Speed & Unit Specifications
Undersized cooling units can lead to premature failure and/or prevent the system from reaching the desired set temperature. As a result, they are not covered under warranty. www.whisperkool.com | Page 7... -
Page 10: Preparing The Unit For Installation
PREPARING THE UNIT FOR INSTALLATION The WhisperKOOL Unit requires a dedicated 240V, 15-amp circuit. The unit draws a large amount of amps during its initial startup. By designating a dedicated circuit breaker, you will guarantee the unit has enough power to run effectively. Contact an electrician for assistance with the installation of this dedicated electrical circuit. -
Page 11: Preparing The Installation Location
Make sure that the internal height remains at 406 mm (3500ti & 5000ti) or 578 mm (8000 ti) so that the WhisperKOOL unit will fit snugly through the framed cut-out. www.whisperkool.com | Page 9... -
Page 12: Mounting Bracket Installation
PREPARING THE UNIT FOR INSTALLATION A two-piece mounting bracket is used to secure the unit to the wall studs. Two optional filler brackets can also be installed to frame around the top and bottom of the unit. The mounting holes on the unit have been designed to hold the unit at a two-degree (2°) angle. -
Page 13: Optional Exterior Grille
The mounting screws will secure through the center holes on the mounting bracket flanges. Use the supplied pan-head screws to fasten the grille to the unit. You are required to use the 13 m pan-head screws provided. Do not drill holes into unit. Non-Flush Installation Flush Installation www.whisperkool.com | Page 11... -
Page 14: Installing The Unit
The 44 mm screws should penetrate the studs as well as the upper and lower supports to provide adequate support for the WhisperKOOL unit (see illustration). Seal all cracks and gaps around the WhisperKOOL Extreme unit with an air-tight sealant or caulking to prevent air leakage. -
Page 15: Condensation Drain Line
Then use the supplied drain line brush to clean the interior drain line. Use the drain line access door to drop a pan tab into the drip tray to prevent the buildup of microbial growth. WRONG: Drain line is under water. www.whisperkool.com | Page 13... -
Page 16: Liquid Measuring Thermostat System (Bottle Probe)
LIQUID-MEASURING THERMOSTAT SYSTEM (BOTTLE PROBE) WhisperKOOL cooling units come with a liquid-temperature-measuring thermostat. The self-calibrating bottle probe contains a sensor which communicates back and forth with the thermostat. This results in a consistent temperature setting and accuracy. Wine should be kept at a very precise, controlled temperature and humidity. By measuring the liquid temperature rather than air, the unit will operate 75–80% of the time. -
Page 17: Multi-Speed Fan Control
When initially installing the unit, set the fan speed to the High setting to quickly cool down the cellar. Once the wine cellar reaches the desired temperature, a lower fan speed may be selected. In the event that the outdoor temperature rises above 0°C (when exhausting to the outdoors), a higher fan speed may be required. www.whisperkool.com | Page 15... -
Page 18: System Operation
“PB2” (evaporator probe). Setpoint Safety Features The setpoint is set at the factory (WhisperKOOL) to 14°C. It can Once the compressor relay is de-energized the controller must be adjusted by the customer between 10–21°C in 0.1 degree wait five minutes before reenergizing the relay. This prevents increments. -
Page 19: Controller Functions
The alarm symbol is shown and an audible buzzer will sound when the unit encounters an issue that needs attention. The displayed alarm codes are explained on the next page. To silence the buzzer, press any button. The alarm code will remain displayed until corrected. www.whisperkool.com | Page 17... -
Page 20: Alarm Codes
An increase in this parameter will keep the fan running longer after the compressor has turned off, reintroducing some of the moisture which was extracted from the wine cellar during the cooling cycle back into the cellar. (The WhisperKOOL unit, Humidity however, cannot increase the humidity of the cellar.) This parameter should not be adjusted below 1. -
Page 21: Extreme 3500Ti, 5000Ti, & 8000Ti Wiring Diagram
1 2 3 4 5 WHITE WHITE WHITE CRANKCASE HEATER BROWN C P CITOR COMPRESSOR FAN SPEED SWITCH GREY EVAP FAN WHITE WHITE YELLOW HIGH BLUE BL CK BROWN C P CITOR CONDENSER GREY WHITE YELLOW BLUE BL CK www.whisperkool.com | Page 19... - Page 22 EXTREME 8000 ti WIRING DIAGRAM EwPlus 974 NTC Probe 1 2 3 4 5 6 7 8 9 10 11 Extreme ti 974 Controller FRONT REAR RECEPTACLE RECEPTACLE WHITE BLUE GREEN BLACK BLACK BLACK L1 1 2 3 4 5 BLACK 1 2 3 4 2 3 4 5...
-
Page 23: Troubleshooting Guide
If so, call Customer Service at 1-800-343-9463. System runs constantly Possible cause Solution Leaky door seal or poorly insulated cellar Fix leaky door seal and insulate cellar in accordance with this manual (page 9) www.whisperkool.com | Page 21... - Page 24 Unit leaks water Possible cause Solution °) Unit is level System should have a two-degree (2 pitch towards the exhaust side Drain line clogged or kinked Check drain line to make sure water can flow freely Drain is clogged, preventing water from escaping 1.
-
Page 25: Maintenance Schedule
They are harmful or fatal if ingested. Wear protective gloves when handling pan tabs. Wash hands thoroughly after handling. If pan tabs make contact with eyes, rinse cautiously with water for several minutes. In case of an emergency, call 1-800-255-3924 (24 hours). www.whisperkool.com | Page 23... - Page 26 NOTES EXti 011824 Page 24...
- Page 27 WhisperKOOL 1738 E. Alpine Ave Stockton, CA 95205 www.whisperkool.com www.whisperkool.com | Page 25...
Need help?
Do you have a question about the EXTREME Series and is the answer not in the manual?
Questions and answers