
Related Manuals for Charnwood W614


Summary of Contents for Charnwood W614
- Page 1 10” TILT ARBOR SAWBENCH OPERATING INSTRUCTIONS MODEL: W614 Cedar Court, Walker Road, Bardon Hill, Leicester, LE6 1TU Tel. 01530 516926 Fax. 01530 516929 email; sales@charnwood.net website: www.charnwood.net...
-
Page 2: Table Of Contents
CONTENTS INTRODUCTION Your new Performance Power tool will more than satisfy your expectations. It has been Introduction manufactured under stringent quality standards to meet superior performance criteria. Environmental protection Description of symbols You will find your new tool easy and safe to operate and, with proper care, it will give you many Specifications years of dependable service. -
Page 3: Specifications
additional important safety instructions. SPECIFICATIONS 1. Keep the work area clean and tidy. Cluttered work areas and benches invite accidents and Nominal voltage: 0–240Vac ~ 50Hz injury. Power input: 1500W 2. Consider the environment in which you are working. Do not use power tools in damp or wet No load speed: 5700min locations. -
Page 4: Additional Safety Rules For Saws
15. Remove adjusting keys and wrenches. Check to see that keys and adjusting wrenches are removed • Damage to hearing if effective earmuffs are not worn. from the tool before switching it on. • Harmful emissions of wood dust when the machine is used in closed rooms. 16.Avoid unintentional starting.Always check that the switch is in the OFF position before plugging in the •... - Page 5 replacement. • To rectify faults or remove jammed pieces of wood, always switch off the machine first and remove the mains plug! • Keep the saw table and your workplace clean of wood scrap and any unnecessary objects. • Adjustments, measurements and cleaning jobs are to be performed only when the motor is •...
-
Page 6: Accessories
ACCESSORIES Due to modern mass production techniques, it is unlikely that your power tool is faulty or that a part is missing. If you find anything wrong, do not operate the tool until the parts have been replaced or the fault has been rectified. Failure to do so could result in serious personal injury. Accessories supplied include: •... -
Page 7: Know Your Product
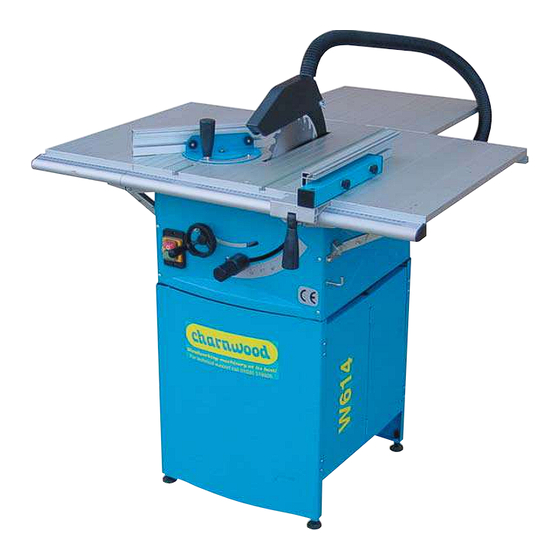
KNOW YOUR PRODUCT 1. Table top 12. Blade bevel locking knob 2. Switch 13. Back extension table 13a. 2 x side extension table 3. Riving knife 14. Cabinet stand 4. Removable table top section 15. 2 x support for back extension table 5. -
Page 8: Before Using The Machine
BEFORE USING THE MACHINE FITTING THE TABLE SAW TO THE STAND Warning. Before connecting a tool to a power source (power point receptacle, outlet, etc.) be sure that the voltage supply is the same as that specified on the nameplate of the tool. A power source with a voltage greater than that specified for the tool can result in serious injury to the user, as well as damage to the tool. -
Page 9: Adjusting The Cutting Angle Stops
4. Tighten the wing nut sufficiently so that the guard rests on the table top (1) but will lift when 10. Place a 45° angle between the saw table and the saw blade. the work piece is pushed into the blade. 11. -
Page 10: Adjusting The Fence
ADJUSTING THE FENCE MAKING LONGITUDINAL CUTS Cutting width Important. After each new adjustment it is advisable to carry out a trial cut in order to check the set dimensions. 1. Use the fence when making longitudinal cuts. After switching on the saw, wait for the blade to reach its maximum speed of rotation before 2. -
Page 11: Making Bevel Cuts
Warning. Worn push blocks must be replaced without delay. 7. Now turn the blade depth adjustment wheel (10) until the saw blade is at the minimum cutting depth, so that it is easier to take the blade out. MAKING BEVEL CUTS 8. -
Page 12: General Inspection
GENERAL INSPECTION Regularly check that all the fixing screws are tight. They may vibrate loose over time. REPAIRS Only an authorised service centre should replace the cordset or drivebelt or effect other repairs. If the cordset is damaged or worn, have it repaired or replaced by an authorised service centre. Page 22... - Page 14 Description Part Order Qty. TJ250D01011 bracket GB12618-90 mushmoon head break mandrel blind rivets 4X8 washer TJ250D01013-3 plate TJ250D01013-2 side bracket assemble TJ250D01013 nut M10 GB6170-86 15501005 adjustment foot TJ250D04001-6 fence tube GB96-85 large washer 31502013 combined nut TJ250D04001-8 plastic plate TJ250D04001-1 slide base TJ250D04001-2...
- Page 15 Description Part Order Qty. TJ25003010 bushing TJ25003008A clamping knob hexagon screws M6X8 GB80-85 TJ25003004-1A handle GB818-85 cross recessed pan hesd screws M6X50 TJ25003004-2A crank KJD22 switch GB6172-86 GB818-85 cross recessed pan head screws M4X8 GB845-85 cross recessed pan head tapping screws ST4.2X16 guide bar TJ250A02012-3 GB819-85...
- Page 16 Description Part Order Qty. GB/T1972-92 spring 12.5A GB889-86 prevailing torque type hexagon nuts M6 TJ250D06004-2 support plate GB/T879.2 spring-type straight pins-slotted 2X6 GB/T882-86 spindle TJ250D06004-3 short support plate TJ250D06004-1 long rotatingplate TJ250D06004-6 left sup TJ250D01001 side plate TJ250D06002-2 sliding rail of extended table TJ250D06002-7 left slide slot block TJ250D06002-1...
- Page 17 Description Part Order Qty. TJ25002011 adjusting washer TJ25002008A-1 saw blade guard,left TJ250B02013 drive wheel belt 6PJ251 GB6170-86 hexagon nut M8 GB93-87 spring washer 8 TJ25002003 riving knife bracket assembly TJ250B02002 riving knife TJ25002004 pressure plate GB5783-86 bolt M6X20 TJ25002009 contractive ripe TJ25002008A-2 saw blade ,right GB62-88...
Need help?
Do you have a question about the W614 and is the answer not in the manual?
Questions and answers