
Related Manuals for ZEROXCLUB BD702


Summary of Contents for ZEROXCLUB BD702
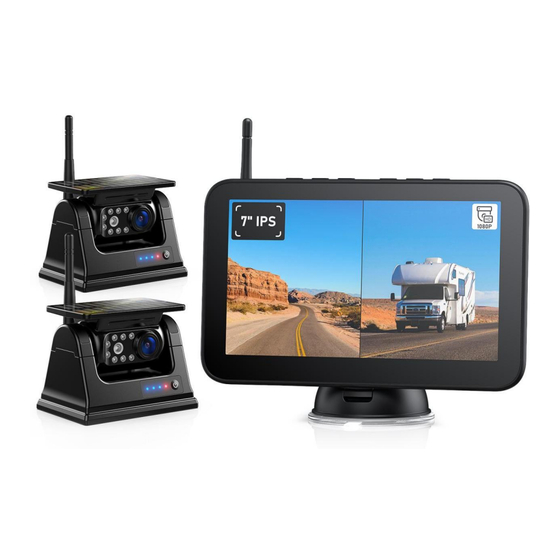
- Page 1 ZEROXCLUB Instructions Manual Solar Wireless Backup Camera System Model: BD702 Any questions or suggestions please send an email to customer service via sales@uszeroxclub.com...
-
Page 2: Table Of Contents
ZEROXCLUB Instructions Manual TABLE OF CONTENTS WARRANTY ..................2 BEFORE USING ................... 2 CHARGE THE BATTERY ..............3 WHAT IS IN THE BOX ................. 4 ABOUT CAMERA ................. 4 INSTALLATION ..................6 Installation of the Antenna ..............6 Installation of the Camera ..............6 Installation of the Monitor .............. -
Page 3: Warranty
ZEROXCLUB Instructions Manual WARRANTY ZEROXCLUB offers a full 18 months warranty and 3 months replacement policy. We also provide lifetime technical support to ensure that you enjoy your modern backup camera for many years to come. To obtain warranty support, or if you are not satisfied in... -
Page 4: Charge The Battery
ZEROXCLUB Instructions Manual CHARGE THE BATTERY Fully Charge the battery before use via the supplied USB cable. 1. Connect the supplied USB-C cable to the Type-C port of the camera. 2. Plug the USB-C cable into the USB wall charger and Plug your charger into an outlet. -
Page 5: What Is In The Box
ZEROXCLUB Instructions Manual WHAT IS IN THE BOX 7-inch Monitor (Build-in 32GB memory card) Backup Camera*2 12V Car Charge Suction Cup Mount USB Wall Charger*2 USB Power Cable for Antenna*3 USB-C Cable*2 Monitor ABOUT CAMERA... - Page 6 ZEROXCLUB Instructions Manual 1. Two Charging Methods The camera supports USB-C charging (5V DC charging) and Solar charging. Due to the inefficiency of solar charging caused by the limitation of solar panel area, it is best to use Type-C charging as the primary charging method.
-
Page 7: Installation
ZEROXCLUB Instructions Manual a. Turn off the camera to save energy when you don’t need it,such as overnight. b. Fully Charge the battery before use via the supplied USB cable. The solar panel can be used as a tool to supply power to the battery, extend the working time of the backup camera and reduce the charging times. -
Page 8: Installation Of The Monitor
ZEROXCLUB Instructions Manual NOTICE a. Aluminum and fiberglass magnets vehicle body is weakly attracted to a magnetic base. We recommend that you can purchase a metal plate and bolts from the local hardware store. After cutting it down to size and used the bolts that you through-bolted to the vehicle. -
Page 9: Operating Instruction
ZEROXCLUB Instructions Manual (1)Connect Red wire to ACC power(which is the gear switch before starting up the car's motor).Vehicle turns on, monitor turns on automatically,Vehicle turns off, monitor will turn off. (2)Connect Black wire to Negative Power/Ground/Sheet Metal. NOTICE Do not allow water to enter the LCD Display. -
Page 10: Main Screen Interface
ZEROXCLUB Instructions Manual (5) The button cannot be operated to access the menu panel if the system is recording. Please press OK first to stop recording. (6) If everything is backwards, press and hold the button a few seconds can rotate the screen. -
Page 11: Pairing Operation
ZEROXCLUB Instructions Manual Function Increase button or Function Decrease button to select the menu item. Sub-menu items may be highlighted in red. NOTICE Pressing the button won't bring up the main menu when in split-screen mode or recording mode. To return from any selection, press the button or wait for a timeout. -
Page 12: Picture Operation
ZEROXCLUB Instructions Manual Single Camera Pairing Steps 1) Turn off the camera first. Press button to select a full channel that needs to be paired. (The channel must be a blue screen with no signal, and only one channel is currently displayed, which is full screen.) -
Page 13: System Operation
ZEROXCLUB Instructions Manual 1) Press button to enter menu interface. to select PICTURE. Press 2) Press to confirm. 3) Press to select BRIGHTNESS / CONTRAST / HUE , press to confirm. Press to adjust settings. 4) After all settings are done, press to return to previous panel, press it again to exit the menu. -
Page 14: Play Operation
ZEROXCLUB Instructions Manual 3) Press to select TIME / LANGUAGE / AUTO-DIM / P-LINE / DEFAULT, press to confirm. Press to adjust settings. 4) After all settings are done, press to return to previous panel, press it again to exit the menu. -
Page 15: Troubleshooting
ZEROXCLUB Instructions Manual 1) Press button to enter menu interface. 2) Press to select RECORD. Press to confirm. 3) Press to select REWRITE / FORMAT, press confirm. Press to turn on/off. After all settings are done, press to return to previous panel, press it again to exit the menu. - Page 16 ZEROXCLUB Instructions Manual the manual to re-pair. 2) Chang the the angle of the antenna can improve signal. Move the antenna out a little bit, keeping the tip of the antenna as far away from metal objects as possible. The antenna cling to the sheet metal will weaken the transmission signal.
- Page 17 ZEROXCLUB Instructions Manual may cause damage to the camera. 4) Bad contact in the charging cable. Unplug and re-insert the charging cable. Ensure the stable connection. 5) Improper charging temperature. For the battery-powered camera, it cannot be charged if the temperature is out of the charging temperature range 0℃(32℉) - 45℃...
-
Page 18: Faqs
ZEROXCLUB Instructions Manual If you have any questions not mentioned above, just feel free to email us at sales@uszeroxclub.com. We're always there for you! FAQS Question Answer If the rough surface of the dash did not work, you can plan ahead and make sure the surface is smooth, like glass or plastic. - Page 19 ZEROXCLUB Instructions Manual USB wall charger. Plug the other end into the camera's type-c port. Plug the charge into the wall outlet. 2.Charge the camera with a batter pack: Charge your power bank in advance and remember to take it with you when you won't have access to wall outlet.
-
Page 20: Safety Information
We will reply you within 24 hours. SAFETY INFORMATION ● There are no user-serviceable parts inside the ZEROXCLUB camera system. Contact ZEROXCLUB customer service at sales@uszeroxclub.com if the part is ever compromised. ● Do not disassemble or attempt to repair any part of the camera system. -
Page 21: Specifications
ZEROXCLUB Instructions Manual SPECIFICATIONS Monitor 7’’ LCD Display Connector Type DC female connector Item Weight 0.52 pounds Power Supply DC 12V~24V 230mA Monitor Dimensions 7.3(L) x 4.53(H) x 0.78(D) in Camera Image Sensor CMOS 1920 x 1080 Effective Pixels Waterproof Rating...
Need help?
Do you have a question about the BD702 and is the answer not in the manual?
Questions and answers