
Subscribe to Our Youtube Channel
Related Manuals for ZEROXCLUB BSC702


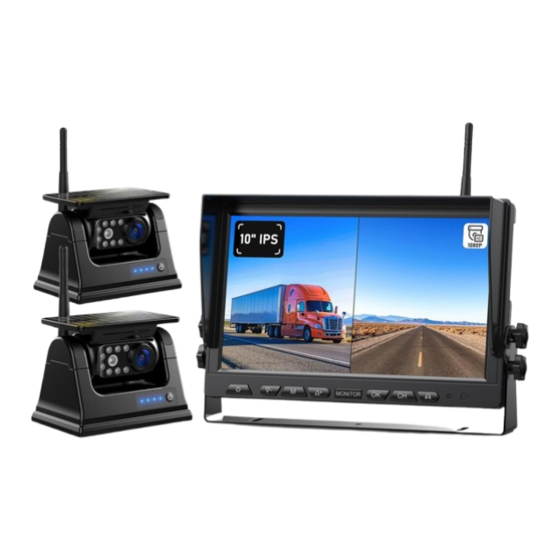
Summary of Contents for ZEROXCLUB BSC702
- Page 1 ZEROXCLUB Instructions Manual Solar Wireless Backup Camera System Model: BSC702 Any questions or suggestions please send an email to customer service via sales@uszeroxclub.com...
-
Page 2: Table Of Contents
ZEROXCLUB Instructions Manual TABLE OF CONTENTS WARRANTY ............................1 BEFORE USING ..........................1 CHARGE THE BATTERY ......................1 WAHT IS IN THE BOX ........................2 SPECIFICATIONS ........................... 2 ABOUT CAMERA ..........................3 INSTALLATION ..........................5 Installation of the Antenna ...................... 5 Installation of the Camera .......................5 Installation of the Monitor ......................6... -
Page 3: Warranty
ZEROXCLUB Instructions Manual WARRANTY ZEROXCLUB offers a full 18 months warranty and 3 months replacement policy. We also provide lifetime technical support to ensure that you enjoy your modern backup camera for many years to come. To obtain warranty support, or if you are not satisfied in... -
Page 4: Waht Is In The Box
ZEROXCLUB Instructions Manual NOTICE Turn off the camera while it's charging. otherwise the camera will consume power while charging. NOTICE The Type-C Charging port is not waterproof, please cover it back after charging. Otherwise the camera may not work if it gets water in it. -
Page 5: About Camera
ZEROXCLUB Instructions Manual Monitor Connector DC female connector Item Weight 0.19 pounds Power Supply DC 12V Monitor Dimensions 10(L) x 6.5(H) x 0.94(D) in Camera Image Sensor CMOS 1920 x 1080 Effective Pixels Waterproof Rating IP69K Charging Voltage DC 5V 2A View Angle 140°... - Page 6 ZEROXCLUB Instructions Manual 1. Two Charging Methods The camera supports USB-C charging (5V DC charging) and Solar charging. Due to the limitation of the solar panel area, solar charging is only an auxiliary means to extend the working time of the camera, and it is better to use Type-C charging as the main charging method.
-
Page 7: Installation
ZEROXCLUB Instructions Manual c. Many vehicles provide constant power to the 12V outlet. If your outlet provides constant power, please remember to unplug the monitor when not in use to avoid draining the vehicle battery. d. If the battery indicator bar shows that the battery is in a low state of charge, please charge the battery in time. -
Page 8: Installation Of The Monitor
ZEROXCLUB Instructions Manual The camera has a strong magnetic base that easily adheres to metal surfaces. You just attach it where you want and then adjust the camera angle as needed. NOTICE a. Aluminum and fiberglass magnets vehicle body is weakly attracted to a magnetic base. - Page 9 ZEROXCLUB Instructions Manual Suction Cup Bracket Installation 1. Clean and dry the mounting surface where the monitor can be easily seen inside the car, and does not obstruct your vision when driving. 2. Remove the plastic sheet of the suction cup, press it against the mounting surface and push the suction cup lock lever down to lock the suction cup.
-
Page 10: Operating Instruction
ZEROXCLUB Instructions Manual You can also use the red and black power cord to power your monitor. (1)Connect Red wire to ACC power(which is the gear switch before starting up the car's motor).Vehicle turns on, monitor turns on automatically,Vehicle turns off, monitor will turn off. -
Page 11: Main Screen Interface
ZEROXCLUB Instructions Manual Power button: Turn on / off the monitor and standby Decrease/Brightness Adjustment/Flip Image button: Select forward in menu operation. Press to reduce brightness. Press and hold for 5S to rotate. Menu/Return button: Press to access menu or return to the previous panel. -
Page 12: Settings Operation
ZEROXCLUB Instructions Manual Unpaired: If this sign is displayed in the upper left of the screen, this channel is not yet paired with the camera. Settings Operation Menu There are eight primary menu selections. Selected menu items are highlighted in yellow. -
Page 13: Pairing Steps
ZEROXCLUB Instructions Manual Special Notice a. The cameras have been paired in the factory for QC testing. If it does not, manually re-pair the camera. b. If you need to pair the camera to another channel, or if the monitor does not seem to have a signal, you can follow the pairing steps to re-pair. -
Page 14: Picture Operation
ZEROXCLUB Instructions Manual paired with channel 1, then please pair the second camera with channel 2. If you want to pair the second camera to channel 1, please refer to the "Detailed Pairing Method" to re-pair. Remember to only pair with one camera at a time. Other cameras should be disconnected to prevent signal interference. -
Page 15: Cam-Setup Operation
ZEROXCLUB Instructions Manual You can flip the image to front view, mirror view or inverted view according to your needs. There are four options to flip the image on the monitor. 1) Press button to enter menu interface. 2) Press to select MIR-FLIP. -
Page 16: System Operation
ZEROXCLUB Instructions Manual 1) Press button to enter menu interface. 2) Press to select CAM-SETUP. Press to confirm. △+ ▽- 3) Press to select CAM1 / CAM2 / CAM3 / CAM4 / △+ ▽- SCAN TIME / AUTO SCAN, press to confirm. -
Page 17: Play Operation
ZEROXCLUB Instructions Manual 1) Press button to enter menu interface. 2) Press to select SYSTEM. Press to confirm. △+ ▽- 3) Press to select TIME / LANGUAGE / AUTO-DIM / △+ ▽- DELAY TIME / P-LINE / DEFAULT, press to confirm. -
Page 18: Troubleshooting
ZEROXCLUB Instructions Manual 1) Press button to enter menu interface. to select PICTURE. Press 2) Press to confirm. △+ ▽- 3) Press to select BRIGHTNESS / CONTRAST / HUE / △+ ▽- ZOOM, press to confirm. Press to adjust △+ ▽-... - Page 19 ZEROXCLUB Instructions Manual 2) Check if the cable or charger is damaged. Use another cable or another 5V/2A charger to charge the camera and put it in the wall socket. Or you may use other devices to verify the charger and USB-C cable could work well.
-
Page 20: Fqas
ZEROXCLUB Instructions Manual 4) If the vehicle body is aluminum or fiberglass which is blocking the signal and we recommend that you raise the camera to get a direct line of sight signal. 5) Look at the camera/monitor to find if the antenna is off. Check if the antenna screw connector on the camera/monitor is loose. - Page 21 ZEROXCLUB Instructions Manual No, this is completely wireless and there are no wires which connect to the backup lights. If you have it always plugged-in to your car's Does it only comes on when I power outlet, it comes on when you fire up am in reverse? the car.
- Page 22 ZEROXCLUB Instructions Manual of the camera? environment. How to turn on/off the Parking 1. Press button. Guideline? MENU → SYSTEM→ P-LINE→ ON/OFF. It might be caused by the current, please make sure the current draw on the camera and monitor is 2A.
-
Page 23: Safety Information
4. You can also try to try extended antenna cable to boost the signal. SAFETY INFORMATION ● There are no user-serviceable parts inside the ZEROXCLUB camera system. Contact ZEROXCLUB customer service at sales@uszeroxclub.com if the part is ever compromised. - Page 24 ZEROXCLUB Instructions Manual ● Use this product within the voltage range specified. Failure to do so can cause electronic shock or product malfunction. ● Do not install the monitor where it may obstruct drivers view or obstruct an air bag device.
Need help?
Do you have a question about the BSC702 and is the answer not in the manual?
Questions and answers