
Related Manuals for Yolink YS7617-UC


Summary of Contents for Yolink YS7617-UC
- Page 1 YoLink Smart Lock (Door Lever) YS7617-UC Installation & User Guide Revision Jul. 17, 2024...
-
Page 2: Table Of Contents
. Before You Begin . In the Box . Get to Know Your YoLink Smart Lock . Install the App . Add Your YoLink Smart Lock to the App . Installation . Operations . App Functions: Device Screen . App Functions: Device Details Screen . -
Page 3: Welcome
Welcome Thank you for purchasing YoLink products! We appreciate you trusting YoLink for your smart home & automation needs. Your 100% satisfaction is our goal. If you experience any problems with your installation, with our products or if you have any questions that this manual does not answer, please contact us right away. -
Page 4: Before You Begin
Before You Begin Visit our YoLink Smart Lock (Door Lever) support page on our website, for the latest installation guides, additional resources, information and videos by visiting: https://www.yosmart.com/support/YS7617-UC Or by scanning the QR code: Download the most current version of the user... - Page 5 Yolink App. Add the smart lock to the Yolink App, you can lock or unlock the door and check the historical unlocked record (including member, method, date and time) through the App.
-
Page 6: In The Box
In the Box Front Panel Back Panel Hole Drawing Paper Back Inner Plate key (2) IC Card (2) Strike Plate & Buckle Box Quick Start Guide... - Page 7 In the Box, Continued AA Battery (4, Non-rechargeable) Lock Body Mounting Screws (5) Mounting Studs Type (3) Panel Mounting Screws Type (6) Square Spindle Sprung Lock Body...
-
Page 8: Get To Know Your Yolink Smart Lock
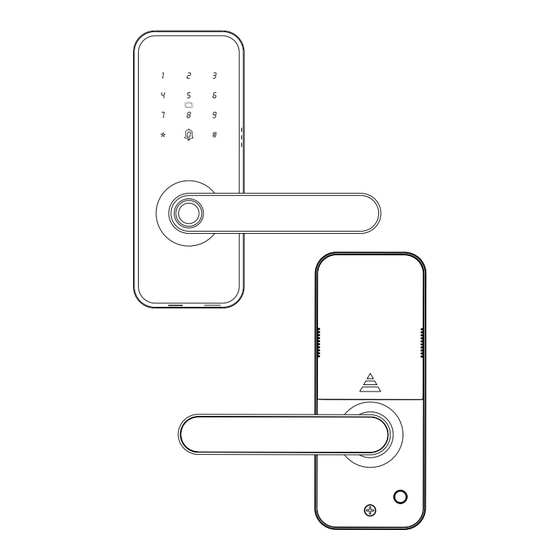
Get to Know Your YoLink Smart Lock (Door Lever) Front Panel: Keyboard IC Card Scanner Doorbell Front Handle Fingerprint Scanner The bottom of front panel: Type-C port Key Hole... - Page 9 Get to Know Your YoLink Smart Lock (Door Lever), Continued Back Panel: Battery Cover Battery set SET Button Back Handle Lock Button Assemble Screw...
- Page 10 Get to Know Your YoLink Smart Lock (Door Lever), Continued 1) Battery Cover 10) Lock Body 2) Back Plate 11) Lock Body Screw 3) Back Panel 12) Spindle 4) Panel Screw 1 13) Assomble Screw Blot 1 5) Back Handle...
-
Page 11: Install The App
Install the App If you are new to YoLink, please install the app on your phone or tablet, if you have not already. Otherwise, please proceed to the next section. Scan the appropriate QR code below or find the “YoLink app” on the appropriate app store. -
Page 12: Add Your Yolink Smart Lock To The App
Add Your YoLink Smart Lock (Door Lever) to the App 1. Tap Add Device (if shown) or tap the scanner icon: Scanner icon 2. Approve access to your phone’s camera, if requested. A viewfinder will be shown on the app. - Page 13 Add Your YoLink Smart Lock (Door Lever) to the App, Cont. 4. You can change the device name and assign it to a room later. Tap Bind device. 5. If successful, the screen will appear as shown. Tap Done.
-
Page 14: Installation
Installation Confirm your door is inside opening or outside opening The orientation of the lock cylinder determines whether the door is an inside opening door or an outside opening door. Lock Cam Curved surface towardsclosing door direction a. Close the door direction b. - Page 15 Installation, Continued Installation diagram Place the hole drawing papare on the door Open the hole for lockset...
- Page 16 Installation, Continued 1. Prepare the door and check dimensions a. Measure to confrm that the hole in the door 2.17" (55mm) b. Measure to confrm that the backset is either 2.3" or 2.76" (60mm or 70mm) c. Measure to confirm that the hole in the door is 0.98"...
- Page 17 Installation, Continued 2. Open the strike hole, deep 12 mm, and install it with screw 12mm 3. Install the Lock Body a. The lock body can adjust to lengths of 60 and 70mm. Please choose according to the length of the door panel opening 60/70mm 70mm 60mm...
- Page 18 Installation, Continued c. Install the lock body into the door panel. Use Lock Body Mounting Screws*2 4. Adjust the lock body Left-outside-opening Right-outside-opening door door Left-inside-opening Right-inside-opening door door...
- Page 19 Installation, Continued 5. Install the square spindle The dot short side stands the outside of the door, and insert the square spindle into the square hole of the lock body 6. Adjust the front handle. The Dot direction must be same as the handle - If the lock has the correct door handle, you can just go to step 6-2.
- Page 20 Installation, Continued Mounting Studs Type After door handle reversal is complete, put mounting studs onto the front panel. 7. Adjust the back handle Unscrew the reversing screw, adjust the direction of handle by rotating it as needed, tighten the reversing screw after adjusting. Press the handle times to ensure it is smooth.
- Page 21 Installation, Continued 8. Install Front panel a. Insert the square spindle from the outside of the door into the square hole of the lock body (as picture shows to install). b. The dot side faces the outside of the door. c.
- Page 22 Installation, Continued 9. Install mounting plate a. Fix the mounting plate onto the inside doorsurface by using 3pcs mounting screws. b. Adjust the front panel and assemble screw bolt to make the panel vertical. c. Then tighten mounting plate with screws. Panel Mounting Screws A1 10.
- Page 23 Installation, Continued 11. Install the main cable Plug the main cable into the back panel main cable interface. Main Cable Main Cable Interface 12. Install the back panel a. Insert the square spindle into that square hole of the back panel. b.
- Page 24 Installation, Continued 13. Install the battery and battery cover a. Install 4 batteries in the battery compartment. b. Press the SET button. c. Install the battery cover.
-
Page 25: Operations
Operations 1. Set the Local Password Each YoLink Smart Lock (Door Lever) support only one local password. You will need to set the local password physically. - Steps: After waking up the keypad, press *#*#, then enter a 4-8 digits password, and finally press # to confirm. - Page 26 Operations, Continued 2. Unlock the Door a) Place your finger on the fingerprint scanner. Once the lock successfully recognizes the fingerprint, the door will unlock. b) Enter a password on the front module followed by the # button. When the password is correct and valid, the door will unlock.
- Page 27 The Lock will be automatically locked for 90 seconds after the wrong password is entered for 5 times in 5 minutes, you can’t deal with any operations with the lock. You can unlock the door using a mechanical key or through YoLink app.
- Page 28 Operations, Continued 3. Lock the Door Method A: Press the “*" button after unlock the door Method B: Use a mechanical key Method C: Auto-lock Settings in the app, default is 3 seconds. Make sure you have at least one method to unlock the door before you lock it.
- Page 29 Lock Button 5. Doorbell There will be an alert notification sent to your YoLink account to notice you someone is pressing down the doorbell button. Repeatedly pressing the doorbell within 10 seconds will not trigger another notification.
-
Page 30: App Functions: Device Screen
App Functions: Device Screen In the app, tap on your YoLink Smart Lock (Door Lever) icon. Your YoLink Smart Lock (Door Lever) main screen should be similar to the one shown below. Tap to Exit This Screen Device Name Tap for Contact & Support... -
Page 31: App Functions: Device Details Screen
App Functions: Device Details Screen Tap the three dots (in the upper right corner) to open the YoLink Smart Lock (Door Lever) Details screen. Your Smart Lock‘s screen should be similar to the one shown below. Device Type Device Name... - Page 32 App Functions: Device Details Screen, Continued Model Number Device EUI Unique Identifier Number Device Serial Number Signal Intensity (From YoLink Hub) Battery Firmware Revision (Refer to page 41) Remove Device from Current Account Tap to delete the device from your YoLink account...
-
Page 33: App Functions: Temporary Code Manage
App Functions: Temporary Code Management Screen Temporary Code includes One-Time Code, Time-limited Code and Custom Code. Each type of temporary code can be added up to four. One-Time Code is a four-digit number randomly generated by the system and is valid for 24 hours and can only be used once before it expires. -
Page 34: App Functions: Member Manage
App Functions: Member Management Screen By default, there is one administrator who cannot be deleted; up to 11 additional members can be added. Clicking on a member's avatar allows you to delete the member. Each member supports four unlocking methods: fingerprint, code, card, and fob. -
Page 35: App Functions: Alarm Strategy Screen
App Functions: Alarm Strategy Screen You can set up notifications in Alarm Strategy settings, make sure you have enabled App, Email, SMS notification from the app->Menu-> Settings->Account Settings->Advanced Settings, and verified your email address and added your phone number in the app. Strategy Name Tap to edit the name Related Devices... - Page 36 Send SMS Tap to select Admin to enable limited text messages, select All (subscribe required-starter or standard plan), if desired to send to all members Trigger Action Tap to choose trigger actions (YoLink sirens, YoLink SpeakerHubs, scene)
-
Page 37: App Functions: Smart - Scene
App Functions: Smart - Scene Go to App Menu->Settings->Account-> Advanced Settings->Enable the control of security devices, then you can set up scene for your YoLink Smart Lock (Door Lever). Tap to view the scene history Tap to save the settings... -
Page 38: App Functions: Smart - Automation
App Functions: Smart - Automation The YoLink Smart Lock can be set up as condition or action in automation. To set up as an action, firstly go to App Menu->Settings-> Account->Advanced Settings->Enable the control of security devices. Tap to save the settings... -
Page 39: Control D2D
Control-D2D, YoLink devices can be controlled without the Hub or an internet connection. (Use of YoLink Control-D2D is optional; you can use the Automation feature in the app OR use YoLink Control, but YoLink Control-D2D offers the benefit of operation without the Hub or internet connection.) One device controls another directly. - Page 40 Control D2D, Continued 1. To configure your Smart Lock as a controller, press and hold the SET button for 5-10 seconds until you hear “Device to Device Pairing Mode,” then release the button. SET Button 5-10 seconds 2. To configure a Siren as the responder, press and hold the SET button for 5-10 seconds until the LED quickly blinks green, then release the button.
-
Page 41: App & 3Rd-Party Services
10 to 15 seconds until the LED quickly blinks red, then release the button. App & 3rd-Party Services The YoLink Smart Lock (Door Lever) works with several voice assistants, including Alexa and Google, and it works with other automation platforms such as IFTTT and Home Assistant. -
Page 42: Battery Replacement
Battery Replacement Push upwards to open the battery cover Install 4 batteries in the battery compartment... - Page 43 Battery Replacement, Continued Install the battery cover...
-
Page 44: Factory Reset
Factory Reset Factory reset will erase device settings and restore it to factory default settings. Doing a factory reset will not remove the device from your account and it will not harm the device, or lose any data or require you to redo your automations, etc. -
Page 45: Firmware Update
Firmware Update Your YoLink products are constantly being improved, with new features added. It is periodically necessary to make changes to your device's firmware. For optimal performance of your system, and to give you access to all available features for your devices, these firmware updates should be installed when they become available. -
Page 46: Specifications
Specifications Working Voltage: 4 AA Alkaline Batteries Low Voltage Alarm: 4.8 ± 0.2V Working Temperature: -13°F ~ 158°F (-25°C ~ 70°C) Working Humidity: 25-95% Non-Condensing Backup Power Supply: USB 5V/1A (Type C Port) - Page 47 Specifications, Continued 6.41” (163.0mm) 2.87” (73.0mm) 3.34” (85.0mm) FRONT SIDE 6.41” (163.0mm) 3.26” (83.0mm) 2.87” (73.0mm) FRONT SIDE...
-
Page 48: Warnings
Environmental section in Specifications, on page 42 If your YoLink Smart Lock (Door Lever) gets dirty, please clean it by wiping it down with a clean, dry cloth. Do not use strong chemicals... - Page 49 Warnings, Continued Do not install or use this device where it will be subjected to high temperatures and/or open fame Do not install or use this device where it will be subjected to physical impacts and/or strong vibration. Physical damage is not covered by the warranty To avoid damaging the device, if storing the device for an extended period, remove the...
-
Page 50: Warranty
Warranty 1 Year Limited Electrical Warranty YoSmart Inc. warrants to the original user (“customer”) of this product that it will be free from defects in materials and workmanship, under normal use, for 1 years from the date of purchase. This warranty does not apply to devices that have been improperly installed, modified, put to a use other than designed, or subjected to acts of God (such as floods,... -
Page 51: Fcc Statement
FCC Statement This device complies with part 15 of the FCC Rules. Operation is subject to the following two conditions: (1) This device may not cause harmful interference, and (2) this device must accept any interference received, including interference that may cause undesired operation. Any Changes or modifications not expressly approved by the party responsible for compliance could void the user's authority to operate the... - Page 52 The device has been evaluated to meet general RF exposure requirement. The device can be used in portable exposure condition without restriction. PRODUCT NAME: YOLINK SMART LOCK (DOOR LEVER) PARTY: YOSMART, INC. TELEPHONE: 831-292-4831 MODEL NUMBER:...
-
Page 53: Contact Us
Contact Us We are here for you, if you ever need any assistance installing, setting up or using a YoLink app or product! Need help? For fastest service, please email us 24/7 at service@yosmart.com Or call us at 831-292-4831 (US phone support...
Need help?
Do you have a question about the YS7617-UC and is the answer not in the manual?
Questions and answers