Table of Contents
Advertisement
Quick Links
Advertisement
Table of Contents

Subscribe to Our Youtube Channel
Related Manuals for Yolink Smart Lock M1


Summary of Contents for Yolink Smart Lock M1
- Page 1 User Guide YS7606-UC YoLink Smart Lock M1 Deadbolt...
- Page 2 US Live Tech Support: 1-800-355-0157 Monday-Friday, 9:00am - 5:00pm PST Fullerton, CA 92831...
-
Page 3: Table Of Contents
Smart Home Setup ......14 YoLink App Guide ......16 Details . -
Page 4: Introduction
INTRODUCTION The YoLink Smart Lock M1, is a stand-alone electronic keypad deadbolt replace- ment with smart phone remote features when paired with a YoLink Smart HUB (sold separately) using the YoLink smart phone app. YoLink uses the newest in communication network technology, connecting YoLink compatible smart... -
Page 5: Disclaimer & Warning
DISCLAIMER & WARNING DISCLAIMER: • Carefully read instructions in their entirety before installing. • Always use proper safety measures during the install of this product. • Always have traditional keys on hand in case of electronic failure. • Back Module (B) needs to be protected from weather. WARNING •... -
Page 6: Getting Started
GETTING STARTED REQUIRED TOOLS FOR INSTALL • Phillips screwdriver • x4 AA Batteries (Please read Warnings pg.2) PARTS LIST A. Front Module B. Back Module C. Strike Plate D. Mounting Plate E. Extendable Latch F. Screws G. Keys... -
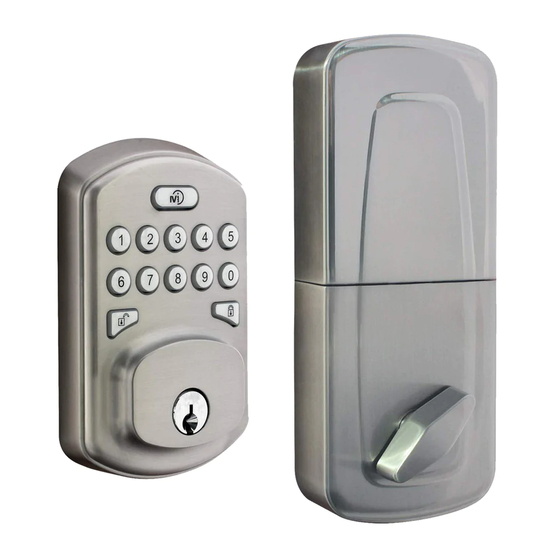
Page 7: Hardware Functions
HARDWARE FUNCTIONS Hardware Interface 1. Doorbell: Sends notification to YoLink App. 2. 0~9 Keypad: Enter passcode. 3. Unlock Button: Press after entring passcode. 4. Lock Button: Locks door. 5. 1~2 Switch: Set for left/right handed installation. 6. Set Button: Use to set local passcode. - Page 8 LED Status Indicators The LED backlighting on your lock can indicate basic information regarding lock status. Refer to diagram below: Keypad Blue Backlight Low light visibility. Lock Button Red- Single Blink Door Locked. Red- Multi Blink Factory Reset. Unlock Button Green- Single Blink Door Unlocked.
- Page 9 3 Unlocking/Locking Methods: • Traditional Key (2 Included). • Using Keypad to enter local, managed and visitor passcodes. • Remotely using YoLink App (YoLink HUB needed, sold separately). Scramble PIN code: Enter random digits BEFORE, AFTER, or IN THE MIDDLE of correct PIN code.
-
Page 10: Installation
INSTALLATION Step 1: Adjust Latch Backset 60mm(23/8′′) 70mm(23/4′′) Latch adjustable depending on door backset. • Twist buckle, extend/retract, twist back. - Page 11 Step 2: Install Latch & Strike Plate...
- Page 12 Step 3: Mount Front Module...
- Page 13 Step 4: Fasten Back Mounting Plate ** Do not use power screwdriver **...
- Page 14 Step 5: Mount Back Module ** Do not use power screwdriver ** LEFT HANDED RIGHT HANDED Be sure thumbturn oriented as shown when installing...
- Page 15 Step 6: Set for Left/Right Handed Door, Install Battery Cover Before installing battery cover, Set your lock to Left or Right handed: • Locate 1 | 2 switch on the back module just below the battery tray. • Set to 1 if hinges are on the LEFT of the door when ENTERING through the front.
-
Page 16: Local Passcode
LOCAL PASSCODE Default: • Lock is set with a preprogrammed default local passcode. Strongly suggested to change default password to a unique owner passcode. • Default Passcode: 12345678 S Button Changing Local Passcode • Remove battery cover from back module. •... -
Page 17: Smart Home Setup
SMART HOME SETUP YoLink Smart HUB A YoLink Smart HUB is REQUIRED in order to remotely access your YoLink M1 door knob with your Smart Phone. Other YoLink Devices (Available on Amazon) Door sensors, water leak sensor, motion detector, Wall plugs, wall switch, temp and humidity sensor, garage door opener and more in development. - Page 18 Longer Distance, Lower Battery Consumption YoLink offers its own Smart Home ecosystem that uses LoRa, a communication technology that’s better than the rest. The YoLink Smart HUB can connect with YoLink compatible smart devices up to a quarter mile away and its lower bandwidth use extends battery life of YoLink devices.
-
Page 19: Yolink App Guide
YOLINK APP GUIDE YoLink Smart Phone App The YoLink app can be found for both iOS or Android through the Apple App Store or the Google play Store. • iOS 9 or higher is required for Apple iPhones or tablets. - Page 20 Log in or Create a YoLink Account After downloading the YoLink app onto your smart phone, open the app and log in. If you don’t have a YoLink account, tap Sign up for an account and follow the steps.
- Page 21 Pairing YoLink Door Knob M1 to YoLink App • Tap the Scan Icon “ ” at the top right and scan QR code found on the inside of the battery cover. • Customize Name, Room, and decide to add to Favorites by clicking the “...
-
Page 22: Details
• b. Room: Specify a unique location for your lock. • c. Favorites: Add to your favorite list of YoLink devices for easier access. • d. History: A log of when your lock has been locked/unlocked. • e. Delete Device: Unpair and delete lock from your device list. -
Page 23: Manage User Or Visitor Passcode
MANAGE USER OR VISITOR PASSCODE Set and Manage User Passcode (Account Admin Only) • Open YoLink App. • Tap on Lock in Device List. • Tap User Manage ” “ and then tap the “ ” icon. • Fill in user details including: Password: Entering a 4-8 digit unique user code. -
Page 24: Automation
AUTOMATION Automation allows you to set up IFTTT style rules and triggers allowing YoLink connected devices to work together. YoLink M1 Door lock can only be set as a trigger. • Open YoLink App • Tap on Smart icon “... -
Page 25: Basic Lock Functions
BASIC LOCK FUNCTIONS - UNLOCK Traditional Key: • Use 1 of the 2 included keys to unlock your YoLink Smart Lock M1. Keypad: • Enter Local, User, or 1-Time Visitor passcode followed by the unlock button. 12 345 678 •... - Page 26 BASIC LOCK FUNCTIONS - LOCK Traditional Key: • Use 1 of the 2 included keys to lock your YoLink Smart Lock M1. Keypad: • Press the Lock button. YoLink App • Open YoLink App on your Smart Phone. • Tap on your paired YoLink Smart Lock M1.
-
Page 27: Maintenance
To ensure our customer have the best user experience, we highly recommend you could update our newest version firmware. • Tap the “YoLink Smart Lock M1” in App to go to its controls. • Tap the “ ” icon at the top-right corner to go to details. -
Page 28: Factory Reset
FACTORY RESET Factory reset: Hold the “S” or “C” button for 20-25 seconds until there is 2 beeps, then release. Factory reset complete when keypad no longer blinks. • Deletes all password. • Removes access network information. • Local password resets to 12345678. C &... -
Page 29: Specification
SPECIFICATION Password: 30 user passwords, 1 local password, 1 one-time visitor password Voltage: 6V DC (4 AA Battery) Alert Voltage: 5.42V DC Working Power Consumption: <1.4A Standby Power Consumption: <80uA Environment: working Temperature: 0º~40ºC (32º~104ºF) working Humidity: 10%~90% (non-condensing) -
Page 30: In-App Alexa/Google Assist Guide
IN-APP ALEXA/GOOGLE ASSIST GUIDE Alexa/Google Assist Guide: Use Alexa or Google Assistant to control your YoLink devices. • Open YoLink App on your smart phone. • Log in if not already. • Tap the Main Menu “ ” icon at the top left. -
Page 31: Troubleshooting
TROUBLESHOOTING Batteries: Over 60% of issues are discovered to be battery related. • Be sure batteries are brand new popular name brand “AA” alkaline batteries. • Refer back to “Warnings” Section on page 2. Door Jamb Alignment: • Make sure strike plate portion on the door frame are aligned so there is minimal resistance on the door knob as it extends into the door. - Page 32 - If the lock beeps 2 times and locks successfully, it has at least 1 password stored in its memory and is operating correctly. 3: It shows the lock is offline on YoLink App: - If hub is offline. Reconnect your hub to the Internet and press the “S” button of smart lock once.
-
Page 33: Technical Support & Warranty
TECHNICAL SUPPORT & WARRANTY WARRANTY provided by Milocks MiProducts Corp. Fullerton, CA 92831 Made in Taiwan Lifetime Warranty on Exterior Finish - 25 Years Mechanical Warranty - 1 Year Limited Electrical Warranty MiLocks warrants to the original residential user of this product that it will be free from defects in materials and workmanship, under normal use, for 1 year from the date of purchase. -
Page 34: Fcc Statement
FCC STATEMENT This equipment has been tested and found to comply with the limits for a Class B digital device, pursuant to part 15 of the FCC Rules. These limits are designed to provide reasonable protection against harmful interference in a residential installation. This equipment generates, uses and can radiate radio frequency energy and, if not installed and used in accordance with the instructions, may cause harmful interference to radio communications. - Page 35 FCC RF Radiation Exposure Statement This equipment complies with FCC RF radiation exposure limits set forth for an uncontrolled environment. This device and its antenna must not be co-located or operating in conjunction with any other antenna or transmitter. “To comply with FCC RF exposure compliance requirements, this grant is applicable to only Mobile Configurations.
Need help?
Do you have a question about the Smart Lock M1 and is the answer not in the manual?
Questions and answers