Advertisement
Available languages
Available languages
Quick Links
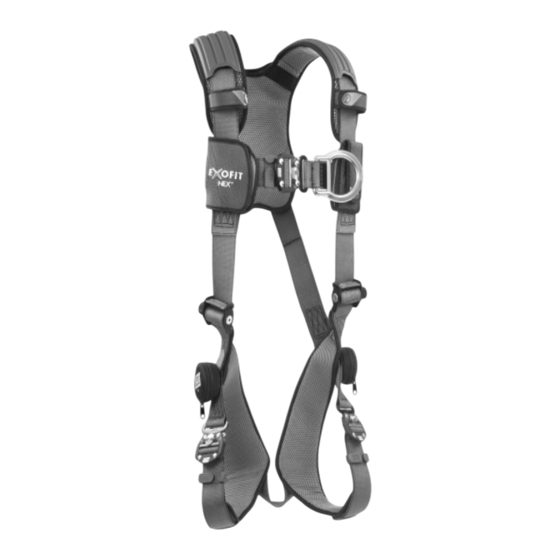
The Ultimate in Fall Protection
Component:
A
Repel Technology
Webbing
B
Hybrid Comfort
Padding
C
Tech-Lite™
D-Rings
D Duo-Lok™ Quick
Connect Buckles
E
Revolver™ Vertical
Torso Adjusters
F
Suspension
Trauma Straps
G Hybrid Comfort
Padding
® NanoSphere
is a registered trademark of Schoeller Technologies AG, Switzerland
®
(patent protected technology). Dri-Lex
Evazote® is a registered trademark of Zotefoams PLC.
FORM NO: 5903028
REV: H
SPECIFIC INSTRUCTIONS
48
Material:
62
NanoSphere
treated
®
2
Polyester
Nylon,
3
Dri-Lex
Aerospacer Mesh,
®
Polyester & Nylon Mesh,
Non-Slip Rubber
Aluminum
4
Zinc Plated Steel,
5
Aluminum Alloy,
Alloy Steel
Zinc Plated Steel,
6
Stainless Steel,
Aluminum,
Nylon
Nylon,
7
Zinc Plated Steel
Nylon,
3
Dri-Lex
Aerospacer Mesh,
®
Evazote
VA 35 or PCF
®
Crosslinked Polyurethane
Foam
is a registered trademark of Faytex Corp.
®
1
78
1113174
1113175
1113176
1113177
1113178
1113179
1113210
1113211
1113212
1113213
1113214
CE TYPE TEST
USA CE PRODUCTION
QUALITY CONTROL
SLOVAKIA CE PRODUCTION
QUALITY CONTROL
EN361:2002
18
C
20
D
51
8
9
A
10
28
EN358:2000
27
C
28
52
27
26
D
28
51
D
51
27
51
A
8
11
D
EXOFIT NEX™
Full Body Harness
Model Numbers:
1113215
1113454
1113906
1113216
1113455
1113907
1113217
1113456
1113908
1113218
1113457
1113909
1113219
1113458
1113910
1113264
1113900
1113911
1113449
1113901
1113912
1113450
1113902
1113913
1113451
1113903
1113914
1113452
1113904
1113919
1113453
1113905
1113950H
EN361:2002
3
EN358:2000
3
Satra Technology Centre
8
Wyndham Way
Telford Way
Kettering, Northants
NN16 8SD, UK
BSI Product Services
9
Kitemark Court
Davy Avenue
Knowlhill, Milton Keynes
MK5 8PP, UK
VVUU, a.s.
9
Pikartska 1337/7
Ostrava-Radvanice
Czech Republic
=
#
49
=
48
#
EN361:2002
C
B
B
E
E
F
G
G
D
© Copyright 2014, Capital Safety
1113951H
1113952H
1113953H
1113992
1113993
1113994
1113995
No. 0321
No. 0086
No. 1019
716 07
5902392
D
A
EN358:2000
C
D
D
A
Advertisement

Related Manuals for DBI SALA EXOFIT NEX 1113174


Summary of Contents for DBI SALA EXOFIT NEX 1113174
- Page 1 EXOFIT NEX™ SPECIFIC INSTRUCTIONS Full Body Harness Model Numbers: 1113174 1113215 1113454 1113906 1113951H 1113175 1113216 1113455 1113907 1113952H 1113176 1113217 1113456 1113908 1113953H 1113177 1113218 1113457 1113909 1113992 The Ultimate in Fall Protection 1113178 1113219 1113458 1113910 1113993 1113179 1113264 1113900 1113911...
- Page 2 1.0 FOREWORD This instruction describes donning and use of the ExoFit NEX™ Full Body Harness. It should be used as part of an ® employee training program as required by CE. IMPORTANT: Before using this equipment, record the product identifi cation information from the Installation and Service Label on the Equipment Identifi...
- Page 3 Figure 1 - Vest Style Harness Figure 2 - Cross-Over Style Harness A. Belt Loops A. Belt Loops Step 1. Locate back D-ring held in position by the D-ring pad; lift up harness and hold by this D-ring. Ensure the straps are not twisted. Step 2.
- Page 4 Figure 3 - Donning the ExoFit NEX™ Vest Style Full Body Harness Step 1 Step 2 Step 3 Duo-Lok™ Quick Connect Buckles Connection: Connect buckle ends by inserting the tab into the receptor until a click is heard. Strap Adjustment: Rotate Webbing Lock to unlocked position .
- Page 5 B. EXOFIT NEX™ CROSS-OVER STYLE FULL BODY HARNESS: The ExoFit NEX™ Cross-Over Style Harness incorporates loops for a removable waist belt. The belt can be installed through the two loops in the harness located in the lower back shoulder straps (see Figure 2). The belt will pass through the harness just below the padded area.
- Page 6 Figure 3 - Donning the ExoFit NEX™ Cross-Over Style Full Body Harness Step 1 Step 2 Step 3 Duo-Lok™ Quick Connect Buckles Connection: Connect buckle ends by inserting the tab into the receptor until a click is heard. Strap Adjustment: Rotate Webbing Lock to unlocked position .
- Page 7 SUSPENSION TRAUMA STRAP: Some models Figure 5 - Suspension Trauma Straps of the ExoFit NEX™ Full Body Harness are equipped with a Suspension Trauma Strap (Figure 5) to help prolong allowable suspension time in the event of a fall from height. It should only be used in situations where a fall has occurred or for training.
- Page 8 4.0 TRAINING It is the responsibility of the purchaser and the user of this equipment to assure that they understand these instructions and are trained in the correct care and use of this equipment. They must also be aware of the operating characteristics, application limits, and the consequences of improper use of this equipment.
-
Page 9: Maintenance, Servicing, And Storage
Figure 7 - i-Safe™ RFID Tag Figure 8 - Stitched Impact Indicator Wrap-Around Cover i-Safe™ RFID Tag Product Labels A Stitched Impact Indicator 6.0 MAINTENANCE, SERVICING, AND STORAGE NOTE: Only Capital Safety or parties authorized in writing may make repairs to this equipment. WASHING INSTRUCTIONS: Washing procedures for the ExoFit NEX™... - Page 10 1.0 INTRODUCCIÓN Estas instrucciones describen la colocación y uso del arnés de cuerpo entero ExoFit NEX™ . Se debe usar como parte de ® un programa de formación para empleados, según lo exige la CE. IMPORTANTE: antes de usar este equipo, anote la información de identifi cación del producto que se encuentra en la etiqueta de instalación y reparaciones de la hoja de identifi...
- Page 11 Figura 1 - Arnés de tipo chaleco Figura 2 - Arnés de tipo cruzado A. Bucles del cinturón A. Bucles del cinturón Paso 1. Ubique la anilla en D posterior en posición con la almohadilla de la anilla en D, levante el arnés y sostenga de esta anilla en D.
- Page 12 Figura 3 - Colocación del arnés de cuerpo entero de tipo chaleco ExoFit NEX™ Paso 1 Paso 2 Paso 3 Hebillas de conexión rápida Duo-Lok™ Conexiones: conecte los extremos de la hebilla insertando la lengüeta en el receptor hasta que se escuche un clic.
- Page 13 ARNÉS DE CUERPO ENTERO DE TIPO CRUZADO EXOFIT NEX™: el arnés de tipo cruzado ExoFit NEX™ incorpora bucles para un cinturón desmontable. El cinturón se puede instalar a través de los dos bucles del arnés ubicados en la parte inferior de las correas de hombros traseras (ver Figura 2). El cinturón pasa por el arnés justo debajo del área almohadillada.
- Page 14 Figura 4 - Colocación del arnés de cuerpo entero de tipo cruzado ExoFit NEX™ Paso 1 Paso 2 Paso 3 Hebillas de conexión rápida Duo-Lok™ Conexiones: conecte los extremos de la hebilla insertando la lengüeta en el receptor hasta que se escuche un clic. Ajuste de la correa: gire el pasador de cincha hasta la posición de desbloqueo .
- Page 15 CORREA PARA TRAUMATISMO POR Figura 5 - Correas para traumatismo por suspensión SUSPENSIÓN: algunos modelos del arnés de cuerpo entero ExoFit NEX™ están equipados con una correa para traumatismo por suspensión (Figura 5) para permitir la prolongación del tiempo de suspensión permitido ante la eventualidad de una caída desde altura.
- Page 16 4.0 FORMACIÓN Es responsabilidad del comprador y del usuario garantizar que está familiarizado con estas instrucciones, y que cuenta con formación en el cuidado y uso correctos de este equipo. También deben tener conocimiento de las características de funcionamiento, los límites de aplicación y las consecuencias del uso incorrecto de este equipo. IMPORTANTE: la formación se debe llevar a cabo sin exponer al usuario a un riesgo de caída.
-
Page 17: Mantenimiento, Reparación Y Almacenamiento
Figura 7 - Etiqueta RFID i-Safe™ Figura 8 - Indicador de impacto cosido Envoltorio Etiqueta RFID i-Safe™ Etiquetas de producto A Indicador de impacto cosido 6.0 MANTENIMIENTO, REPARACIÓN Y ALMACENAMIENTO NOTA: solo Capital Safety o partes autorizadas por escrito pueden reparar este equipo. INSTRUCCIONES DE LAVADO: los procedimientos de lavado para el arnés de cuerpo entero ExoFit NEX™... - Page 18 SERIAL NUMBER i-Safe™ INTELLIGENT SAFETY SYSTEM NUMÉRO DE SÉRIE ÉQUIPÉ D’UN SYSTÈME INTELLIGENT DE SÉCURITÉ i-SAFE™ NUMERO DI SERIE SISTEMA DI SICUREZZA INTELLIGENTE i-Safe™ SERIENNUMMER INTELLIGENTES SICHERHEITSSYSTEM i-Safe™ NÚMERO DE SERIE SISTEMA DE SEGURIDAD INTELIGENTE i-Safe™ NÚMERO DE SÉRIE SISTEMA DE SEGURANÇA INTELIGENTE i-SAFE™ SERIENUMMER i-Safes™...
- Page 19 ANNEAU EN D AVANT (S’IL EST PRÉSENT). CE - POUR L’ARRÊT DE CHUTE. ANSI/OSHA - POUR LE MAINTIEN EN POSITION, L’ASCENSION D’UNE ÉCHELLE OU L’ARRÊT APRÈS UNE CHUTE LIBRE DE 2 PIEDS MAXIMUM. C LES ANNEAUX EN D LATÉRAUX (S’ILS SONT PRÉSENTS) SONT DESTINÉS AU MAINTIEN EN POSITION D LES ANNEAUX EN D D’ÉPAULE (S’ILS SONT PRÉSENTS) SONT DESTINÉS AU SAUVETAGE UNIQUEMENT NE PAS LES UTILISER POUR D’AUTRES APPLICATIONS.
- Page 20 FORREST D-RING (HVIS DEN ER TIL STEDE). CE - TIL STANDSNING AF FALD. ANSI/OSHA - TIL PLACERING, FÆRDEN PÅ STIGER, ELLER STANDSNING AF FALD MED MAKSIMALT 2 FODS FRIT FALD. C SIDE-D-RINGE (HVIS DE ER TIL STEDE) ER TIL PLACERING D SKULDER-D-RINGE (HVIS DE ER TIL STEDE) ER KUN TIL REDNING.
- Page 21 VOIR LES INSTRUCTIONS. AVERTISSEMENT : LES INSTRUCTIONS DU FABRICANT DOIVENT AVOIR ÉTÉ LUES ET COMPRISES AVANT TOUTE UTILISATION DU DISPOSITIF. LES INSTRUCTIONS FOURNIES AVEC CE PRODUIT AU MOMENT DE L’EXPÉDITION DOIVENT ÊTRE RESPECTÉES. LE NON-RESPECT DE CES INSTRUCTIONS PEUT CAUSER DES BLESSURES GRAVES OU LA MORT. PRENDRE CONTACT AVEC DBI-SALA SI UNE FEUILLE D’INSTRUCTION EST REQUISE.
- Page 22 ARNÊS DE CORPO. CINTA EM POLIÉSTER CAPACIDADE: UMA PESSOA, 140 kg MÁX. C ADVERTÊNCIA: NÃO EXCEDA A CAPACIDADE DESTE OU DE OUTROS COMPONENTES DO SISTEMA. A CAPACIDADE É O PESO COMBINADO PARA O QUAL O COMPONENTE FOI CONCEBIDO PARA SER UTILIZADO. O PESO COMBINADO INCLUI O PESO CORPORAL DO UTILIZADOR, O VESTUÁRIO, AS FERRAMENTAS E QUAISQUER OUTROS OBJECTOS TRANSPORTADOS.
- Page 23 ADVARSEL: PRODUSENTENS INSTRUKSJONER MÅ LESES OG FORSTÅS FØR BRUK. INSTRUKSJONENE SOM MEDFØLGER DETTE PRODUKTET PÅ FORSENDELSESTIDSPUNKTET, MÅ FØLGES. DERSOM DE IKKE FØLGES, KAN DET FØRE TIL ALVORLIG PERSONSKADE ELLER DØDSFALL. KONTAKT DBI-SALA HVIS DERE TRENGER INSTRUKSJONSARKET. INSPISERES FØR HVER GANGS BRUK.
- Page 24 СМ. ИНСТРУКЦИЮ. ПРЕДУПРЕЖДЕНИЕ. ПЕРЕД ИСПОЛЬЗОВАНИЕМ ДАННОГО СНАРЯЖЕНИЯ НЕОБХОДИМО ОЗНАКОМИТЬСЯ С ИНСТРУКЦИЕЙ ПРОИЗВОДИТЕЛЯ. НЕОБХОДИМО СЛЕДОВАТЬ ИНСТРУКЦИИ, ПРИЛАГАЮЩЕЙСЯ К ИЗДЕЛИЮ НА МОМЕНТ ПОСТАВКИ. НЕСОБЛЮДЕНИЕ ПРАВИЛ, УКАЗАННЫХ В ИНСТРУКЦИИ, МОЖЕТ ПРИВЕСТИ К СЕРЬЕЗНЫМ ТРАВМАМ ИЛИ СМЕРТИ. В СЛУЧАЕ ПОТРЕБНОСТИ В ЛИСТКЕ-ИНСТРУКЦИИ ОБРАТИТЕСЬ В КОМПАНИЮ DBI-SALA. ПЕРЕД КАЖДЫМ ИСПОЛЬЗОВАНИЕМ ПРОВОДИТЕ...
- Page 25 SECCIÓN DE NORMAS A CONTINUACIÓN C FECHA DE FABRICACIÓN (AÑO/MES) LOTE: NÚMERO DE MODELO: NORMAS: D REGISTRO DE INSPECCIÓN INICIALES FECHA G CONSULTE LA ETIQUETA RFID EN EL BOLSILLO CLARO. H NO RETIRE ESTA ETIQUETA CONFORMIDADE DO PRODUTO SECÇÃO DE “NORMAS” ABAIXO C FABRICADO (ANO/MÊS): LOTE: NÚMERO DO MODELO: NORMAS: D REGISTO DE INSPECÇÃO INICIAL...
- Page 26 PARAAF DATUM ZIE RFID TAG IN DOORZICHTIGE ZAK. VERWIJDER DIT ETIKET NIET EFTIRFYLGNI VARÐANDI VÖRUNA KAFLI UM “STAÐLA” ER HÉR AÐ NEÐAN C FRAMLEITT (ÁR/MÁNUÐUR): LOT: MÓDEL NÚMER: STAÐLAR: D EFTIRLITSSKRÁ UPPHAFSSTAFIR DAGSETNING G SJÁ RFID MERKI Í GEGNSÆUM VASA. H EKKI SKAL FJARLÆGJA ÞENNAN MERKIMIÐA СООТВЕТСТВИЕ...
- Page 27 Garantie limitée à vie Garanzia di durata limitata Garantie de l’utilisateur fi nal : CAPITAL SAFETY garantit à l’utilisateur fi nal d’origine (« Garanzia dell’utente fi nale: CAPITAL SAFETY garantisce all’utente fi nale originale (di seguito Utilisateur fi nal ») que ses produits sont exempts de défauts de matériaux et de fabrication dans “Utente fi...
-
Page 28: Limited Lifetime Warranty
LIMITED LIFETIME WARRANTY Warranty to End User: CAPITAL SAFETY warrants to the original end user (“End User”) that its products are free from defects in materials and workmanship under normal use and service. This warranty extends for the lifetime of the product from the date the product is purchased by the End User, in new and unused condition, from a CAPITAL SAFETY authorised distributor.
Need help?
Do you have a question about the EXOFIT NEX 1113174 and is the answer not in the manual?
Questions and answers