RoboLabs ROBOJETFLOSS ACB-09-120 Operating Manual
Cotton candy machines
Hide thumbs
Also See for ROBOJETFLOSS ACB-09-120:
- Operation manual (27 pages) ,
- Operating manual (24 pages)

Related Manuals for RoboLabs ROBOJETFLOSS ACB-09-120


Summary of Contents for RoboLabs ROBOJETFLOSS ACB-09-120
- Page 1 OPERATING MANUAL ROBOJETFLOSS COTTON CANDY MACHINES CAUTION: READ THE INSTRUCTIONS BEFORE USING THE MACHINE! PDF version of this manual is available on www.robolabs.pro...
- Page 2 tm2620/tm2627 Apr-20...
-
Page 3: Table Of Contents
tm2620/tm2627 Apr-20 Table of contents Safety requirements....................4 1. Overview and operation..................5 1.1. Designation....................5 1.2. Technical specifications................5 1.3. Delivery set....................5 1.4. Power requirements..................6 1.5. Ambient conditions..................6 1.6. Protectors and lockups.................6 1.7. Machine design and operating principle............6 2. Intended use......................8 2.1. Raw material requirements................8 2.2. -
Page 4: Safety Requirements
tm2620/tm2627 Apr-20 Safety requirements READ THE ENTIRE MANUAL BEFORE OPERATING! ONLY ALLOW TRAINED PERSONNEL TO OPERATE THE ROBO JETFLOSS! 1. DO NOT TURN ON until transport fastening nuts are fully RAISED. 2. DO NOT OVERFILL spinning head with flossugar. 3. WEAR eye protection during operation. -
Page 5: Overview And Operation
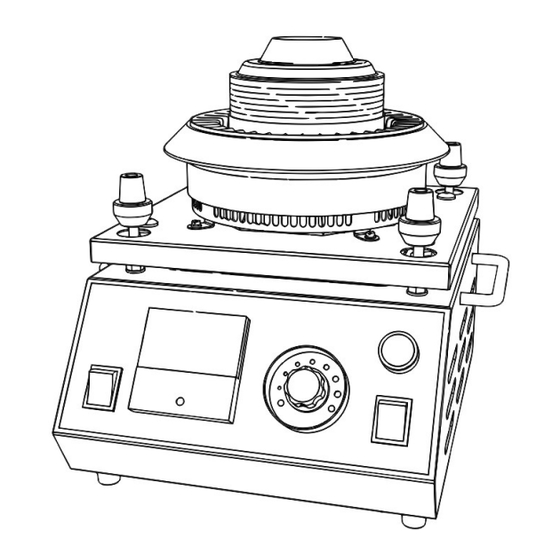
tm2620/tm2627 Apr-20 1. Overview and operation 1.1. Designation RoboJetFloss machine is intended to produce cotton candy using sugar with or without added flossine. Due to the patented design, this model allows operation under high ambient temperature and relative humidity. Candy floss leaves the machine vertically, producing servings up to 2 meter (6 feet) in diameter. -
Page 6: Power Requirements
tm2620/tm2627 Apr-20 1.4. Power requirements MACHINE MUST ONLY BE CONNECTED TO A GROUNDED OUTLET! Input current does not exceed 16 A. The machine is equipped with 6 ft power cord with NEMA 5-20 standard plug or NEMA 5-15 standard plug (ROBOJETFLOSS ACB-09-120 only). - Page 7 tm2620/tm2627 Apr-20 Plastic/Aluminum floss pans (18) are not shown. An electric motor drives the spinning head at a high rate of speed (see datasheet). A Stator (4) is mounted on the chassis to direct air flow in an upward spiral. It is fitted with a silicone Sealing Collar (5) which seals the gap between the floss pan and the stator in order to prevent sugar from falling onto the chassis.
-
Page 8: Intended Use
tm2620/tm2627 Apr-20 The front panel has the following controls: Switch (11) turns on the electric motor which rotates the spinning head; Switch (12) turns on the heating element; Adjustment Knob (13) regulates power to the heating element and thus controls its temperature;... -
Page 9: Operation
tm2620/tm2627 Apr-20 For indoor operation 20° C (70° F) and 50% RH minimize airflow by exposing no more than 1.5 cm (½ inch) of the intake grill: Next, remove the thin protective film from the Floss Pan and wash with dish soap. Place the pan on the machine making sure the indentations rest on the four rubber support legs. - Page 10 tm2620/tm2627 Apr-20 Next, turn on the heater coil power switch (12), and use the adjustment knob (13) to set voltmeter (14) to between 150-160 V (EU version) or 70-80 V (US version). Depending on conditions, it will take about 1 minute to warm up the head to operating temperature.
- Page 11 tm2620/tm2627 Apr-20 ‘Cold Start’ procedure When the machine has been off for more than 15 minutes, it will take at least 60 seconds before the heating coil has warmed enough for the production of floss to begin. If the machine has been off for a brief time, such as to add more flossugar, this time will be reduced substantially.
- Page 12 tm2620/tm2627 Apr-20 ‘NO-SNOW’ TOOL In the production of cotton candy, “snow” includes flakes, flecks, small filaments and sugar dust that are all too small to be collected in the normal winding process of producing a cotton candy serving. There are four situations when “snow” will be emitted from the head: 1.
- Page 13 tm2620/tm2627 Apr-20 If you do notice melted or burnt sugar accumulating on top or lip of the spinning head cover, or excessive buildup on the sidewall, then this should be scraped off before proceeding. This can be done using a wooden bamboo skewer or stick (never metal) while the head is spinning.
-
Page 14: Shutting Down
tm2620/tm2627 Apr-20 cotton candy. The most common technique is forcing the candy sleeve to follow you several feet away from the machine like a “snake” or animated rope. The “snake” trick requires plenty of space, and note that if there is wind present you will have to have the floss follow you down-wind. - Page 15 tm2620/tm2627 Apr-20 cotton candy as the head cools down. When the coil cools to the point that “snow” is produced, then cover the head with the “No Snow” tool and allow the head spin for 5-7 minutes to fully cool down before turning off the main power switch (11). Once cool to the touch, wipe out the inside of the “No Snow”...
-
Page 16: Technical Maintenance
tm2620/tm2627 Apr-20 3. Technical maintenance 3.1. General instructions ATTENTION! THIS PART OF OPERATION MANUAL IS INTENDED ONLY FOR TRAINED PERSONNEL EXPERIENCED WITH ELECTRICAL EQUIPMENT. DO NOT CLEAN THE SPINNING HEAD OR COMPONENTS WITH SHARP OR METAL PARTS. HOT WATER, A SPONGE OR SOFT BRISTLE BRUSH IS ALL THAT IS REQUIRED OR PERMITTED! DISCONNECT THE POWER SUPPLY BEFORE CLEANING OR PERFORMING TECHNICAL MAINTENANCE! The purpose of technical maintenance is extend the working life of the machine... - Page 17 tm2620/tm2627 Apr-20 To disassemble the spinning head: 1. Remove all sugar from the head, turning upside-down if necessary. 2. Detach floss head cover (10) by removing three flat-head screws (23). 3. If the cover is ‘glued’ to the sidewall, gently tap with the screwdriver handle in order to loosen the parts.
- Page 18 tm2620/tm2627 Apr-20 BRUSH UNIT MAINTENANCE As with most electrical motors, the Robo JetFloss utilizes brushes and slip rings which are subject to wear and require inspection, maintenance and eventual replacement. To inspect and maintenance the brush unit it is necessary to take off the stator (4) by removing the four fastening screws.
-
Page 19: Troubleshooting
tm2620/tm2627 Apr-20 3.2. Troubleshooting DISCONNECT THE POWER SUPPLY BEFORE DIAGNOSTICS AND REPAIR. EMI FILTER MUST BE DISCHARGED BY CLOSING ALL THE PINS IN THE PLUG! FAILURE POSSIBLE CAUSE REMEDY Machine doesn’t turn on when No power at the wall Use a tester to check the voltage on all phases. Provide power switch is activated. -
Page 20: Transportation And Storage
tm2620/tm2627 Apr-20 4. Transportation and storage The equipment may be transported by any kind of covered vehicle, in accordance with local regulations. Ambient temperature during the transportation and storage must be between - 25°C and +55°C (-13° F and +131° F). 5. -
Page 21: Warranty Obligations
Due to constant improvement of the equipment, technical specifications are subject to change without prior notice! 7. Manufacturer details NPO Tvertorgmash LLC 11 Industrial Street, Tver, 170000 Russia Technical support is available: Email: support@robolabs.pro Phone: +7 495 956 4000...
Need help?
Do you have a question about the ROBOJETFLOSS ACB-09-120 and is the answer not in the manual?
Questions and answers