Advertisement
Quick Links
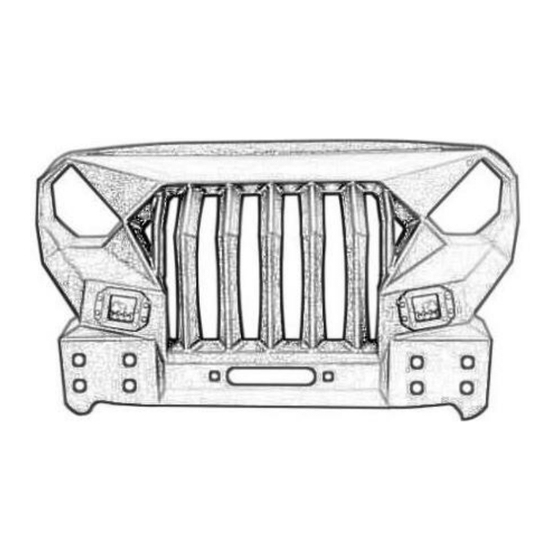
Front Bumper
(1) Contents:
Regular Version
Qty Part Name
1
Front Bumper Assembly
8
Hex Bolts
2
Socket Head Cap Screws
2
Button Head Socket Cap Bolts Screws
4
Button Head Socket Cap Bolts Screws
10
Split Lock Washer
4
Split Lock Washer
BXG.2038A-1S
BXG.2038B-S
Size(mm) Qty Part Name
2
Split Lock Washer
M12*45
2
Flat Washer
M12*35
4
Flat Washer
M6*20
10
Flat Washer
M8*20
10
Flange Hex Lock Nuts
M12
4
Flange Hex Lock Nuts
M8
1
Glue Strip
Size(mm)
M6
M6*20*1
M8*20*1
M12*30*1.5
M12
M8
1230
Advertisement

Related Manuals for HOOKE ROAD BXG.2038A-1S


Summary of Contents for HOOKE ROAD BXG.2038A-1S
- Page 1 BXG.2038A-1S Front Bumper BXG.2038B-S (1) Contents: Regular Version Qty Part Name Size(mm) Qty Part Name Size(mm) Front Bumper Assembly Split Lock Washer Hex Bolts M12*45 Flat Washer M6*20*1 Socket Head Cap Screws M12*35 Flat Washer M8*20*1 Button Head Socket Cap Bolts Screws...
- Page 2 If you purchased the wing version, you will receive the following accessories in another package. Part Name Size(mm) Part Name Size(mm) Wings Flat Washer M6*16*1 Button Head Socket Cap Bolts M6*16 Flat Washer M8*16*1 Screws Button Head Socket Cap Bolts M8*16 Flange Hex Lock Screws...
- Page 3 About 2 hours, 2-3 people may be needed. Installation time may differ according to your mechanical skill level. (PLEASE VERIFY ALL PARTS ARE PRESENT AND READ INSTRUCTIONS CAREFULLY BEFORE STARTING INSTALLATION!) To view the electronic version (BXG.2038A-1S & BXG.2038B-S), please scan the QR code.
- Page 4 (4) Installation instruction: Step 1: Install the Socket Head Cap Bolts (M12*35), Split Lock Washer (D12), Flat Washer (M12*35*2), Flange Hex Lock Nuts (M12). No need to tighten it in this step. Step 2: After step 1, install the Wrench Bracket on it.As shown below.And tighten the Socket Head Cap Bolts (M12*35) in this step with 10mm L type wrench.
- Page 5 Step 3: Install the Mountings Bracket into the bumper with the Button Head Socket Cap Bolts Screws (M8*20), Split Lock Washer (D8), Flat Washer (M8*20*1), Flange Hex Lock Nuts (M8). Don’t tighten up those bolts.
- Page 6 Step 4: Install the Button Head Socket Cap Bolts Screws (M6*20), Split Lock Washer (D6, Flat Washer (M6*20*1). Hook up the bumper into your vehicle.
- Page 7 Step 5: Before install the bumper, please glue the glue strip into the bumper. Install the bumper & the D-rings base into the car frame with the Hex Bolt(M12*40), Split Lock Washer (D12), Flat Washer (M12*2*30), Flange Hex Lock Nuts (M12). Note: Before installing those bolts, please adjust the position of the mounting bracket installed in the previous step and hang it on your vehicle.
- Page 8 Step 6: Install the D-rings. Step 7: The installation is complete (without the wings part). We hope you enjoy a wonderful off-road life with this quality Hooke Road product!
- Page 9 Step 8: If you purchased the wings version, please refer to the below steps to install the wings. Install the wings with the Button Head Socket Cap Bolts Screws (M8*20 & M6*16), Split Lock Washer (D8 & D6), Flat Washer (M8*16*1 &...
- Page 10 Step 9: The installation is complete.We hope you enjoy a wonderful off road life with this quality product! Step 10: This step is optional and not 100% necessary. IF you purchase the wing version, you can connect the wing light as follow. The wing light have the functions of the DRL light and the Turn lamp.
- Page 11 1.The product parts in this instruction may differ slightly from the actual product contents but generally does not affect the installation of the product. 2.Please feel free to contact your distributor if you have any kind of question about your purchase. Hooke Road to find your parts...
Need help?
Do you have a question about the BXG.2038A-1S and is the answer not in the manual?
Questions and answers