Advertisement
Quick Links
Dealer/Installer: Give manual to homeowner.
Installer: Read "Safe Installation" on page #2 and all instructions before beginning. For proper assembly and
installation, instructions must be followed completely.
Homeowner: Read "Safe Use" on back cover before using. Save these instructions.
Installation must comply with local codes and may require permits.
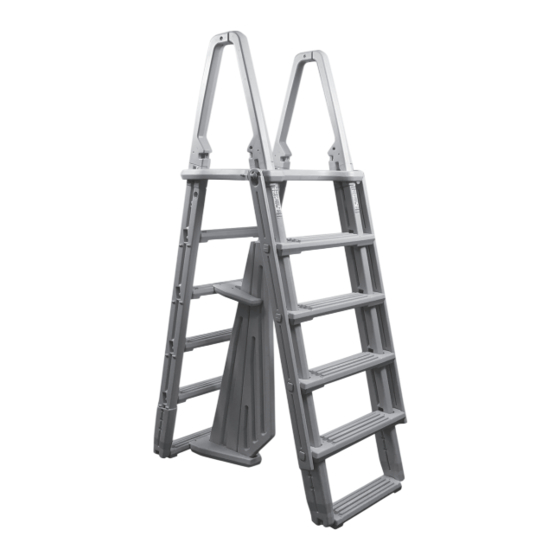
Ladder must be attached to pool frame - not for use on soft-sided/inflatable pools.
SWING UP SECTION OF LADDER MUST BE INSTALLED ON OUTSIDE OF POOL
ASSEMBLY, INSTALLATION AND USE MANUAL
Assembly video available online: www.conferplastics.com
Scan to
see our
Installation
Videos
The Anti-Entrapment
Barrier is included
in this ladder as
required by ISPSC
requirements.
The Anti-
Entrapment Barrier
is NOT intended
as a substitute for
competent adult
supervision.
50
1973
2023
To reduce the risk of drowning, entrapment, falls, paralysis, electrocution, or
other serious injury or death:
MODEL #7100X
A-FRAME LADDER
Adjusts to fit pools 48" to 54"
WEIGHT LIMIT 300 LBS.
Proudly Made in U.S.A. by
© Confer Plastics, Inc.
®
2022
Advertisement

Related Manuals for Confer Plastics Evolution 7100X


Summary of Contents for Confer Plastics Evolution 7100X
- Page 1 The Anti-Entrapment Barrier is included in this ladder as required by ISPSC requirements. The Anti- Entrapment Barrier is NOT intended as a substitute for competent adult supervision. Proudly Made in U.S.A. by 1973 2023 © Confer Plastics, Inc. ® 2022...
-
Page 2: Safe Installation
Model #7100X A-FRAME LADDER Ladder must be attached to pool frame - NOT FOR USE with soft-sided/inflatable pools If missing parts call - Toll free U.S./Canada - 800-635-3213 or www.conferplastics.com Tools Needed for Assembly Parts List 4 - Ladder Legs * - Hammer or mallet Handrails 2 - Tread Connectors... - Page 3 If the pool is 48” tall, the If the round plastic extension boots may not inserts on the sides be needed. If the pool is of the extension taller than 48”, install the boots are still in extension boots: place, remove them using a drill and a Slip the four extension 5/16”s drill bit.
- Page 4 Making sure that the “swing-up” side of the platform is facing away from the “inside” ladder section, as shown, slip the openings of the platform over the upper ends of the ladder legs. Using a mallet or hammer tap the platform Slip the other two ladder legs down until it is fully seated onto the “nubs”...
- Page 5 Fingers Large Small Barrier Barrier Lay ladder on its side, put a little liquid soap onto the square ends of the treads. Next place the tread connector onto the Separate Barrier sections at the top ends of the treads and strike hard with slightly and position Upper Brace over a rubber mallet to seat tread connector Small Barrier Section.
- Page 6 WARNING! For Maximum stability, the ladder must be fastened to the top of the pool. ATTACHING LADDER TO POOL: There are two methods to attach the ladder to the pool. If the 7100X deck sits directly on the pool top ledge, follow step 23a.
-
Page 7: Maintenance
To reinstall, see Step #22. CONFER PLASTICS INC. FIVE YEAR WARRANTY Confer Plastics Inc. warrants their swimming pool ladders and spa products to be free from defects in workmanship for five years from date of purchase. DO NOT RETURN DEFECTIVE PART TO DEALER E-MAIL CONFER PLASTICS AT: LADDERS@CONFERPLASTICS.COM... - Page 8 Complete your backyard! Purchase our patio furniture LeisureAccents.com...
Need help?
Do you have a question about the Evolution 7100X and is the answer not in the manual?
Questions and answers