Advertisement
Biamp NPX Convenience Paging Stations
NPX H1040/G1040/H1100/G1100
Installation & Operation Guide
NPX H1040/G1040
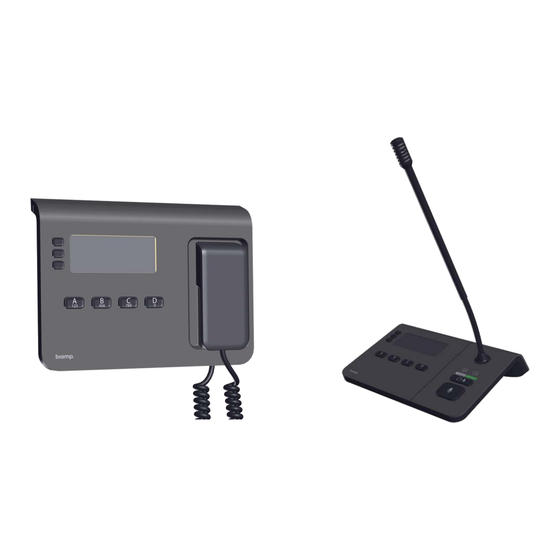
NPX H1040/G1040 Paging Stations
NPX H1040/G1040 are 4-button convenience paging stations with a handheld
or gooseneck microphone for use in Tesira
embedded DSP and on-board memory to support stored message playback and
customized preambles.
NPX H1100/G1100 Paging Stations
NPX H1100/G1100 are 10-button convenience paging stations with a handheld
or gooseneck microphone for use in Tesira or Qt X systems. The H1100/G1100
feature embedded DSP and on-board memory to support standard and advanced
public address functionalities.
Setup and Use
The Tesira software provides an intuitive interface for setup and programming
of the NPX paging stations. The information supplied by this manual relates to
physical connections and device setup. For more details on software, please
consult the
Tesira Help
File.
NPX paging stations can be integrated in Qt X systems and configured with Qt X
software. Refer to
Qt X software help
Note: NPX systems can be incorporated in either Tesira OR Qt X systems, but
the same paging station(s) cannot be incorporated, or controlled with both at
the same time.
A:
9300 S.W. Gemini Drive Beaverton, OR 97008 USA
or Qt
X systems. Each features
®
®
for programming and system information.
NPX H1100/G1100
The following NPX Paging Station Device Maintenance actions require Windows
10 Version 1809 or newer:
• Firmware Updates
• Network Settings
• Upload and Download of Preambles and Recordings
• Device Security Settings
• Device Description
• Add/Modify/Remove Station PIN
To remove Page Codes and create or update Tesira layouts that include NPX,
the user may use Windows 7 or versions of Windows 10 older than 1809.
Installation
Each model supports both tabletop and wall mounting with a removable "foot"
that allows the paging station to be mounted flat against any surface. Click
for installation details.
here
W:
www.biamp.com
Advertisement
Table of Contents

Related Manuals for Biamp NPX Series


Summary of Contents for Biamp NPX Series
- Page 1 Biamp NPX Convenience Paging Stations NPX H1040/G1040/H1100/G1100 Installation & Operation Guide NPX H1040/G1040 NPX H1100/G1100 NPX H1040/G1040 Paging Stations NPX H1040/G1040 are 4-button convenience paging stations with a handheld The following NPX Paging Station Device Maintenance actions require Windows or gooseneck microphone for use in Tesira or Qt X systems.
- Page 2 NPX HANDHELD/GOOSENECK FRONT & BACK Front 1. LCD Menu Navigation Buttons Up, Down and Select buttons allow the user to navigate the LCD menu. 2. LCD Allows the user to view menus and functions. Operation for more details. 3. Page Code Selection Buttons Defines a voice-paging operation including its Figure 3: NPX Back Panel type, destination and priority.
-
Page 3: Product Installation
PRODUCT INSTALLATION 4. Secure the foot to a flat surface. Cut a hole into the surface, below or Install away from heat sources such as vents, radiators, heat registers and just beyond, where the RJ-45 port at the back of the NPX will be located. stoves or near water or steam. -
Page 4: Wall Mount Installation
PRODUCT INSTALLATION (CONTINUED) Wall-Mount Installation An optional wall-mounting bracket is clipped to the back of the NPX but must 5. Attach the bracket to a single or double gang box with flat-head screws as be removed and flipped for installation. shown in Figure 13. -
Page 5: Operation
OPERATION LCD Button Navigation Up, Down and Select navigation buttons adjacent to the LCD allow the user to navigate the system of menus for the NPX device. Down Select The table below shows the screens and navigation during and after powering up the NPX device: Function Navigation Description... - Page 6 OPERATION (CONTINUED) Paging and Message Playback Instructions Playback a recorded message 3. At the Page Code screen press the top or middle buttons next to navigate to and highlight a specific page code. The user may also type the appropriate page code number on the keypad. 4.
- Page 7 OPERATION (CONTINUED) Paging and Message Playback LCD Button Navigation Function Navigation Description Select a Page Displays the current page code and allows • Press to navigate to appropriate page Code the user to scroll to select a page code. code •...
- Page 8 OPERATION (CONTINUED) Paging and Message Playback LCD Button Navigation Function Navigation Description Page Failed • Displays briefly when a user attempts to make a page while a higher priority page code is already in progress. Playback Failed • N/A Displays briefly when the user tries to play back a message with a non-existent recording.
- Page 9 OPERATION (CONTINUED) Record a Message LCD Button Navigation Function Navigation Description Recordings Screen Displays the list of assigned and unassigned • Press to go to previous recording slot. message slots. • Press to go to next recording slot. • Press to go to page code screen if slot is not selected.
- Page 10 OPERATION (CONTINUED) LCD Icons and Fault Codes The icons below represent the LCD functions on the NPX device to help the System Alerts displays a list of current faults on the NPX device: user to navigate the function menus: Fault Code Description Icon Function...
- Page 11 OPERATION (CONTINUED) Keypad NPX H1040/G1040 4-Key Keypad NPX H1100/G1100 10-Key Keypad Keypad Functionality 4-Button 10-Button The 4-button station allows up to four page codes to be assigned (one for each The 10-button station allows up to 999 page codes to be assigned. Users can of the four buttons A,B,C,D).
- Page 12 page 12 Installation and Operation Guide...
- Page 13 NPX Separated AVB Network TesiraFORTE AVB AI TC-5 Zone 1 Zone 2 REVAMP 2120T Zone 3 AMP-450BP Zone 4 LAPTOP (for configuration only) Cable Type Network Cable Line Level Audio Speaker Level Audio Speaker Level Audio using Network Cable Installation and Operation Guide page 13...
- Page 14 page 14 Installation and Operation Guide...
- Page 15 Single Qt X Controller with NPX Paging Stations Qt X 600 / 600D Qt X 600 / 600D NPX G1100 NPX G1100 Qt X Passive Emitters Paging Station 1 Paging Station 2 (up to 60 per Run) PI-AE NMS-NG10GPX-AVB PS-AE-3 Qt X Active Emitters (up to 25 per Run) PI-AE...
- Page 16 Warranty www.biamp.com/legal/warranty-information Safety and Compliance www.biamp.com/compliance Dante is a registered trademark of Audinate ® Biamp™ is a trademark of Biamp Systems, LLC Biamp , Tesira , and Qt X are registered trademarks of Biamp ® ® ® Systems, LLC.
Need help?
Do you have a question about the NPX Series and is the answer not in the manual?
Questions and answers