Advertisement
Quick Links
Tools Needed:
6mm Allen Key
Drill
Driver Bit
NOTE: Anchoring to floor or wall may require additional tools and hardware. See note at end of instructions.
Components:
A
B
C
D
E
17-TYP015
Page 1 of 10
5mm & 4mm
Box Level
Allen Keys
Model
A
17-2424BL
B
17-175120EC
C
17-17597CP
D
17-LEVKIT
E
17-4896BDB (L/R)
NOTE: If connecting Barn Door Wall 17-4896BDB(L/R) to a different
configuration than 17-TYP015, see page #4 to start assembly of Barn Door
Wall.
Square One
Assembly Instructions
17-TYP015 (LEFT & RIGHT)
Open End
Tape
Wrenches
Measure
Description
Single Block, 24"x24"
(4 Bolts & Nuts Included)
End Cap, 120"
Corner Post, 97-3/4"
Leveler Kit, 2 Levelers
Barn Door Wall (Left or Right)
Ladder
2 to 3
Installers
17-TYP015
Quantity
54
3
(used horizontally)
4
(used vertically)
15
1
800.422.5727
www.IndianaFurniture.com
Advertisement

Related Manuals for Indiana Furniture Square One 17-TYP015


Summary of Contents for Indiana Furniture Square One 17-TYP015
- Page 1 Square One Assembly Instructions 17-TYP015 (LEFT & RIGHT) Tools Needed: Open End 6mm Allen Key Ladder 2 to 3 Drill 5mm & 4mm Box Level Tape Wrenches Driver Bit Installers Allen Keys Measure NOTE: Anchoring to floor or wall may require additional tools and hardware. See note at end of instructions. Components: 17-TYP015 Model...
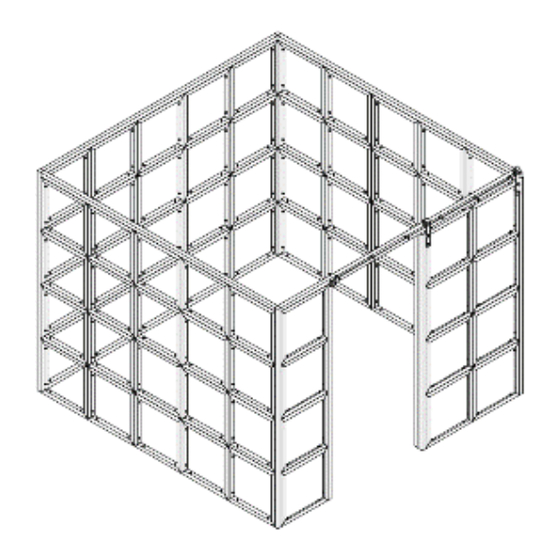
- Page 2 Square One Assembly Instructions 17-TYP015 (LEFT & RIGHT) 80mm bolt Begin by building the configuration 1 block high. To establish the configuration footprint. 60mm bolt Align the holes in blocks and connect with 2, 80mm bolts and 2, 17mm nuts. Fasten the bolt and nut together but do not over tighten because you will want to align and firmly tighten upon final setup.
- Page 3 Square One Assembly Instructions 17-TYP015 (LEFT & RIGHT) Install 2, 97-3/4” Corner Posts using the 60mm bolts. Using a ladder and an assistant, install the 120” End Caps on the top of the unit using the 60mm bolts. Once everything is attached, go back and align components.
-
Page 4: Tools Needed
Square One Assembly Instructions 17-TYP015 (LEFT & RIGHT) BARN DOOR WALL PORTION Tools Needed: Open End 6mm Allen Key Ladder 2 to 3 Drill 5mm & 4mm Box Level Tape Wrenches Driver Bit Installers Allen Keys Measure NOTE: Anchoring to floor or wall may require additional tools and hardware. See note at end of instructions. Components: Barn Door Model... - Page 5 Square One Assembly Instructions 17-TYP015 (LEFT & RIGHT) BARN DOOR WALL PORTION Roller The model used in these instructions is a 17-4896BDBR which is a right hand unit. Note: For a 17-4896BDBL, left hand unit everything is mirrored, notes for left hand units will be in [ ].
- Page 6 Square One Assembly Instructions 17-TYP015 (LEFT & RIGHT) BARN DOOR WALL PORTION Assemble the single blocks for the wall portion as shown using the 80mm bolts & 17mm nuts. Attach the 96” rails to the ends of the assembly as shown using the 60mm bolts.
- Page 7 Square One Assembly Instructions 17-TYP015 (LEFT & RIGHT) BARN DOOR WALL PORTION With some help, move the barn door wall section into place on the unit configuration. Attach the barn door wall to the corner posts of the configuration using 60mm bolts.
- Page 8 Anchoring to the floor, wall, ceiling, and other furniture will require additional tools and hardware, not provided by Indiana Furniture. The installer is responsible for sourcing hardware and for the installation of support per building conditions.
- Page 9 Square One Assembly Instructions Acoustical Panel Inserts (AP-2020AP) 17-TYP015 (LEFT & RIGHT) 24” ACOUSTICAL PANEL INSERTS Tools Needed: Ladder 1 Installer Begin by verifying the location of where the panel will be placed on the Square One configuration. Take the Acoustical Panel Insert and orient it how you want it installed.
- Page 10 Square One Assembly Instructions Acrylic Panel Inserts (AI-2020AC) 17-TYP015 (LEFT & RIGHT) 24” ACRYLIC PANEL INSERTS Tools Needed: Ladder 1 Installer Begin by verifying the location of where the panel will be placed on the Square One configuration. Peel off the backing on one side of the tape disk and attach the four tape disks to the heads of the top and side bolts in the Square One frame.
Need help?
Do you have a question about the Square One 17-TYP015 and is the answer not in the manual?
Questions and answers