Table of Contents
Advertisement
Quick Links
Advertisement
Table of Contents

Subscribe to Our Youtube Channel
Related Manuals for EchoMaster Pro PBS-RD1


Summary of Contents for EchoMaster Pro PBS-RD1
- Page 1 PBS-RD1 77GHz Blind Spot Detection Assist System OPERATION GUIDE / MANUAL...
- Page 2 Thank you for purchasing the EchoMaster PBS-RD1 The EchoMaster Pro radar detection system is designed to assist in the avoidance of obstacles while reversing and driving. Disclaimer: EchoMaster® is strictly a driver assistance device, and should not be relied upon as a substitute for safe driving practices.
-
Page 3: System Components
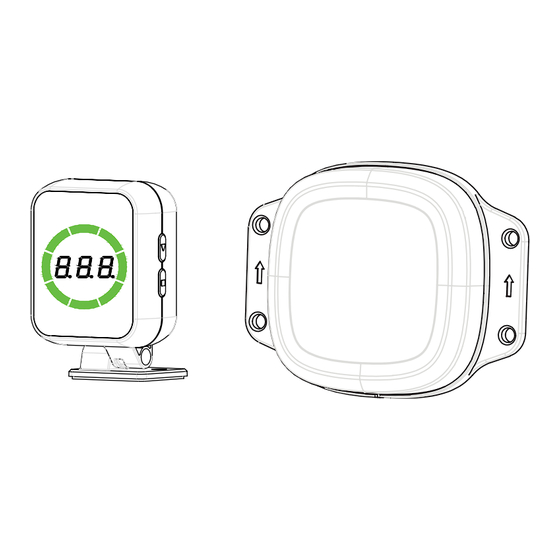
SYSTEM COMPONENTS 1. System Components Diagram Name Sensor Display Main Harness 32.8’ (10m) Sensor Extension 16.4’ (5m) Sensor Extension 5˚ Angled Sensor Mounting Plate 10˚ Angled Sensor Mounting Plate Sensor Bracket Screw 4.8*30mm Screw 5*20mm Screw 4*15mm Cable Tie QR Card email - support@stingersolutions.com tel - 727-592-5991... -
Page 4: System Wiring Diagram
Blind Spot Detection Assist System INSTALLATION GUIDE 3. System Wiring Diagram SYSTEM WIRING DIAGRAM IGN/ACC (Red) GND (Black) Reverse Signal Wire (Purple) Right Turn Signal Wire (Gray) Left Turn Signal Wire (White) Trigger Output (Green) Illustrations are typical and may not match exact vehicle detail email - support@stingersolutions.com tel - 727-592-5991... -
Page 5: System Connection Overview
SYSTEM CONNECTION OVERVIEW Sensor Sensor IGN/ACC IGN/ACC (Red) GND (Bla GND (Black) Reverse S Reverse Signal Wire (Purple) Right Turn Signal Wire (Gray) Right Tur Left Turn Signal Wire (White) Left Turn Trigger Output (Green) Display Trigger O Display 1. Connect Ignition Power Wire (+) Battery + 1. - Page 6 Display connect power Trigger Ou Fuse Display wire here 1. Connect Ignition Power Wire (+) Ignition Switch Connect Ignition Power Wire (+) Note: the system will be on when the Battery + vehicle’s ignition is turned to "ON". connect power Battery + wire here Fuse...
-
Page 7: Sensor Installation
4. Sensor Installation 4. Sensor Installation SENSOR INSTALLATION (1) Installation height requirement 1: Installation Height Requirement (1) Installation height requirement 23.6”-51.2” (0.6-1.3m) 23.6”-51.2” (0.6-1.3m) (2) Vertical angle requirement 2: Vertical Angle Requirement (2) Vertical angle requirement Upward angle Upward angle Installation height Upward tilt angle 23.6”-29.5”... - Page 8 3: Sensor and Bracket Orientation A. The sensor bracket is fixed on a horizontal plane and the vertical installation angle is adjusted through the installation bracket. B. The sensor bracket is fixed on a vertical plane and the vertical angle is adjusted through the installation bracket.
-
Page 9: Display Installation
. Display Installation DISPLAY INSTALLATION 1: Select Location Select location: Choose a suitable location so that the driver can easily observe the content splayed on the monitor Choose a suitable mounting location that the driver can easily observe the content on the display. Monitor fixation: Clean the adhesive position of the monitor, remove the 3M dhesive from the bottom of the monitor, and stick it in a suitable position. -
Page 10: Function Description
FUNCTION DESCRIPTION 1: Self Diagnosis 7. Function Description When the key is turned to the “ON” position, the system starts a self-diagnostic (1) Self-Diagnosis procedure and informs the driver of the system status by audible and visible When the key is turned to ON, the system starts to make self-diagnosis, and remind driver of the alerts. -
Page 11: Normal Operation
System Display Sound Cue Status Reading Normal Beep once Operation (Bi--) 2: System Settings Setting Sensor Press the “Function” button to select the Beep twice Function function and press the “Setting” button to enter Abnormality (Bi-Bi-) the settings for that function. the settings function, and press the confirm button to enter the Function Setting... - Page 12 Only detect Only All targets detect moving moving detected targets targets Press the □ button four times, the buzzer will beep once to Sensor enter the learning setting mode. Press the ▽ setting button Learning once, and the display will display "L1". The system will enter Learning Function the learning mode, and the green bars will light up one by one in...
- Page 13 Distance display Distance bar Detection Obstacle Distance Audible Color Bar Display Zone Distance Display Alarm Light bar is off Not detected — — Tone Bright green color stripes 26.6’ - 32.8’ 26.6 - 32.8 (8.1 - 10.0m) (8.1 - 10.0) Bright yellow green stripes 20.0’...
- Page 14 4: Learning Function When the installation position of the radar is not at the outermost side of the (4) Learning Function vehicle, the radar can easily detect the vehicle body, or vehicle accessories in the When the installation position of the radar is not at the outermost side of the vehicle, the radar is rear bumper area, which can result in a false alarm.
- Page 15 Learning failure Beep twice 5: Rear Collision Warning (RCW) The system is active when the key is turned to the “ON” position and any gear, (5) Rear Collision Warning (RCW) except reverse is engaged. If any one of the following two conditions is met, When the key is turned to ON and any gear but R is engaged, the system starts to work.If any one and the hazard warning light is off, the RCW alarm will be triggered (controlling of the following two conditions is met, and the hazard warning light is off, the RCW alarm will be...
-
Page 16: Basic Functions
) Blind Spot Detection BSD/Lane Change Aid (LCA) Conditions 6: Blind Spot Detection BSD/Lane Change Aid (LCA) (6) Blind Spot Detection BSD/Lane Change Aid (LCA) Any gear but R (6) Blind Spot Detection BSD/Lane Change Aid (LCA) a. Conditions A. Conditions a. - Page 17 BSD warning LCA warning area area BSD warning LCA warning area area There is no vehicle in the BSD alarm area and there is a vehicle in the LCA alarm There is no target vehicle in the BSD alarm area, and there is a vehicle in the LCA alarm area, but the overtaking time is greater than 3.5 seconds, the display will not area, but the overtaking time >...
- Page 18 LCA warning area area BSD warning LCA warning area area In the case of the first-level alarm, when turning right, the second-level alarm will be issued (the color bar on the right side of the display will blink and the buzzer In the case of the first-level alarm, if turn right, the second-level alarm will be issued (the color bar on the right side of the display will blink, and the buzzer will beep twice);...
- Page 19 (7) Rear Cross Traffic Alert (RCTA) a. Conditions In Reverse gear 7: Rear Cross Traffic Alert (RCTA) (7) Rear Cross Traffic Alert (RCTA) (7) Rear Cross Traffic Alert (RCTA) a. Conditions a. Conditions A. Conditions In Reverse gear In Reverse gear b.
-
Page 20: Automatic Brightness Adjustment
Automatic Brightness Adjustment: 8: Automatic Brightness Adjustment splay detects the external brightness and will automatically adjusts the The display detects the external brightness and will automatically adjust the ness of the display brightness of the display. 9: Detection Range Settings Detection Range Setting: etection range of the sensor is shown in the figure below. -
Page 21: Installation Notes
INSTALLATION NOTES 1: This product is designed to work with 12-24V battery vehicles. 2: The front of the radar sensor should not be covered by metal objects. 3: Connect cables according to the labels. 4: Make sure the wiring harness is secured and far away from heat sources, sharp edges and any moving vehicle components. - Page 22 (1) Select location: Choose a suitable location so that the driver can easily observe the content displayed on the monitor (2) Monitor fixation: Clean the adhesive position of the monitor, remove the 3M adhesive from the bottom of the monitor, and stick it in a suitable position. It can also be fixed with screws.
- Page 23 Phone – 727-592-5991 E-Mail – support@stingersolutions.com EchoMaster is a Power Brand of Stinger EchoMaster.com REV. DC031924...
Need help?
Do you have a question about the PBS-RD1 and is the answer not in the manual?
Questions and answers