
Subscribe to Our Youtube Channel
Related Manuals for EchoMaster Pro FCTP-GM2403


Summary of Contents for EchoMaster Pro FCTP-GM2403
- Page 1 Installation Guide Trailering Camera System Compatible with IOK Touchscreen Radios Silverado/Sierra Heavy Duty Trucks (2024-Present)
- Page 2 Installation Guide FCTP-GM2403 Trailering Camera System Important Please read and follow the instructions carefully. To emphasize special information, the symbol and the words Warning, Caution and Note have special meanings. Pay special attention to messages highlighted by these signal words.
-
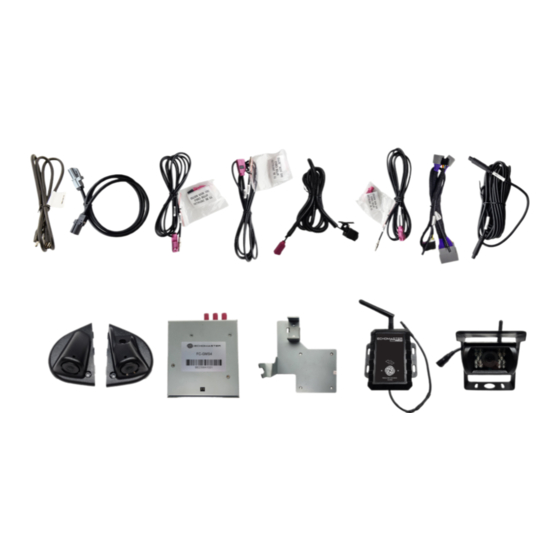
Page 3: What's In The Box
Installation Guide FCTP-GM2403 Trailering Camera System What’s in the Box Parts Description FCTP-GM2403 Image Part Number Description GMS4-USB-CBL USB Update Cable for FC-GMS4 Interface GMS4-LVDS-HAR LVDS Harness for FC-GMS4 GMS4-M2F-72 72” RIGHT Camera Fakra Extension Harness GMS4-M2F-50 50” FRONT Camera Fakra Extension Harness... -
Page 4: Tools Required
Installation Guide FCTP-GM2403 Trailering Camera System Tools Required 13mm Driver Flush Cutters Nylon Trim Removal Tools 7mm Driver 10mm Driver Torx - 15 Electrical Tape Phillips Screw Driver Razor Knife Fish Tape Small Flat Blade Pry Tool tel - 1-866-766-2267... -
Page 5: Door Disassembly
Installation Guide FCTP-GM2403 Trailering Camera System Door Disassembly Step 1: Using a small flat blade pry tool or similar, remove the inner handle rubber cover to access the 7mm bolts underneath it. Step 2: Remove the 2 x 7mm bolts located underneath the inner... - Page 6 Installation Guide FCTP-GM2403 Trailering Camera System Door Disassembly (continued) Step 4: Starting at the top inside edge of the door panel, pull the panel towards you to release the fasteners, working your way down and towards the rear of the door and then back up and towards the door lock post.
- Page 7 Installation Guide FCTP-GM2403 Trailering Camera System Step 6: With the door panel leaned toward you and away from the door, remove the door latch release cable. Do this by pressing down on the tab, pulling back and then rotating the fastener 90 degrees towards the door until the cable is able to lift out of the retainer.
- Page 8 Installation Guide FCTP-GM2403 Trailering Camera System Routing the Camera Cables (continued) Step 2: Using a small flat blade pry tool remove the bottom cap of the mirror. There are indentations in the cap from the factory to aide in this procedure.
- Page 9 Installation Guide FCTP-GM2403 Trailering Camera System Step 5: Remove the plastic cap on the upper inside corner of the door to gain access to the rubber membrane and the factory connectors. Step 6: Using a razor knife, make an “X” cut between the two...
- Page 10 Installation Guide FCTP-GM2403 Trailering Camera System Routing the Camera Cables (continued) Step 8: On the outside of the door secure the Fakra connector side of the camera harness to the fish tape using electrical tape. This will allow us to route the short cable from outside of the door to the inside of the door.
- Page 11 Installation Guide FCTP-GM2403 Trailering Camera System Step 12: Push the door side of the wire boot into the door. Step 13: Release the top of the door boot on the vehicle side using a plastic trim tool. Step 14: Remove the door sill plate. Begin by removing the side seat trim panel by pulling up.
- Page 12 Installation Guide FCTP-GM2403 Trailering Camera System Routing the Camera Cables (continued) Step 15: Remove the under dash beauty panel, if present, by removing the push pin fasteners. (2 under the glove compartment and 1 towards the front of the vehicle)
- Page 13 Installation Guide FCTP-GM2403 Trailering Camera System Step 17: Module Module Locate GMS4-M2F-72 (RIGHT) or GMS4- Connector Connector M2F-128 (LEFT) and remove the small ziploc bag and set it aside. The connector housing will be installed after the cable is routed.
- Page 14 Installation Guide FCTP-GM2403 Trailering Camera System Routing the Camera Cables (continued) Step 20: Secure the camera extension cable to the factory door harness using the supplied zip ties. The cable will follow the path outlined in yellow when it is secured to the factory wiring harness.
- Page 15 Installation Guide FCTP-GM2403 Trailering Camera System Step 23: Connect the GMS4-M2F-72 (RIGHT) or the GMS4-M2F-128 (LEFT) to the camera cable and push them together until fully seated. You will hear an audible click when the connectors lock together. Secure the connector to the factory mirror connector using a zip tie.
- Page 16 Installation Guide FCTP-GM2403 Trailering Camera System PCAM-12FF Installation: Camera Installation Step 1: Find the desired mounting location. NOTE PLEASE NOTE The recommended mounting location is centered on the grill and just below the emblem. Step 2: Remove the adhesive backing from the mounting base of the camera.
- Page 17 Installation Guide FCTP-GM2403 Trailering Camera System Step 4: Using a small flat blade tool or similar, remove the 10 push-in rivets to remove the plastic trim panel on the top side of the grill. Step 5: Remove the (x2) T15 screws attaching the hood release handle to the hood release.
- Page 18 Installation Guide FCTP-GM2403 Trailering Camera System Step 7: After removing the 10mm bolts, carefully pull the front fascia trim away from the frame rail. Step 8: Locate 5 open mounting holes in the back of the front fascia and insert the provided zip ties with attached christmas tree push fasteners.
- Page 19 Installation Guide FCTP-GM2403 Trailering Camera System Step 10: Continue routing the cable along the side of the passenger headlight as shown below. Route the cable through the opening behind the headlight and up between the frame rail and fuse box and battery.
- Page 20 Installation Guide FCTP-GM2403 Trailering Camera System PCAM-12FF: Routing the Camera Extension Harness Step 1: From the interior of the vehicle, locate a small round access point in the large grommet on the firewall under the dash on the passenger’s side. Cut an “x” (marked in red) in the access point and feed a wire fishing tool through the opening from inside the vehicle to the engine bay.
- Page 21 Installation Guide FCTP-GM2403 Trailering Camera System Step 3: With the extension harness now routed, grab the small plastic bag containing the connector housing and retention clip. First, slide the pink connector housing on to the bare connector end. Then, slide the black retention clip onto the connector housing to secure the connector.
- Page 22 Installation Guide FCTP-GM2403 Trailering Camera System Rear Wireless Camera Receiver Installation Step 1: Locate the Wireless Camera Receiver with the pre-attached 3M double sided tape and prepare to mount it to the back glass. Step 2: Clean the surface and secure the wireless camera receiver to the back window as shown in the picture.
- Page 23 Installation Guide FCTP-GM2403 Trailering Camera System Step 3: Release the retaining clips and remove the upper trim panel from the C pillar and route the pigtail cable from the wireless camera receiver. Make certain the cable is routed behind any air bag hardware that is located in that area.
- Page 24 Installation Guide FCTP-GM2403 Trailering Camera System Rear Wireless Camera Receiver (continued) Step 5: Remove the passenger side rear door sill using a plastic trim tool. Pull loose the rubber door seal between the rear door sill and the upper trim panel removed in step 3.
- Page 25 Installation Guide FCTP-GM2403 Trailering Camera System Module Assembly and Installation Step 1: Locate the factory radio receiver high in the passenger side kick area. Disconnect the Gray and Black 28 pin connectors along with the LVDS cable which is located next to the Black 28 pin connector. The LVDS connector can easily be identified as it will have the Blue cable.
- Page 26 Installation Guide FCTP-GM2403 Trailering Camera System Module Assembly and Installation (continued) Step 5: Connect the GMS4-M2F camera extension harnesses to each of the corresponding connectors on the module. Line up the labels and connect in the following orientation: CONNECTIONS ON MODULE...
- Page 27 Installation Guide FCTP-GM2403 Trailering Camera System Step 8: Finally, connect the 10 pin black connector from GMS4-PTH-HAR to the GMS4 module. Step 9: Remove the 10mm retaining nut from the plastic bracket in the passenger side kick area. NOTE If factory Multifunction Power Supply Converter...
- Page 28 Installation Guide FCTP-GM2403 Trailering Camera System Module Assembly and Installation (continued) Step 10: Place the GMS4 mounting bracket onto the vehicle’s plastic Multifunction Power Supply Converter Bracket bracket according to the picture. Make sure that the C portion of the mounting bracket clips all the way around the plastic factory bracket.
- Page 29 Installation Guide FCTP-GM2403 Trailering Camera System Testing & Setup (continued) Step 3: Once the Intellihaul 3.0 home screen appears, press the corresponding button for the camera you wish to test. Pressing the HOME button on the radio’s control panel will return you to the Intellihaul 3.0 home screen.
- Page 30 Installation Guide FCTP-GM2403 Trailering Camera System Enabling the Front Camera (continued) Step 3: Enabling one of the two Front camera options from the Camera Setup menu will enable the front camera in the camera menu. 1. Enable Front Camera Speedup Trigger - When enabled, the front camera will display when exiting reverse and turn off after 8 MPH.
- Page 31 Installation Guide FCTP-GM2403 Trailering Camera System Mirror Hang Tag After completeing the initial setup and verifying proper functionality, take the mirror hang tag (A.) with the User Guide QR code on it and hang it from the rear view mirror, as shown in figure B, so that the customer is able to scan the QR code to access the user guide.
- Page 32 AGREEMENT: End user agrees to use this product in compliance with the instructions and terms of use above and with all State and Federal laws. EchoMaster provides instructions and safety warnings with respect to this product and disclaims all liability for any use not in conformity with those instructions or other misuse of its product. If you do not agree, please discontinue use immediately and contact EchoMaster.
Need help?
Do you have a question about the FCTP-GM2403 and is the answer not in the manual?
Questions and answers