
Related Manuals for Kinderkraft MINK PRO i-Size


Summary of Contents for Kinderkraft MINK PRO i-Size
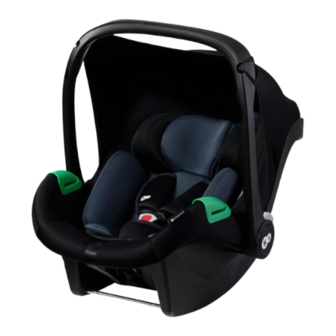
- Page 1 MINK PRO i-Size USER GUIDE MODEL: MINK PRO i-Size ECE R129.03 v.4.0 MODEL: I-LITE ECE.R129.03 ver. 1.0...
- Page 2 1.0 Usage NOTE! Product graphics serve an illustrative function. The car seat has been designed, tested and approved for use in accordance with the requirements of UN/ECE Regulation No. 129 concerning the approval of child improved restraint systems (UN/ECE R129/03). •...
- Page 3 Hight of the child Car seat setting Car seat mounting On a MINK FX base: ISOFIX connectors + support leg 40-75 cm Three-point car seat belt...
-
Page 4: Safety Instructions
2.0 Safety instructions Please take a few minutes to read this instruction manual in order to ensure the proper safety of your child. • The car seat MUST NOT be installed on the vehicle seats mounted backwards or sideways. • The car seat MUST NOT be placed on the vehicle seats with an active front air-bag. - Page 5 !WARNINGS! Make sure that the luggage and other objects are adequately secured, in particular on the rear parcel shelf, as they can cause injuries in the event of a collision. Please refer to your vehicle operating manual for information on the The car seat CANNOT be used without a cover.
- Page 6 DO NOT use the car seat if its parts are damaged or loose. On some vehicle seats made of delicate materials, the use of car seats may leave marks and/or discolouration. In order to prevent it, you can place a In the event of an emergency, it is important to quickly unfasten the car blanket, towel or similar product under the car seat.
- Page 7 3.0 Securing the child 3.1 Using the insert 1. Connect the headrest part of the insert with the rest of it using snap fasteners 2. Unfasten the safety harness 3. Move the safety harness to the sides of the car seat. 4.
- Page 8 3.2 Headrest height adjustment together with internal safety harness 1. Unfasten the safety harness 2. Loosen the inner safety harness as much as possible by pressing the safety harness adjustment button while pulling on it. Remember! Do not pull on the shoulder pads.
- Page 9 Adjust the appropriate height of the inner safety harness so that the harness enters the seat backrest at the height of the child's shoulders or slightly above...
- Page 10 3.3 Setting the position of the handle To set the car seat handle in the selected position, perform the following steps. 1. Press the car seat handle adjustment button on both sides at the same time to unlock the handle 2.
- Page 11 3.3.1 Positions of the handle Position for installation with the Position for carrying and mounting on use of car seat belt the stroller frame and ISOFIX base Position for placing the child in the Position for car seat storage car seat...
-
Page 12: Using The Sun Shade
4.0 Using the sun shade The sun shade is used to prevent direct sunlight on the child's face Installation of the sun shade: 1. Set the car seat handle to the carrying position 2. Place the fastener of the sun shade in the appropriate place on the handle of the car seat To remove the sun shade, follow the above steps in reverse order. - Page 13 5.0 Installation in the vehicle 5.1 Installation of the car seat rearward facing using seat belt NOTE! Before starting the installation, make sure that the seat is equipped with a three-point car seat belt and that the air-bag is disabled. 1.
- Page 14 4. Set the car seat handle in an installation position with the use of a car seat belt - facing the vehicle seat. The handle should rest on the vehicle seat. 5. Insert the shoulder part of the car seat belt into the rear car seat belt guide marked green.
-
Page 15: Base Installation
5.2 Installing the car seat rearward facing using the ISOFIX- MINK FX base Remember to deactivate the air-bag before installing the car seat on the vehicle seat! 5.2.1 Base installation: 1. Before placing the base on the vehicle seat, unfold the base support leg. 2. - Page 16 NOTE! Never install the support leg on the storage box in the floor of the car - the storage box can break during an accident; if in doubt, refer to the vehicle manual. NOTE! The support leg must never be unsupported, and no objects can be placed under it.
- Page 17 5.2.2 Installation of the car seat on the ISOFIX MINK FX base: 1. Set the handle in the mounting position on the ISOFIX base. 2. Position the car seat so that it is rearward-facing and insert it into the base - you should hear a characteristic click and the car seat should be locked in the base.
- Page 18 5.3 Removing the car seat from the ISOFIX base and removing the base 5.3.1 Removing the car seat: 1. Slide the base lock lever and hold it, then press the car seat release button. 2. Lift the car seat up. Base lock lever Car seat release button...
-
Page 19: Removing The Base
5.3.2 Removing the base: 1. Slide the support leg up using the leg extension adjustment button 2. Press the ISOFIX release buttons and slide the arm into the base. Do this on both sides. 3. Remove the base from the vehicle seat and remove it from the vehicle. 4. -
Page 20: Installation
NOTE! Please refer to the stroller manual for information on car seat compatibility. Handle adjustment button Stroller adapters The MINK PRO i-Size seat is compatible with Kinderkraft strollers and strollers from other manufacturers with universal adapters. In order to verify whether the stroller is equipped with universal adapters, contact its manufacturer. - Page 21 Removing the stroller: 1. Press the buttons on both sides to remove the car seat from the stroller adapters. 2. Remove the car seat from the adapters. The location of the buttons for removing the car seat from the adapters is marked with arrows Button for removing the car seat from the stroller adapters (buttons are located under the cover)
- Page 22 7.0 Maintenance instructions 7.1 Removing the cover 1. Remove the sun shade from the car seat handle 2. Loosen the inner safety harness as much as possible, then slide the shoulder pads off the safety harness. 3. Remove the cover from the headrest of the car seat 4.
- Page 23 5. Unhook the elastic ribbon from the car seat shell. 6. Pull out the two ribbons (the cover and the sun shade ribbons) from the slot. 7. To remove the cover from the back of the car seat, slightly stretch the plastic element and slide the fabric of the cover and the sun shade out of the lock.
-
Page 24: Installing The Cover
Align the cover with the attachment points on the car seat. NOTE! Never use strong detergents or bleaches. NOTE! The internal safety harness system must not be dismantled! Never disassemble individual parts of the internal safety harness. The full text of the Warranty Terms and Conditions is available at WWW.KINDERKRAFT.COM... - Page 25 7.3 Cleaning Only the original cover should be used, as it is an essential element of the safety of the car seat. • The cover can be removed. Machine wash in warm water (up to 30°C) using a mild detergent. Leave to dry. Do not spin, do not tumble dry, do not use bleach.
Need help?
Do you have a question about the MINK PRO i-Size and is the answer not in the manual?
Questions and answers