Advertisement
Table of Contents
- 1 Table of Contents
- 2 Preface
- 3 Product Overview
- 4 Features
- 5 Ambient Environment
- 6 Precautions before Use
- 7 Operation
- 8 Front Panel
- 9 Rear Panel
- 10 Items for Setting System Parameters
- 11 Notices before Use & Operating Procedure
- 12 Setting 19035-M & Connecting DUT
- 13 Service & Maintenance
- 14 General
- 15 Replacing the Battery
- 16 Repairing the Device
- Download this manual
Advertisement
Table of Contents

Subscribe to Our Youtube Channel
Related Manuals for Chroma 19035


Summary of Contents for Chroma 19035
- Page 1 Wound Component EST Scanner 19035/19035-M/19035-S Quick Start Guide...
- Page 3 Wound Component EST Scanner 19035/19035-M/19035-S Quick Start Guide Version 1.1 December 2010 P/N ITM-0107075...
- Page 4 Legal Notices The information in this document is subject to change without notice. Chroma ATE INC. makes no warranty of any kind with regard to this manual, including, but not limited to, the implied warranties of merchantability and fitness for a particular purpose.
- Page 5 All Chroma instruments are warranted against defects in material and workmanship for a period of one year after date of shipment. Chroma agrees to repair or replace any assembly or component found to be defective, under normal use during this period.
- Page 6 Material Contents Declaration The recycling label shown on the product indicates the Hazardous Substances contained in the product as the table listed below. : See <Table 1>. : See <Table 2>. <Table 1> Hazardous Substances Lead Mercury Cadmium Hexavalent Polybrominated Polybromodiphenyl Part Name Chromium...
- Page 7 “ ” indicates that the level of the specified chemical substance exceeds the threshold level specified in the standards of SJ/T-11363-2006 and EU 2005/618/EC. Chroma is not fully transitioned to lead-free solder assembly at this moment; however, most of the components used are RoHS compliant.
- Page 8 Failure to comply with these precautions or specific WARNINGS given elsewhere in this manual will violate safety standards of design, manufacture, and intended use of the instrument. Chroma assumes no liability for the customer’s failure to comply with these requirements. BEFORE APPLYING POWER Verify that the power is set to match the rated input of this power supply.
- Page 9 Safety Symbols DANGER – High voltage. Explanation: To avoid injury, death of personnel, or damage to the instrument, the operator must refer to an explanation in the instruction manual. High temperature: This symbol indicates the temperature is now higher than the acceptable range of human. Do not touch it to avoid any personal injury.
- Page 10 Fuse (2) For 2.5A SLOW 240VAC User’s Manual CD CD for user’s manuals Quick Start Guide – T-Ch. Traditional Chinese version Quick Start Guide – Eng English version When additional item is required, please inform Chroma the item name. viii...
- Page 11 Hazard Operation Methods Do not touch the testing area when this scanner is outputting voltage or you may get electric shock and it may cause death. Be sure to obey the following: The earth wire must be connected exactly and use a standard power cord.
- Page 12 Storage, Freight & Maintenance Storage When not in use, please pack the device properly and store in a suitable environment. Freight Please pack the device carefully before moving it. If any of the original packing material is missing, please use suitable alternative material and mark it “fragile”...
-
Page 13: Table Of Contents
Front Panel ................12 Rear Panel................. 13 Items for Setting System Parameters........14 Notices before Use & Operating Procedure......14 Setting 19035-M & Connecting DUT ......... 14 Service & Maintenance ..............16 General..................16 Replacing the Battery ..............16 Repairing the Device ..............16... -
Page 15: Preface
Features ■ Diverse Tests The 19035 Wound Component EST Scanner is able to use the test functions such as Withstand Voltage test for AC (WVAC), Withstand Voltage test for DC (WVDC), Insulation Resistance (IR) test, DC Resistance (DCR) test and Open/Short Check separately. - Page 16 Wound Component EST Scanner 19035/19035-M/19035-S Quick Start Guide ■ OSC (Open/Short Check) The EST Scanner has built-in OSC function to check if there is any Open (bad connection) or Short (DUT shorted) occurred during test. It may cause the Fail product to be identified as Pass if Open occurs.
-
Page 17: Ambient Environment
Wound Component EST Scanner 19035/19035-M/19035-S Quick Start Guide ■ An option of GP-IB/HANDLER/Temperature Compensation 3 in 1 interface is available for purchase. ■ Impulse Winding Test (Optional) This EST Scanner is able to install the optional RS232 interface card and Impulse Winding Tester for wound component pulse test. -
Page 18: Precautions Before Use
Wound Component EST Scanner 19035/19035-M/19035-S Quick Start Guide inevitable, please install a power filter. The scanner should be stored within the temperature range of -10°C ~ +50°C. If Noise the unit is not going to be used for a long time, please... - Page 19 Wound Component EST Scanner 19035/19035-M/19035-S Quick Start Guide Figure 2-1 Grounding Safely Connecting test cable to RTN/LOW terminal As the arrow in Figure 2-2 shows, connect the test cable to RTN/LOW terminal. It is necessary to check if the test cable is connected all the time when the Scanner is in use.
- Page 20 Wound Component EST Scanner 19035/19035-M/19035-S Quick Start Guide ■ Plug in the high voltage test cable to high voltage output terminal. ■ At last connect the RTN/LOW test cable to the unit under test and then connect high voltage test cable.
- Page 21 Wound Component EST Scanner 19035/19035-M/19035-S Quick Start Guide <<< CAUTION! When output terminal is cutoff >>> Ensure the test is done Sometimes the user might need to touch the high voltage areas such as DUT, high voltage test cable or output terminal etc. due to configuration or test required change.
- Page 22 Wound Component EST Scanner 19035/19035-M/19035-S Quick Start Guide HIPOT Analyzer Figure 2-5 10. Remote controlling the Scanner The EST Scanner can be remote controlled generally for high voltage output via external control signal. When performing it, it is necessary to follow the control guidelines for safety and precautions.
- Page 23 DANGER LED indicator is still off, it means the indicator may be broken. Please power off the hardware and replace it with another device, then send the broken one back to Chroma or its distributor for repair service. 16. Be aware of the following when using the Scanner for long hour in normal state.
- Page 24 Wound Component EST Scanner 19035/19035-M/19035-S Quick Start Guide Label Fuse 100V 5A Slow/250V 120V 5A Slow/250V 220V 2.5A Slow/250V 240V 2.5A Slow/250V Be sure to use the fuse with correct specification or it WARNING may cause hazard. 18. This Scanner is normally operated under AC power If the selected voltage range for local power supply is unstable, it may cause the device to work inaccurately or abnormally.
- Page 25 Wound Component EST Scanner 19035/19035-M/19035-S Quick Start Guide 23. Keep test cable away from the panel Please keep the high voltage cable or the DUT away from the panel at least 30 cm during operation to avoid the display interference caused by high-voltage discharge.
-
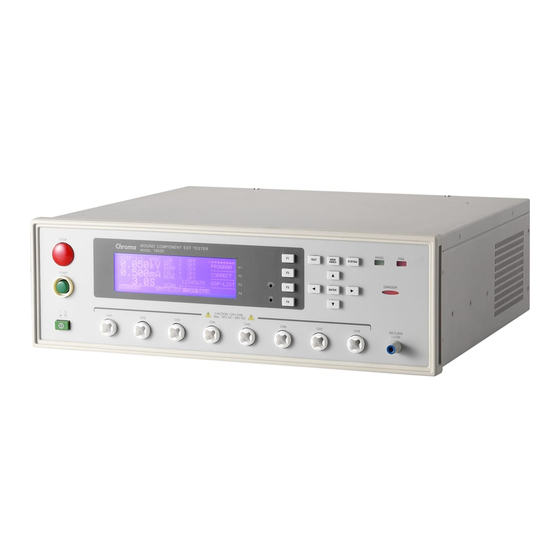
Page 26: Operation
Wound Component EST Scanner 19035/19035-M/19035-S Quick Start Guide Operation Front Panel 1. Display 4. Terminals 2. Indicator 3. Buttons Figure 3-1 19035, 19035-S Figure 3-2 19035-M... -
Page 27: Rear Panel
Wound Component EST Scanner 19035/19035-M/19035-S Quick Start Guide Rear Panel Figure 3-3 INTER LOCK: Short-circuit these two terminals can output the high voltage. VOLTAGE SELECTOR: It changes the Input AC power supply of the Scanner. Switch the voltage selector and change the fuse based on the AC power supply. -
Page 28: Items For Setting System Parameters
Wound Component EST Scanner 19035/19035-M/19035-S Quick Start Guide Items for Setting System Parameters Setting Items Description TEST CONTROL It sets the related parameters for test. SYSTEM CONFIG It sets the system related parameters. KEY LOCK It sets the keyboard lock function. - Page 29 Wound Component EST Scanner 19035/19035-M/19035-S Quick Start Guide Setting: Withstand Voltage AC (WVAC) Test Mode STEP 1/1 WVAC ARC : WVAC : 0.050kV RAMP VOLT FALL HIGH : 0.500mA WVDC REAL TIME 3.0S 1 2 3 4 5 6 7 8 SCAN H –...
-
Page 30: Service & Maintenance
225mAh Repairing the Device Be sure to contact the Service Center of Chroma by calling 886-3-3279688 to get a repair permit before returning the device. The device serial no. is required to facilitate the process. The service is free of charge if it is within the warranty.
Need help?
Do you have a question about the 19035 and is the answer not in the manual?
Questions and answers