Table of Contents
Advertisement
Available languages
Available languages
Quick Links
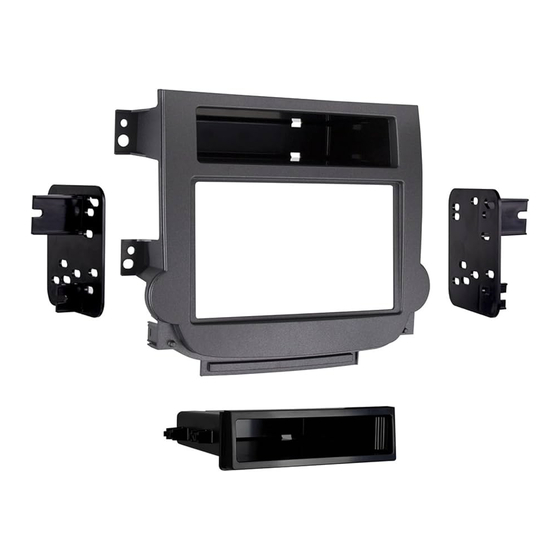
KIT COMPONENTS
• A) Radio trim panel • B) Brackets • C) Pocket • D) (4) #8 x 3/8" Phillips screws • E) (2) White panel clips • Axxess interface and harness (not shown)
A
B
Metra. The World's Best Kits.
®
Chevrolet Malibu
Malibu Limited
MetraOnline.com
Visit
for more detailed information about the product and up-to-date vehicle
specific applications
KIT FEATURES
• ISO DDIN radio provision with pocket
• Painted black to match factory dash
C
D
MetraOnline.com
2013-2015
(w/ auto climate controls)
2016
(w/ auto climate controls)
E
© COPYRIGHT 2020 METRA ELECTRONICS CORPORATION
95-3318B
I N S TA L L AT I O N I N S T R U C T I O N S
TABLE OF CONTENTS
Dash Disassembly ..................................................2
Kit Assembly ..........................................................3
Axxess Interface Installation .................................4
- Connections ....................................................4-6
- Installation ..........................................................6
- Initializing ...........................................................6
- Adjustments .......................................................6
Climate Control Status ....................................7
WIRING & ANTENNA CONNECTIONS (sold separately)
Wiring Harness: Axxess interface included
Antenna Adapter: 40-EU55
TOOLS REQUIRED
• Panel removal tool • Phillips screwdriver
• 9/32" socket wrench
Attention!
Let the vehicle sit with the key
out of the ignition for a few minutes before
removing the factory radio. When testing the
aftermarket equipment, ensure that all factory
equipment is connected before cycling the
key to ignition.
REV. 7/20/20 INST95-3318B
Advertisement
Table of Contents

Related Manuals for Metra Electronics 95-3318B


Summary of Contents for Metra Electronics 95-3318B
-
Page 1: Table Of Contents
When testing the aftermarket equipment, ensure that all factory equipment is connected before cycling the key to ignition. Metra. The World’s Best Kits. MetraOnline.com ® © COPYRIGHT 2020 METRA ELECTRONICS CORPORATION REV. 7/20/20 INST95-3318B... -
Page 2: Dash Disassembly
DASH DISASSEMBLY Malibu 2013 Malibu 2014-2015 (with automatic climate controls) (with automatic climate controls) With the key in the off position: Malibu Limited 2016 (with automatic climate controls) 1. Unclip and lift up the panel surrounding With the key in the off position: the shifter. -
Page 3: Kit Assembly
KIT ASSEMBLY ISO DDIN radio provision with pocket 1. Install the panel clips onto the radio trim panel. (Figure A) 2. Attach the pocket with the provided (4) #8 x 3/8” Phillips screws. (Figure A) 3. Attach the radio brackets to the aftermarket radio with the screws supplied with the radio. -
Page 4: Axxess Interface Installation
AXXESS INTERFACE INSTALLATION CONNECTIONS From the 18-pin harness to the aftermarket radio: INTERFACE FEATURES • Retains the factory personalization menu and climate controls status • Connect the (2) Red wires to the accessory wire. (If installing an ASWC-1, there will be a Red wire there to connect as well.) •... -
Page 5: Connections
CONNECTIONS For models with a BOSE sound-system: Note: Some models do not have speed sense on the data-bus. Refer to the 20-pin Gray harness to the aftermarket radio step. If you do not have a wire populated on the factory side •... -
Page 6: Installation
If the ASWC-1 is not being used, disregard this harness. If it will be used, please refer to the ASWC-1 instructions for radio connections and programming. Note: If using the ASWC-1, connect it after you initialize and test the 95-3318B, with the key in the off position. -
Page 7: Personalization Menu And Climate Control Status
PERSONALIZATION MENU AND CLIMATE CONTROL STATUS ATTENTION: The Rearview Camera Input is used to display the Personalization Menu and the Climate Control Status. If the aftermarket radio does not have a screen with a Rearview Camera Input, then there will be no visualization of the Climate Controls Status or Personalization Menu. An externally mounted screen could be substituted in this situation. If there is no visual, please go back and check the wiring and settings in the radio. - Page 8 Log onto www.installerinstitute.com or call 800-354-6782 for more information and take steps toward a better tomorrow. Metra recommends MECP certified technicians Metra. The World’s Best Kits. MetraOnline.com ® © COPYRIGHT 2020 METRA ELECTRONICS CORPORATION REV. 7/20/20 INST95-3318B...
- Page 9 Además, no quite el radio de fábrica con la llave en la posición o de encendido ni con el vehículo funcionando. Metra. The World’s Best Kits. MetraOnline.com ® © COPYRIGHT 2020 METRA ELECTRONICS CORPORATION REV. 7/20/20 INST95-3318B...
- Page 10 DESMONTAJE DEL TABLERO Malibu 2013 Malibu 2014-2015 (con controles de temperatura automáticos) (con controles de temperatura automáticos) Con la llave en la posición de apagado: Malibu Limited 2016 (con controles de temperatura automáticos) 1. Desenganche y levante el panel que Con la llave en la posición de apagado: rodea la palanca de velocidades.
- Page 11 ENSAMBLE DEL KIT Provisión de radio ISO DDIN 1. Instale los ganchos del panel en el panel de la carcasa del radio. (Figura A) 2. Una la cavidad superior con los (4) tornillos Phillips #8 x 3/8”. (Figura A) 3. Coloque los soportes de radio en el radio de mercado secundario con los tornillos que vienen con el radio.
- Page 12 INSTALACIÓN DE LA INTERFASE AXXESS CONEXIONES Desde el arnés de 18 pins al radio de mercado secundario: CARACTERÍSTICAS DE LA INTERFASE • Retiene el menú de personalización de fábrica y el estado de los controles de clima • Conecte los (2) cables rojos al cable de accesorios. (Si va a instalar un ASWC-1, habrá un cable rojo que también debe conectar).
- Page 13 CONEXIONES Para los modelos con sistema de sonido BOSE: Nota: Algunos modelos no tienen sensor de velocidad en el bus de datos. Consulte el arnés gris de 20 pins para el paso de radio de mercado secundario. Si no tiene un cable poblado del •...
- Page 14 Monte el nuevo ensamble de radio en el tablero y vuelva a armarlo al revés de como lo • Conecte el cable rojo con el cable de accesorios. desarmó, usando el panel de la carcasa del radio 95-3318B. Nota: El relé adjunto a la interfase Axxess únicamente es para los chasquidos audibles de la señal direccional.
- Page 15 MENÚ PERSONALIZACIÓN Y CLIMATIZACIÓN ESTADO ATENCIÓN: La entrada de la cámara retrovisora se utiliza para mostrar el menú de personalización y el estado del control de clima. Si el radio de mercado secundario no tiene una pantalla con una entrada de cámara retrovisora, entonces no habrá...
- Page 16 800-354-6782 para obtener más información y avance hacia un futuro mejor. Metra recomienda técnicos con certificación del Programa de Certificación en Electrónica Móvil (Mobile Electronics Certification Program, MECP). Metra. The World’s Best Kits. MetraOnline.com ® © COPYRIGHT 2020 METRA ELECTRONICS CORPORATION REV. 7/20/20 INST95-3318B...
Need help?
Do you have a question about the 95-3318B and is the answer not in the manual?
Questions and answers