
Related Manuals for Charder MHS2500I


Summary of Contents for Charder MHS2500I
- Page 1 USER MANUAL MHS2500I Lift Scale Please keep the instruction manual at hand all the time for future reference.
- Page 2 Explanation of Text/Symbols on Device Label/Packaging Text/Symbol Meaning Caution, consult accompanying documents before use Separate collection for waste of electrical and electronic equipment, in accordance with Directive 2002/96/EC. Do not dispose of device with everyday waste Name and address of device manufacturer, and year/country of manufacture Carefully read user manual before installation and usage, and follow instructions for use.
- Page 3 Copyright© Charder Electronic Co., Ltd. All rights reserved. This user manual is protected by international copyright law. All content is licensed, and usage is subject to written authorization from Charder Electronic Co., Ltd. (hereinafter Charder) Charder is not liable for any damage caused by a failure to adhere to requirements stated in this manual.
-
Page 4: Table Of Contents
CONTENTS I. Safety Notes ................5 A. General Information ............5 B. EMC Guidance and Manufacturer's Declaration ......8 II. Installation ................12 A. Safety Warning ..............12 B. Inserting Batteries .............18 III. Indicator and Key Functions ..........19 A. Basic Operation ..............21 B. -
Page 5: Safety Notes
I. Safety Notes A. General Information Thank you for choosing this Charder Medical device. It is designed to be easy and straightforward to operate, but if you encounter any problems not addressed in this manual, please contact your local Charder service partner. - Page 6 Charder. This device does not contain any user-maintained parts. All ◼ maintenance, technical inspections, and repairs should be conducted by an authorized Charder service partner, using original Charder accessories and spare parts. Charder is not liable for any...
- Page 7 damages arising from improper maintenance or usage. Dismantlement of the device will void the warranty. Disposal This product is not to be treated as regular household waste, but ◼ should be taken to a designated collection points for electronics. Further information should be provided by local waste disposal authorities.
-
Page 8: Emc Guidance And Manufacturer's Declaration
B. EMC Guidance and Manufacturer's Declaration Guidance and manufacturer’s declaration-electromagnetic emissions The MHS2500I/MHS2600I Lift Scale is intended for use in the electromagnetic environment specified below. The customer or the user of the device should assure that it is used in such an environment. - Page 9 Guidance and manufacturer’s declaration-electromagnetic immunity The MHS2500I/MHS2600I Lift Scale is intended for use in the electromagnetic environment specified below. The customer or the user of the device should assure that it is used in such an environment. IEC 60601 Compliance...
- Page 10 Guidance and manufacturer’s declaration-electromagnetic immunity The MHS2500I/MHS2600I Lift Scale is intended for use in the electromagnetic environment specified below. The customer or the user of the device should assure that is used in such an environment. IEC 60601 test Compliance...
- Page 11 Over the frequency range 150 kHz to 80 MHz, field strengths should be less than 3 V/m. Recommended separation distance between portable and mobile RF communications equipment and the MHS2500I/MHS2600I Lift Scale The device is intended for use in an electromagnetic environment in which radiated RF disturbances are controlled.
-
Page 12: Installation
II. Installation A. Safety Warning Lift Scale must NOT tilt at any time 1. Lift scale must NOT tilt when installed on Patient Lift System. If Lift Scale is tilted and not completely vertical when installed, this will cause the joints of the Lift Scale to bend. This will eventually cause breakage once used enough times and subjected to enough weight, because force is being applied against joints in a way that they aren't designed to handle. - Page 13 Inspect cardan joints before use for signs of damage or looseness 1. Inspect cardan joints connecting Lift Scale to Patient Lift System visually before use. The Lift Scale is designed to be installed between the lifting bar and hanger of the Patient Lift System, in a completely vertical position. Patient Lifter Lifting Bar Patient Lifter...
- Page 14 360-degree swivel bearings. Rotation should be conducted using Lift System, rather than device. The cardan joints on MHS2500I / MHS2600I Lift Scales (with fixed cardan joints) do NOT swivel. If they can be manually twisted, that means the joints are damaged, and the Lift Scale should NOT be used.
- Page 15 3. Lift Scale and hanger bar must be allowed free movement in all directions. If Lift Scale is obstructed from free movement, twisting force will be applied to Lift Scale, potentially causing damage. Lift Scale should be installed on Patient Lift System that allows 360-degree free swivel 1.
- Page 16 Nylock Screws must be screwed in tightly according to specifications Nylock Screws must be secured according to correct assembling procedure. Prepare one hexagon screwdriver and one torque wrench. 1. Hold/fix one side using screwdriver 2. Tighten/attach Nylock Screws using torque wrench (repeat from other side) IMPORTANT: Torque strength must be set at 18kgf-cm ±...
- Page 17 Check to ensure all screws are fully tightened Item Hexagon Nylock screw 2 screws per joint Stopper screw 1 screw per joint Stopper screw must be fully tightened all the way in. CAUTION: DO NOT use the Lift Scale if any screws are loose.
-
Page 18: Inserting Batteries
B. Inserting Batteries 1. Locate battery cover at rear of 2. Remove battery cover device 3. Remove battery case 4. Insert batteries 5. Insert battery case 6. Replace battery cover... -
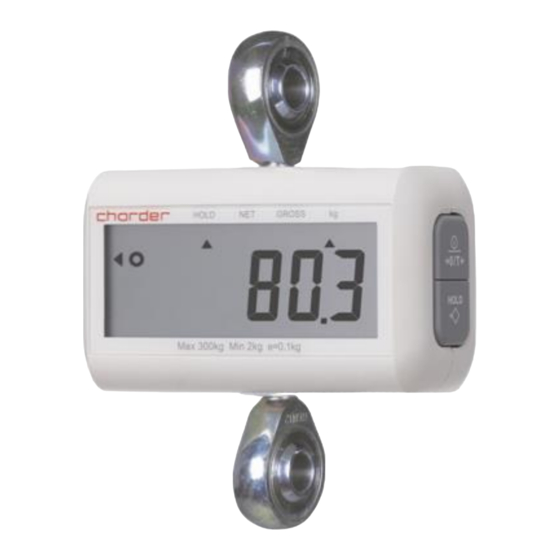
Page 19: Indicator And Key Functions
III. Indicator and Key Functions Device indicator (OIML model) Gross weight Hold function Net weight BMI function active active Weight in kg Device indicator (3-key Unit model) Weight in lb BMI function Net weight Hold function (Unit model only) active active Weight in kg Display... - Page 20 Key Function (2-key model) : Power on or power off. Reset display to 0.0 kg display (can be used if within ±2% of full capacity). Press and hold for 3 seconds to turn off. 2. HOLD: Determine stable weighing value - used when weight is unstable.
-
Page 21: Basic Operation
IV. Using Device A. Basic Operation Switch on the device using key. The device will automatically perform self-calibration, displaying software version. Once "0.00 kg" appears on indicator, device is ready for measurement. Note: If "0.00 kg" does not display on indicator, press key to zero the device. -
Page 22: Bmi (3-Key Model)
C. BMI (3-key model) 1. In normal mode, press and hold key to enter BMI mode. 2. Display will show last recorded height. Digits will flash. 3. Press key to increase, [△] to decrease. Press and hold to speed 4. After inputting height, press to confirm. -
Page 23: Device Setup
V. Device Setup 2-key model When the device is switched on, press and hold the [HOLD] key for about 3 seconds, until the display shows the "SETUP”, followed by "A_OFF” (first option in setting menu). In device setup menu: [HOLD] to toggle next menu option to confirm selection / enter submenu Auto Power-Off: Instruct device to shut off automatically after a certain period of time. - Page 24 3-key △ model When the device is switched on, press and hold the key for about 3 △ seconds, until the display shows the "SETUP”, followed by "A_OFF” (first option in setting menu). In device setup menu: to toggle next menu option to confirm selection / enter submenu Auto Power-Off: Instruct device to shut off automatically after a certain period of time.
- Page 25 3-key Unit model When the device is switched on, press and hold the key for about 3 seconds, until the display shows the "SETUP”, followed by "A_OFF” (first option in setting menu). In device setup menu: to toggle next menu option 1、...
-
Page 26: Troubleshooting
Warranty Program & Return Policy. 1. If Charder is responsible for a fault or defect present upon receipt of the unit, Charder shall either repair the fault, or supply a replacement unit. - Page 27 Distributor support required If the following errors occur, we recommend contacting your local Charder distributor for repair or replacement services: 1. Device will not power on Faulty on/off key ◼ Broken or damaged wires causing short circuit or faulty connection ◼...
-
Page 28: Product Specifications
VII. Product Specifications A. Device Information Model MHS2500I Weight Capacity 300 kg x 0.1 kg 400 kg x 0.2 kg Measurement Accuracy ± 1.5e OIML Class III LCD Screen 1.0-inch LCD screen (5 1/2 digits) Dimensions Overall 122(W) x 52(D) x 180(H) mm Device 1.04 kg... - Page 29 Notes _______________________________________________________ _______________________________________________________ _______________________________________________________ _______________________________________________________ _______________________________________________________ _______________________________________________________ _______________________________________________________ _______________________________________________________ _______________________________________________________ _______________________________________________________ _______________________________________________________ _______________________________________________________ _______________________________________________________ _______________________________________________________ _______________________________________________________ _______________________________________________________ _______________________________________________________ _______________________________________________________ _______________________________________________________ _______________________________________________________...
- Page 30 Notes _______________________________________________________ _______________________________________________________ _______________________________________________________ _______________________________________________________ _______________________________________________________ _______________________________________________________ _______________________________________________________ _______________________________________________________ _______________________________________________________ _______________________________________________________ _______________________________________________________ _______________________________________________________ _______________________________________________________ _______________________________________________________ _______________________________________________________ _______________________________________________________ _______________________________________________________ _______________________________________________________ _______________________________________________________ _______________________________________________________...
- Page 31 Notes _______________________________________________________ _______________________________________________________ _______________________________________________________ _______________________________________________________ _______________________________________________________ _______________________________________________________ _______________________________________________________ _______________________________________________________ _______________________________________________________ _______________________________________________________ _______________________________________________________ _______________________________________________________ _______________________________________________________ _______________________________________________________ _______________________________________________________ _______________________________________________________ _______________________________________________________ _______________________________________________________ _______________________________________________________ _______________________________________________________...
-
Page 32: Declaration Of Conformity
Classification: Class I with measuring function 2014/31/EU Non-automatic Weighing Instruments Directive RoHS Directive 2011/65/EU and Delegated Directive (EU) 2015/863 Authorized EU Representative: Manufactured by: Charder Electronic Co., Ltd. No.103, Guozhong Rd., Dali Dist., Taichung City, 41262 Taiwan CD-IN-0989 [7012W] 09/2022...
Need help?
Do you have a question about the MHS2500I and is the answer not in the manual?
Questions and answers