
Related Manuals for Spectris SERVOMEX SERVOPRO NOX


Summary of Contents for Spectris SERVOMEX SERVOPRO NOX
- Page 1 SERVOPRO NOX GAS ANALYZER 221195Q Quick Start Guide PN SERVOPRO NOX Gas Analyzer 221195Q Quick Start Guide PN...
- Page 2 +1 281 295 5899 (US toll free) f: + 44 (0) 1892 662 253 e: europe_sales@servomex.com americas_sales@servomex.com w: www.servomex.com www.servomex.com © 2018. Servomex Group Limited. A Spectris Company. All rights reserved SERVOPRO NOx Analyzer Quick Start Guide Rev 1 Page 1...
-
Page 3: Table Of Contents
TABLE OF CONTENTS INTRODUCTION .......................... 4 SAFETY INFORMATION ........................5 DESCRIPTION ........................... 6 Overview .............................. 6 Features..............................7 TECHNICAL SPECIFICATIONS ..............Error! Bookmark not defined. INSTALLATION ........................... 8 Unpacking Instructions ........................8 Rack Mounting ............................. 8 Rear Panel ............................8 Site Selection and Mounting ...................... - Page 4 Setup Menu ............................21 Alarms Menu ............................22 Service menu ............................23 Security menu ............................ 24 USING THE MAIN MENU ........................ 25 Using the Keypad ..........................25 Shortcut Menu ........................... 26 Main Menu Screen ..........................27 Measure Screen ..........................28 Measure Mode ...........................
-
Page 5: Introduction
INTRODUCTION About this Quick Start Guide This guide covers the basics of the installation, connections, software interface overview and routine maintenance of the SERVOPRO NOX. It is not intended to be a full installation manual but is a quick guide for those that are familiar with the use and maintenance of analytical or process instrumentation. A separate SERVOPRO NOX Installation and Operations manual is supplied with the analyzer providing details on the software configuration and operation of the analyzer. -
Page 6: Safety Information
SAFETY INFORMATION Read this Quick Start Guide and the full SERVOPRO NOX Installation and Operations manual. Make sure you fully understand its contents before you attempt to install or operate the analyzer. The following icons are used throughout the manuals to identify any potential hazards that could cause serious injury to people. -
Page 7: Description
DESCRIPTION OVERVIEW The SERVOPRO NOx is a versatile analyzer which uses the time-proven Chemiluminescence Detection (CLD) method to measure NO or NO/NO2/NOx concentrations, all in one standard package, which can also be configured with a paramagnetic oxygen (O ) sensor for emissions monitoring and control. Servomex also has a heated CLD analyzer for certification testing by heavy duty engine manufacturers that must meet the stringent requirements of US EPA 40 CFR Part 1065. -
Page 8: Features
FEATURES Measurement ranges from 0 – 3 ppm up to 3,000 ppm full-scale NO/NO • Automatic calibration and ranging • Fast response time without compromising the detection limits • Electronic control of sample and ozone flow to remove errors due to fluctuations •... -
Page 9: Installation
INSTALLATION ALWAYS REMOVE POWER BEFORE CONNECTING OR DISCONNECTING SIGNAL CABLES OR WHEN SERVICING THE EQUIPMENT UNPACKING INSTRUCTIONS Open the shipping container and carefully remove the analyzer from the packing materials. Inspect the instrument for any sign of damage. Remove the top-cover retaining screws. Visually check for loose parts or connectors that are not properly seated. - Page 10 The rear panel includes the following: 1. Rear-panel Power ON/OFF switch. 2. Power Entry module for power connection, power switch, fuse compartment. 3. Output connectors for analog outputs and remote functions. 4. TCP/IP connection to connect to network. 5. Serial connection to connect serial connector cable. 6.
-
Page 11: Site Selection And Mounting
SITE SELECTION AND MOUNTING CAUTION: The following precautions must be carefully observed: 1. Select a site free from direct sunlight, radiation from a high-temperature surface, or abrupt temperature variations. 2. This analyzer is not suitable for installation outdoors. 3. Select a site where the air is clean. Avoid exposing the instrument to corrosive or combustible gases. -
Page 12: Output Connections
AC Power Switch, Connector and Fuse. NOTE A defective ground may affect the analyzer’s operation. Shielded wiring is recommended for output signals OUTPUT CONNECTIONS Review the Analog and Digital Interface section in the complete Operator’s Manual for detailed instructions on proper setup instructions for the various output selection options. Shielded wiring is recommended for output signals. -
Page 13: Gas Handling Equipment
GAS HANDLING EQUIPMENT Pressure regulators for zero gas (air or N ), ozone supply (air or O ) and span gas cylinders are required for gas analysis using the SERVOPRO NOx analyzer. NOTE High levels of ammonia (greater than 10 ppm NH ) may reduce the NO converter's efficiency to a level that is unacceptable. - Page 14 the dew point to 4°C or less. If the sample contains an acid mist, use an acid mist filter, cooler or similar device to remove all traces of the mist. Presence of Corrosive Gases The useful service life of the instrument will be shortened if high concentrations of corrosive gases such as Cl , SO , HCl etc.
- Page 15 Sample Gas Bypass Outlet and Vent A sample gas bypass outlet connector is located on the analyzer’s rear panel (6mm, ¼-inch tube). Pressure at this outlet should be kept at atmospheric level. ANY backpressure will cause an error in reading. The vent outlet is located on the rear panel and may contain high levels of ozone that should be vented away from the instrument.
-
Page 16: Startup And Shutdown
STARTUP AND SHUTDOWN GENERAL INFORMATION Before using the SERVOPRO NOX, make sure the external plumbing and wiring have been connected correctly as shown in the Rear Panel description. All connections should be leak-tight, and inlet pressure settings adjusted as previously described. NOTE Make sure the proper connections for the vents for the reaction chamber and sample have been made prior to powering on the analyzer, since ozone will be flowing from these vents. -
Page 17: Proper Storage
PROPER STORAGE After powering down following the Shutdown Procedure above, allow the heated analyzer components to cool to room temperature before preparing for storage. If the original shipping box was retained, the analyzer should be stored in the box in the packing material supplied. -
Page 18: Menu Navigation Chart
MENU NAVIGATION CHART The Menu Flow Chart is a handy reference that will help you familiarize yourself with the operation of the SERVOMEX SERVOPRO NOx Analyzer. Start by pressing to access the Main Menu to quickly find any screen. MAIN MENU... -
Page 19: Calibration Menu
CALIBRATION MENU SERVOPRO NOx Analyzer Quick Start Guide Rev 1 Page 18... -
Page 20: Range Menu
RANGE MENU SERVOPRO NOx Analyzer Quick Start Guide Rev 1 Page 19... -
Page 21: Diagnostics Menu
DIAGNOSTICS MENU Menu Main Menu Menus Diagnostics Diagnostic Raw Value I/O Status Status Line Values Display Analyzer Digital ← Temps → Turn Status Line Outputs ← Press → ← → ← Flows → Analyzer Digital Turn Status Line Inputs Programmable Digital Outputs SERVOPRO NOx Analyzer Quick Start Guide Rev 1 Page 20... -
Page 22: Setup Menu
SETUP MENU SERVOPRO NOx Analyzer Quick Start Guide Rev 1 Page 21... -
Page 23: Alarms Menu
ALARMS MENU Menu Main Menu Menus Alarms Alarm Display Current Alarms Alarm Log Alarm Limits On/Off Turn Alarm Temperatures Display On Turn Alarm Pressures Display Off EPC Voltages Concentrations SERVOPRO NOx Analyzer Quick Start Guide Rev 1 Page 22... -
Page 24: Service Menu
SERVICE MENU Menu Main Menu Menus Service Linear Factory Service use Only Coefficients Range 1 Range 2 Range 3 Range 4 SERVOPRO NOx Analyzer Quick Start Guide Rev 1 Page 23... -
Page 25: Security Menu
SECURITY MENU Menu Main Menu Menus Security Operator Levels Reset Password Change Password Standard Functions Setup Functions Factory Functions SERVOPRO NOx Analyzer Quick Start Guide Rev 1 Page 24... -
Page 26: Using The Main Menu
USING THE MAIN MENU USING THE KEYPAD When the Measure screen is displayed, the ten Function keys (F1 through F10) are shortcuts to commonly used screens. On other screens, these keys can either be used as function keys or to enter numeric values. -
Page 27: Shortcut Menu
The Menu key is used to bring you to the Main Menu at any time. The Back key is used to return to the previous screen. The Enter key: 1. In Function mode, the Enter key selects the highlighted function. 2. -
Page 28: Main Menu Screen
Left or right arrows are used to scroll through the shortcut menu. Allows the operator to change the Measure Mode analyzer’s mode to NO, NO NO/NO An advanced diagnostic tool used for Raw Values troubleshooting. Diagnostic Values is used to view Diags Temperatures, Pressures, EPC Percent Full scale and Flows. -
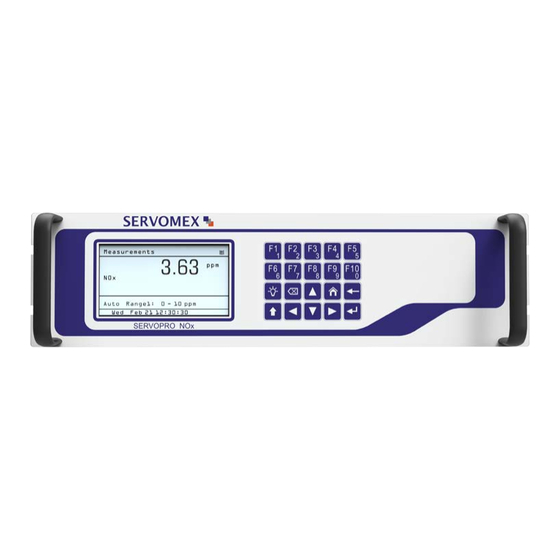
Page 29: Measure Screen
NOTE The Main Menu is your gateway to operational, setup and maintenance functions on the SERVOPRO NOx Analyzer via the corresponding function keys All software functions of the SERVOPRO NOx Analyzer can be reached via the menu above from the Main Menu screen. - Page 30 NOTE The Measure Screen provides a visual of the current concentration of the gas being analyzed, along with other pertinent information. The Measure Screen is accessed by pressing the key. To access the Measure Screen from the Main Menu, press Please review the descriptions below (corresponding with the callouts on the illustration above) to familiarize yourself with the Measure Screen.
-
Page 31: Measure Mode
AK Status Line When the AK Status line is enabled, it will scroll through the analyzer’s present state using AK Protocol. See Protocol. Analyzer Mode The active mode the analyzer is in (NO, NO or NO/NO Measured The current concentration that is displayed on the screen. Concentration Current Range The range currently being used by the analyzer. - Page 32 The Measure Mode menu is accessed by pressing the key on the Main Menu. This menu will affect how the analyzer operates and what is displayed in the Measure screen. Press to set the analyzer in NO only mode. Press to set the analyzer in NO only mode.
- Page 33 To change to the NOx mode, press while in the Measure Mode menu. In NO mode, the sample gas passes through the NO converter and the analyzer measures total NO SERVOPRO NOx Analyzer Quick Start Guide Rev 1 Page 32...
-
Page 34: Analyzer Info
NO/NOX/NO2 MODE → → Example above: NO NOTE The NO/NO Mode activates the “sample and hold” feature which allows the analyzer to automatically cycle between NO and NO measurement. To change to the NO/NO Mode, press from the Measure Mode menu. The current measuring mode (cycle) is indicated above the analyzer range. -
Page 35: Remote/Manual
NOTE The Analyzer Info screen contains the basic identity of your SERVOPRO NOx Analyzer. The Analyzer Info screen is accessed by pressing the key on the Main Menu. This screen includes the Model and Serial Number of your analyzer (for easy identification if you are discussing your analyzer with SERVOMEX), factory settings for sample pressure and air pressure, and the software versions being used. -
Page 36: Standby
The Remote/Manual menu is accessed by pressing the key on the Main Menu. The current setting (Remote Mode) is displayed in the upper right-hand corner of the screen. Example: SREM. The analyzer can be controlled remotely via: • TCP/IP Modbus •... -
Page 37: Warranty
WARRANTY Servomex instruments are warranted to be free from defects in workmanship and materials. Liability under this warranty is limited to servicing, calibrating, and replacing any defective parts of the instrument returned to an authorized Servomex Service Center for that purpose. Fuses are specifically excluded from any liability. -
Page 38: Maintenance Policy
ascertain the cause of failure. The warranties stated herein are exclusive. THERE ARE NO OTHER WARRANTIES, EITHER EXPRESSED OR IMPLIED, BEYOND THOSE SET FORTH HEREIN, and the Seller does not assume any other obligation or liability in connection with the sale or use of said products. - Page 39 1. North and South America: americas_service@servomex.com 2. Asia, Australia, New Zealand: asia_service@servomex.com 3. Europe, Middle East, Africa, India: EMEAI_service@servomex.com SERVOPRO NOx Analyzer Quick Start Guide Rev 1 Page 38...
Need help?
Do you have a question about the SERVOMEX SERVOPRO NOX and is the answer not in the manual?
Questions and answers