Table of Contents
Advertisement
Quick Links
Advertisement
Table of Contents

Related Manuals for CORNING Everon 6000 G2


Summary of Contents for CORNING Everon 6000 G2
- Page 1 Everon™ 6000 G2 Build11_1.7 User Manual...
- Page 2 Preface Material About this Manual This manual describes how to install, use, configure and manage the Corning® Everon™ 6000 G2 platform. It includes a description of the first and ongoing end-to-end configuration, management, and maintenance of the system. Intended Users and Scope This manual is applicable to Corning system installation personnel, technicians, and users.
- Page 3 Hardware to other repair facilities of Corning and/or its return to Customer. FOB point shall be the point of origin in either case. Notwithstanding the foregoing, in no event will Corning be liable for...
- Page 4 2. Prior to repair, Corning will advise Customer of the any test results. If the issue with the Hardware is covered by the warranty, Corning shall either repair or replace the Hardware. Corning may use refurbished Hardware to satisfy a warranty claim. Repaired Hardware is warranted for the longer of (i) the balance of the Hardware Warranty Period or (ii) three (3) months from the date of repair or replacement.
- Page 5 Industrial Boosters may only be used by FCC licenses or those given express (individualized) consent of license. Corning Optical Communications Wireless certifies all the VARs listed as licensed installers for Corning. For the list of licensed VARs, please contact the Technical Support Team at: Email: ONEsupport@corning.com or Phone: + (1) 833 4-CORNING (833-426-7646)
-
Page 6: Table Of Contents
Contents Introduction ........................9 Key Features and Capabilities ....................9 Terminology, Acronyms, and Abbreviations ................10 Corning® Everon™ 6000 G2 Architecture Overview ............... 11 Internal Sub-units ........................ 12 1.4.1 RIU ..........................12 1.4.2 DCU ..........................17 1.4.3 DEU ..........................21 1.4.4... - Page 7 RIU WEB overview ......................86 5.1.2 RIU Parameter Config ....................87 DCU Config .......................... 90 5.2.1 DCU -> Dashboard ......................90 5.2.2 DCU -> RIU ........................98 5.2.3 DCU -> Function......................99 Corning Optical Communications User Manual I LAN-3091-AEN I Page 7...
- Page 8 System Downlink/Uplink Config ..................152 5.7.1 Downlink Output Power Config (Power Sharing Process) ..........152 5.7.2 Uplink Gain Config ....................... 155 Case........................... 156 APPENDIX: LED Functionality and Color Definition............160 Corning Optical Communications User Manual I LAN-3091-AEN I Page 8...
-
Page 9: Introduction
It is designed to support multi-band, multi- technology, and multi-operator networks through the single fiber-based infrastructure. Everon 6000 G2 is a high bandwidth distribution architecture that provides preparedness for future radio technologies, broader spectrum, and new frequency bands. Due to its modular design and configuration... -
Page 10: Terminology, Acronyms, And Abbreviations
PLMN Public Land Mobile Network Radio Frequency SNMP Simple Network Management Protocol Transmission Control Protocol User Datagram Protocol User Equipment Uplink UTRAN Universal Terrestrial Radio Access Network User Datagram Protocol Corning Optical Communications User Manual I LAN-3091-AEN I Page 10... -
Page 11: Corning® Everon™ 6000 G2 Architecture Overview
Images Abbreviation Image RIU-TDD RIU-FDD dLRU dMRU dHRU 1.3 Corning® Everon™ 6000 G2 Architecture Overview Corning Optical Communications User Manual I LAN-3091-AEN I Page 11... -
Page 12: Internal Sub-Units
Figure 1. Architecture diagram Everon 6000 G2 features a fully advanced digital system, which incorporates the RIU (Radio Interface Unit), DCU (Digital Conversion Unit), DEU (Distributed Extension Unit) and multiple types of remotes. All the devices in the system are managed via a web session to the DCU, which provides local and remote management capabilities for all connected system devices using both web GUI (HTTPs) and SNMP interfaces. - Page 13 Figure 3. 2 TO 1 Matrix Figure 4. 4 TO 1 Matrix Figure 5. 8 TO 1 Matrix Corning Optical Communications User Manual I LAN-3091-AEN I Page 13...
- Page 14 Note: The orange line is ethernet cable. The RIU-FDD ethernet cable connection is the same as RIU-TDD. Figure 7. RIU-TDD Interface (front view) ⑦Ground Figure 8. RIU-TDD Interface (back view) Corning Optical Communications User Manual I LAN-3091-AEN I Page 14...
- Page 15 QMA x 8(TDD RIU) Coil holder Coil holder x 2 The holder for the cable rostering Two holes M4 x 2 Connect to the ground Table 2. RIU LED Definitions Corning Optical Communications User Manual I LAN-3091-AEN I Page 15...
- Page 16 Other working modes Cascade level, displayed as “1” or “2” 1 - First cascade level LED displayer 2 - Secondary cascade level A maximum of 16 devices can be cascaded Corning Optical Communications User Manual I LAN-3091-AEN I Page 16...
-
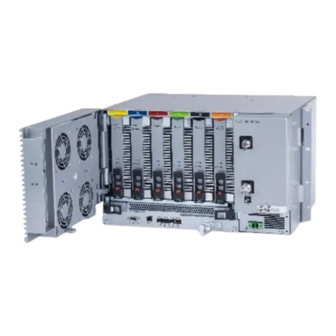
Page 17: Dcu
1.4.2 DCU Figure 11. DCU Digital Conversion Unit (DCU) is the Corning® Everon™ 6000 G2 central controller. The DCU interfaces between the RIU and DEU, implementing signal conversion, processing, and distribution of multiband digital signals to the Distributed Extension Unit (DEU), major functionalities of which include: ▪... - Page 18 24144 T 25600 T 4384 T 5120 T Normal cyclic prefix in downlink Special subframe configuration DwPTS UpPTS Corning Optical Communications User Manual I LAN-3091-AEN I Page 18...
- Page 19 Figure 12. DCU Star Connection Figure 13. DCU Interface (front view) Ground Figure 14. DCU Interface (back view) Corning Optical Communications User Manual I LAN-3091-AEN I Page 19...
- Page 20 Cluster RF Port Number Frequency Range SISO/MIMO TX/RX 1~2 300MHz 1710~4000MHz, TDD/FDD SISO/MIMO TX/RX 3~4 300MHz 1710~4000MHz, TDD/FDD SISO/MIMO TX/RX 5~6 200MHz 600~2700MHz, TDD/FDD SISO/MIMO TX/RX 7~8 200MHz 600~2700MHz, TDD/FDD Corning Optical Communications User Manual I LAN-3091-AEN I Page 20...
-
Page 21: Deu
The DEU supports any mix of power levels, frequency bands and antenna configurations of digital remote units of the Corning® Everon™ 6000 G2 system. Each DEU includes 4 F/O CPRI ports connected to the DCUs or cascaded DEUs, and 24 F/O CPRI ports for connection to the remote units. - Page 22 1. DEU supports flexible network architecture of 4 level daisy chain connections as shown in Figure 16. Figure 16. DEU Daisy Chain Connection Note: Please check the software release note for the DEU cascading features and limitation of each software version. Corning Optical Communications User Manual I LAN-3091-AEN I Page 22...
- Page 23 AC input connector, Max current 3A, 100~240V 100V~240V, Switch x 1 3A,50/60Hz POWER PSU Module PSU module with easy assembly installation design module x 1 MODULE Two holes Connect to the ground M4 x 2 Corning Optical Communications User Manual I LAN-3091-AEN I Page 23...
-
Page 24: Remote Units
DEU and the UE (User Equipment), enabling it to receive the operator service signals in CPRI format, transfer to RF signal and send to UE. Corning digital remote antenna units includes 2 power level types: dLRU/dMRU. Power levels vary from 20dBm to 40dBm to meet different coverage scenarios. The major functionalities include: ▪... - Page 25 The dLRU interfaces and the description are shown in Figure 22 and G2 (2 Fibers) capacity is 2x2 MIMO, total RF BW is 325MHz, which is greater than G1 (3 Fibers). For saving power consumption, port 3 is blocked and disabled. Corning Optical Communications User Manual I LAN-3091-AEN I Page 25...
- Page 26 Table 12. Corning Optical Communications User Manual I LAN-3091-AEN I Page 26...
- Page 27 2500 TDD dMRU-G2-25 2500 TDD 25Gbps dMRU-G2-35 3500 TDD 25Gbps dHRU-G2-6 10Gbps 700L dHRU-G2-7 700U 10Gbps FirstNet dHRU dHRU-G2-85 800/850MHz 10Gbps dHRU-G2-17 2100(EAWS) 10Gbps dHRU-G2-19 1900(PCS) 10Gbps dHRU-G2-23 2300(WCS) 10Gbps Corning Optical Communications User Manual I LAN-3091-AEN I Page 27...
- Page 28 Note: RU has 3 optical ports. G2 (2 Fibers) capacity is 2x2 MIMO, total RF BW is 325MHz, which is greater than G1 (3 Fibers). For saving power consumption, port 3 is blocked and disabled. Corning Optical Communications User Manual I LAN-3091-AEN I Page 28...
- Page 29 SFP optical port OP1/OP2 connection Indicating the operation status of the Status LED indicator STAT equipment Used for grounding the chassis and the GND interface earth, single hole Figure 23. dMRU Interfaces Corning Optical Communications User Manual I LAN-3091-AEN I Page 29...
- Page 30 Ethernet connection for the local setup Maintenance port LED indicator STAT The operation status of the equipment Power input port, voltage input range AC IN Power input port AC IN 100V~240V, 3A Corning Optical Communications User Manual I LAN-3091-AEN I Page 30...
-
Page 31: System Topology And Gain Assignment
The RIU high gain mode will add 30dB insert loss while switching to OFF status ▪ The DCU high gain mode will add 12dB insert loss while switching to OFF status Corning Optical Communications User Manual I LAN-3091-AEN I Page 31... - Page 32 THR) power -40 ~ -12 = 12dB - DCU -2dBm -12dBm -19dBm -14dBfs 12dB 0~20dB DL_ATT -40 ~ 0 = 0dB –DCU +10dBm 0dBm -7dBm -14dBfs 0~20dB DL_ATT Corning Optical Communications User Manual I LAN-3091-AEN I Page 32...
- Page 33 + -12=- -14dBfs 19 dBm power 19 dBm Rated -12 dBm =-14dBfs-(-12- power-(- -7dB -7+ PwrB PwrB PwrB) ~-15 dBm PwrB) Rated =-14dBfs-(-12- -15 dBm -7dB -22dBm -22dBm power- (-15))=-17dBfs Corning Optical Communications User Manual I LAN-3091-AEN I Page 33...
-
Page 34: System Installation
This chapter provides installation instructions for the system units. Refer to the specific elements required in your deployment: ▪ Headend, see 2.1 ▪ Remote Units Installation: dLRU, see 2.5. dMRU, see 2.6. Figure 25. The Installation Process Corning Optical Communications User Manual I LAN-3091-AEN I Page 34... -
Page 35: Headend Units - Architecture Example
2.1 Headend Units – Architecture Example Example: 2X2 MIMO, 1 Operator Figure 26. dLRU-FDD Architecture Image Figure 27.dLRU-TDD Architecture Image Corning Optical Communications User Manual I LAN-3091-AEN I Page 35... -
Page 36: Riu Installation
Ethernet Communication Cable DCU or RIU of next slave device DC Power Adapter HARDWARE – not provided 4 screws #8 or 4 mm (For attachment to rack) SOFTWARE Required TOOLS Cross Screwdriver Corning Optical Communications User Manual I LAN-3091-AEN I Page 36... -
Page 37: Mount The Riu
Note: RIU-FDD installation is the same as RIU-TDD installation 4 screws 4 screws Figure 28. RIU Rack Installation 1) Connect the RF cables on the chassis with M3 screws and sort out the RF cables. Corning Optical Communications User Manual I LAN-3091-AEN I Page 37... - Page 38 Figure 29. RIU Rack Installation with Cables Corning Optical Communications User Manual I LAN-3091-AEN I Page 38...
-
Page 39: Riu Cable Connection
PREV: Upper cascading port to Communication Communication communication DCU or upper level RIU NEXT: RIU/DCU port (RJ45 x 2) port (RJ45 x 2) cable Lower cascade port to other RIU 2.3 DCU Installation Corning Optical Communications User Manual I LAN-3091-AEN I Page 39... -
Page 40: Verify Box Contents
SFP+ Pluggable transceivers (hot-pluggable optical transceiver module) Support 24.3Gbps line rate, single-mode Optical cables Up to 10 km 1~14 LC/UPC SM DX SOFTWARE Required Tools Cross Screwdriver 2.3.2 Mount the DCU Corning Optical Communications User Manual I LAN-3091-AEN I Page 40... - Page 41 Figure 33. Installation Diagram of DCU in the Rack Step 3: Plug in the RF cable plug (RF cable not shown in the below). Figure 34. DCU RF Cable Plug Installation Corning Optical Communications User Manual I LAN-3091-AEN I Page 41...
-
Page 42: Dcu Cable Connection
See 2.1 for the installation example (2x2 MIMO). ➢ To install the HEU, follow these steps: ▪ Verify the box contents, see 2.4.1 ▪ Mount the DEU, see 2.4.2 ▪ Connect the DEU cable, see 2.4.3 Corning Optical Communications User Manual I LAN-3091-AEN I Page 42... -
Page 43: Verify Box Contents
(for attachment to ceiling) SFP+ Pluggable transceivers (hot-pluggable optical transceiver module) Support for 24.3Gbps line rate, single-mode Optical cables Up to 10 km LC/UPC SM DX SOFTWARE TOOLS Required Cross Screwdriver Corning Optical Communications User Manual I LAN-3091-AEN I Page 43... -
Page 44: Mount The Deu
2. Mount the DEU in the rack with 4 pcs of M6 screws. Figure 37.Rack Installation - Step 2 3. Install the DEU in the rack. Figure 38. Rack Installation - Step 3 Corning Optical Communications User Manual I LAN-3091-AEN I Page 44... -
Page 45: Deu Cable Connection
AC power US Type socket + cable Switch x 1 100V~240V, 1.3A- (100V- (indoor) (100V-240V,50Hz/60Hz) 0.6A,50Hz/60Hz 240V,50Hz/60Hz) dLRU/dMRU or DEU Fiber Cable Optical port Optical module Optical port DCU or DEU Corning Optical Communications User Manual I LAN-3091-AEN I Page 45... -
Page 46: Dlru Installation
Left side brackets for dual-unit configuration Right side brackets for dual-unit configuration dLRU-M/L/3.5 Unit Hinge Combiner – for dual unit configuration RF jumper cables DC power adapter Corning Optical Communications User Manual I LAN-3091-AEN I Page 46... -
Page 47: Mount The Dlru
3. Remove the rubber stopper from the SFP+ connector located in the dLRU cable port. Connect the SFP+ LC/UPC SM DX optic cable to the dLRU optic connector. Figure 40. Power Socket/optical ports in dLRU Corning Optical Communications User Manual I LAN-3091-AEN I Page 47... - Page 48 2) Mount the LRU on the bracket with 4 screws. Figure 42. 4 Screws ▪ For a dual unit: 1) Connect the combiner to the mounting bracket with 4 screws. Combiner in bracket Figure 43. Combiner in the Bracket Corning Optical Communications User Manual I LAN-3091-AEN I Page 48...
- Page 49 Tighten the M6 bracket screws on the left and right sides of the upper part of the dLRU, and then hang the device on the mounting bracket. Lock the device on the mounting frame with M6 combination screws, as shown below Figure 45. Single Unit Ceiling Installation Corning Optical Communications User Manual I LAN-3091-AEN I Page 49...
- Page 50 Drill holes on the ceiling at a distance of 200 mm*160 mm according to the size of the mounting holes of bracket, then drive the expansion bolts into the holes, install the mounting bracket, pad gaskets, and lock nuts, as shown in Figure 48. Corning Optical Communications User Manual I LAN-3091-AEN I Page 50...
- Page 51 Low-Band dLRU installation Tighten the M6 bracket screws on the left and right sides of the upper part of the dLRU, and then hang the device on the mounting bracket.. Corning Optical Communications User Manual I LAN-3091-AEN I Page 51...
- Page 52 Hang the combination of the left and right brackets with four M6 bracket screws, and then use M6×15 pentagonal combination screws to fasten the second dLRU. Figure 51. M6 Bracket Screw Holes Figure 52. dLRU Installation Diagram Corning Optical Communications User Manual I LAN-3091-AEN I Page 52...
- Page 53 M6 combination screws as shown in Figure 54. Figure 54. Diagram of Pole Installation for Single Unit Corning Optical Communications User Manual I LAN-3091-AEN I Page 53...
- Page 54 Finally, tighten the M6×15 pentagonal combination screws, as shown in the Figure below. Figure 55. Installation Diagram of the Combiner Figure 56. Installation Diagram of dLRU Pole Corning Optical Communications User Manual I LAN-3091-AEN I Page 54...
-
Page 55: Power+ Spf+ Cable
The voltage range of the device power supply is DC36V~57V. Remove the rubber plug from the SFP+ connector located in the LRU RF port. Connect the SFP+ LC/UPC SM DX optical cable to the LRU optical connector. Corning Optical Communications User Manual I LAN-3091-AEN I Page 55... - Page 56 Figure 59. Power Socket Figure 60. SFP+ Pluggable Transceivers Figure 61. SFP+ Cable Remove Rubber Plug from the Port and Insert the SFP+ Pluggable Transceivers (hot-pluggable optical transceiver module) into it. Corning Optical Communications User Manual I LAN-3091-AEN I Page 56...
-
Page 57: Connect The Ground And Antenna Cables
Crimp the ground in the barrel of the ground lug. Verify that the ground is securely attached to the ground lug by holding and gently pulling on it. ▪ Prepare the other end of the ground and connect it to an appropriate ground point. Figure 62. The Ground Corning Optical Communications User Manual I LAN-3091-AEN I Page 57... -
Page 58: Combiner Cables
(either low or mid band). 2.5.5 Combiner cables Connect the Antenna cables as the Figure shows below. Midband Combiner in the Low band bracket Combiner Figure 64. Combiner in the Bracket Corning Optical Communications User Manual I LAN-3091-AEN I Page 58... - Page 59 To avoid MIMO disruption, ensure that the antennas are connected correctly according to the combiner labels. ▪ There may be some configurations/use-cases which are not required for the combiner as there is only one type of the unit (either low or mid band). Corning Optical Communications User Manual I LAN-3091-AEN I Page 59...
-
Page 60: Verify Normal Operation
Status Description Green Power on or chip configuration process Green flashes (1 time/second) Normal operation Green flashes (2 times/second) Identify STAT Red flashes (1 time/second) Over temperature alarm Hardware alarm Corning Optical Communications User Manual I LAN-3091-AEN I Page 60... -
Page 61: Dmru Installation
SFP+ Pluggable Transceivers (hot-pluggable optical transceiver module); Support for option 8 line-rate 24.3 Gbps, single mode Optical cables Up to 10 km LC/UPC SM DX SOFTWARE Required TOOLS Phillips Screwdriver Corning Optical Communications User Manual I LAN-3091-AEN I Page 61... -
Page 62: Dmru Dimensions
Dimensions - with Fan Physical Dimensions Dimension (W x H x D) (approx. Inch 17 x 3.5 x 14.4 (440 x 88 x 365) (mm) Weight (approx. Lbs. 15 (6.8) (Kg) Corning Optical Communications User Manual I LAN-3091-AEN I Page 62... - Page 63 For each of the units connect the external cables as follows: ▪ Power, see 2.6.5 ▪ SFP+, see 2.6.6 ▪ Fan, see 2.6.7 2.6.5 Power Connect the AC wire to the dMRU connectors panel Corning Optical Communications User Manual I LAN-3091-AEN I Page 63...
- Page 64 Remove the rubber stopper from the SFP+ connector located in the dMRU CPRI port Connect the SFP+ LC/UPC SM DX optic cable to the dMRU optic connector. Figure 71. SFP Connector Figure 72.SPF and Optical Cable Corning Optical Communications User Manual I LAN-3091-AEN I Page 64...
Need help?
Do you have a question about the Everon 6000 G2 and is the answer not in the manual?
Questions and answers