Advertisement
Table of Contents
Technical Support and E-Warranty Certificate www.vevor.com/support
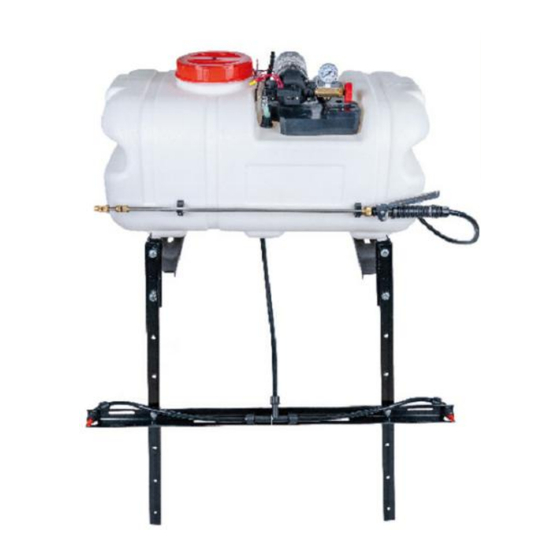
ATV SPRAYER
USER MANUAL
MODEL:BS60
We continue to be committed to provide you tools with competitive price.
"Save Half", "Half Price" or any other similar expressions used by us only represents an
estimate of savings you might benefit from buying certain tools with us compared to the major
top brands and does not necessarily mean to cover all categories of tools offered by us. You
are kindly reminded to verify carefully when you are placing an order with us if you are
actually saving half in comparison with the top major brands.
Advertisement
Table of Contents

Subscribe to Our Youtube Channel
Related Manuals for VEVOR BS60


Summary of Contents for VEVOR BS60
- Page 1 Technical Support and E-Warranty Certificate www.vevor.com/support ATV SPRAYER USER MANUAL MODEL:BS60 We continue to be committed to provide you tools with competitive price. "Save Half", "Half Price" or any other similar expressions used by us only represents an estimate of savings you might benefit from buying certain tools with us compared to the major top brands and does not necessarily mean to cover all categories of tools offered by us.
- Page 2 This is the original instruction, please read all manual instructions carefully before operating. VEVOR reserves a clear interpretation of our user manual. The appearance of the product shall be subject to the product you received. Please forgive us that we won't inform you again if...
-
Page 3: Safety Instructions
SAFETY INSTRUCTIONS Points for attention and warning 1. Warning!!! This product is designed to apply chemicals that may be harmful and could cause serious personal injury if inhaled or brought into contact with the user failure to read and follow owner's manual instructions before use and/or misuse of this product could result in unexpected failure with major injuries. - Page 4 FEATURES 1. Smooth and steam line appearance. The sprayer is ergonomically designed to conform to the human back making it easy to carry. 2. The sprayer comes with a mini diaphragm pump which is lightweight and compact, creating high pressure and extended service life. It features a pressure protection switch (micro switch) to protect the battery the supplied charging socket can be used as a 12-volt power supply in addition to a charging unit.
-
Page 5: Parts List
PARTS LIST PARTS LIST FILLER CAP LANCE FILTER BRASS NOZZLE TANK HOSE PUMP SWITCH PRESSURE GAGE HOOKS REGULATOR VALVE BUCKLE BRACKET1 BELTS BRACKET2 BATTERY CABLE SPRAY NOZZLE... -
Page 6: Assembly Step
ASSEMBLY STEP Step1 With the help of an Allen wrench, install BTACKET 7 on the left and right sides of the bottom of the TANK 3 with bolts. - Page 7 Step2 With the help of an open wrench, install BRACKET 8 on BRACKET 7 and secure it with bolts and nuts.
- Page 8 Step3 With the help of an open end wrench, install SPRAY NOZZLE 9 in a suitable position on BRACKET 8 and secure it with bolts and nuts...
- Page 9 Step4 Tighten the PRESSURE GAGE 5 to the upper end of REGULATOR VALVE 6, wrap the thread with raw tape to prevent water leakage, connect the outlet pipe connector to the corresponding port on REGULATOR VALVE 6, and tighten the connector.
- Page 10 Step5 Connect BRASS NOZZLE 11 and SWITCH 13 and LANCE 10 respectively to form a complete spray gun. Step6 Connect and tighten the joint of the tail of the spray gun assembled by step5 and the other end of the water outlet, to complete the installation of the ATV sprayer.
- Page 11 Step7 Install the HOOK 14 to one end of the BELT 16 and pass the other end through the BUCKLE 15.
- Page 12 Step8 The TANK 3 is securely secured to the ATV with tightening BELTS 16 and the BUCKLES 15 and HOOKS 14.
- Page 13 Step9 Tighten the BATTERY CABLE 17 respectively on the positive (red) and negative (black) poles of the battery, and then connect the plug on the end of BATTERY CABLE17 and the connector of the sprayer to use it normally.
-
Page 14: Product Parameter
PRODUCT PARAMETER Package size(mm) 810×418×425 Size(mm) 700×370×415 N.W(kg) 12.15 G.W(kg) 14.2 Working Voltage DC12V Capacity 60 L Flow 7.2L/min Pump Diaphragm pump Pump power 150W working pressure(MPa) 0.1-0.5 Max pressure(MPa) Pressure gauge range 0~1.0MPa Life span 5 years Made In China... - Page 16 Technical Support and E-Warranty Certificate www.vevor.com/support...
Need help?
Do you have a question about the BS60 and is the answer not in the manual?
Questions and answers