Table of Contents
Advertisement
Quick Links
Advertisement
Table of Contents

Related Manuals for Yolink YS5003-UC


Summary of Contents for Yolink YS5003-UC
- Page 1 Valve Controller 2 YS5003(S)-UC Installation & User Guide Revision Feb. 22, 2024...
-
Page 2: Table Of Contents
TABLE OF CONTENTS . Welcome! . Before You Begin . In the Box . Required Items . Get to Know Your Valve Controller 2 . Power Up . Install the App . Add Your Valve Controller 2 to the App . -
Page 3: Welcome
Welcome! Thank you for purchasing YoLink products! We appreciate you trusting YoLink for your smart home & automation needs. Your 100% satisfaction is our goal. If you experience any problems with your installation, with our products or if you have any questions that this manual does not answer, please contact us right away. -
Page 4: Before You Begin
QR code: Your Valve Controller 2 wirelessly connects to the internet via a YoLink Hub, and it does not directly connect to your WiFi or local network. In order for remote access to the device. from the app, and for full-functionality, a YoLink hub is required. -
Page 5: In The Box
In the Box YS5003(S) Items: Valve Controller 2 Plug-in Power Supply Phillips Head Screws(3) 4 x AA Batteries (Pre-Installed) Quick Start Guide... -
Page 6: Required Items
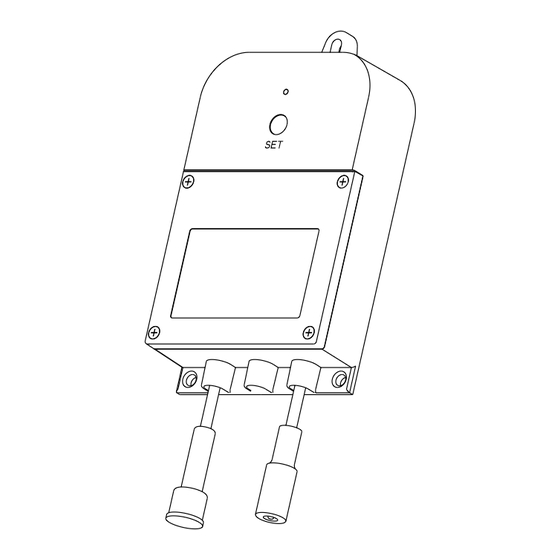
Required Items These tools or items may be required: Wall Anchors Drill with Drill Bits Medium Phillips Screwdriver... - Page 7 Get to Know Your Valve Controller 2 Keyhole Mounting Slot Status LED (See LED Behaviors, Below) SET Button Battery Housing Cover Mounting Hole Valve Control/Status Cable 12VDC Input Cable LED Behaviors Blinking Red Once, Slow Blinking Green Then Green Once Twice Device Start-Up Connecting to Hub...
-
Page 8: Power Up
Power Up Power up the Valve Controller 2 by briefly pressing the SET button, until the LED flashes (red, then green). SET button... -
Page 9: Install The App
Install the App If you are new to YoLink, please install the app on your phone or tablet, if you have not already. Otherwise, please proceed to the next section. Scan the appropriate QR code below or find the “YoLink app” on the appropriate app store. -
Page 10: Add Your Valve Controller 2 To The App
Add Your Valve Controller 2 to the App 1. Tap Add Device (if shown) or tap the scanner icon: Scanner icon 2. Approve access to your phone’s camera, if requested. A viewfinder will be shown on the app. 3. Hold the phone over the QR code so that the code appears in the viewfinder. - Page 11 Add Your Valve Controller 2 to the App, Continued 4. You can change the device name and assign it to a room later. Tap Bind device. 5. If successful, the screen will appear as shown. Tap Done.
-
Page 12: Install The Valve Controller 2
Install the Valve Controller 2 Preparing for installation: Determine where you will mount the valve controller. The Valve Controller 2 was designed to be wall-mounted, at an indoor or outdoor location. If installing your Valve Controller 2 and/or valve device at an outdoor location, please first refer to the environmental range specifications, found on the Valve Controller 2 product support page of our website. - Page 13 Install the Valve Controller 2, Continued With the use of optional extension cables, the valve controller can be installed remotely from the Valve Operator or motorized valve. In some cases this may allow placing the controller at a more convenient or more accessible location (for battery replacement, etc.).
- Page 14 Install the Valve Controller 2, Continued 3. Insert a screw in the top mounting hole location, but do not screw it flush with the wall; leave space on the end of the screw for the valve controller. 4. Hang the valve controller on this screw, and it should be level on the wall.
-
Page 15: App Functions: Device Screen
App Functions: Device Screen In the app, tap on your Valve Controller 2 icon. Your Valve Controller 2 main screen should be similar to the one shown below. Tap to Exit This Screen Device Name Tap for Contact & Support Resources Tap for Device Details Screen... -
Page 16: App Functions: Device Details Screen
Tap to sync with mobile Model Number Device EUI Unique Identifier Number Device Serial Number Signal Intensity (From YoLink Hub) Battery Firmware Revision (Refer to page 25) Remove Device from Current Account Tap to delete the device from your YoLink account... -
Page 17: App Functions: Schedule
App Functions: Schedule Tap to add a schedule Valve Tap to edit the schedule Tap to enable or disable a schedule Swipe left to show Edit and Delete options You can have a maximum 6 schedules at one time. The schedule runs on the device (no internet connection required). -
Page 18: App Functions: Timer
App Functions: Timer Turn On After Valve Slide to enable/disable Turn Off After Valve Slide to enable/disable Set the duration When enabled, the Valve will close after this timer duration has elapsed Set the duration When enabled, the Valve will open after this timer duration has elapsed The timer starts when the settings are saved (by... -
Page 19: App Functions: Alarm Strategy Screen
App Functions: Alarm Strategy Screen You can set up notifications in Alarm Strategy settings, make sure you have enabled App, Email, SMS notification from the app->Menu->Settings->Account Settings->Advanced Settings, and verified your email address and added your phone number in the app. Strategy Name Tap to edit the name Related Devices... - Page 20 All, if desired to send to all members Send SMS Tap to select Admin to enable limited text messages, select All, if desired to send to all members Trigger Action Tap to choose trigger actions (YoLink sirens, YoLink SpeakerHubs, scene)
-
Page 21: App Functions: Automation
App Functions: Automation The Valve Controller 2 can be set up as a condition in an automation. Tap to save the settings Edit the name of the automation Tap to set a condition for the automation Add behavior Tap to add a behavior Delete the behavior Tap to sort behaviors Always Working... -
Page 22: Troubleshooting
Troubleshooting Problem: The valve controller is offline Possible Solutions: Ensure the Valve Controller 2 is on. Repeat the Power Up section steps, if needed Replace the batteries Problem: The valve controller does not respond to the SET button being pressed and/or the EVO Valve Operator is unresponsive Possible Solutions: Ensure the Valve Controller 2 is on. -
Page 23: Control-D2D
YoLink Control-D2D is our unique device-to-device control technology. Using Control-D2D, compatible YoLink devices can control or be controlled by other YoLink devices, without a hub or internet connection. One device can control another device, directly. A device that controls or sends out commands is called the controller. - Page 24 Control D2D, Continued Pairing 1. To configure a Water Leak Sensor 1 as a controller, press and hold the leak sensor’s SET button for 5-10 seconds, until the LED quickly blinks green, then release the button. SET Button (5-10 seconds) 2.
- Page 25 Control D2D, Continued Testing 1. Ensure the valve is in the normal (open) position. 2. Test the water leak sensor (if needed, refer to the sensor user guide for testing instructions). 3. Verify that the valve closes immediately when the leak sensor is activated. Unpairing 1.
-
Page 26: Factory Reset
Factory Reset Factory reset will erase device settings and restore it to factory default settings. Doing a factory reset will not remove the device from your account and it will not harm the device, or lose any data or require you to redo your automations, etc. -
Page 27: Firmware Update
Firmware Update Your YoLink products are constantly being improved, with new features added. It is periodically necessary to make changes to your device's firmware. For optimal performance of your system, and to give you access to all available features for your devices, these firmware updates should be installed when they... -
Page 28: Battery Replacement
Battery Replacement 1. Using a Phillips screwdriver, loosen the four battery cover screws, and remove the battery compartment cover. 2. Remove all four batteries. - Page 29 Battery Replacement, Continued 3. Observing the correct battery position and polarity, replace them with new AA batteries 4. Replace the battery compartment cover and tighten the screws. 5. In the app, verify the Valve Controller 2 is online and the batteries are indicated as good. The Valve Controller 2 can be powered by alkaline or lithium-ion batteries.
-
Page 30: Warnings
Warnings Please install, operate and maintain the Valve Controller 2 (and Motorized Valve or EVO Valve Operator or valve operator) only as outlined in this manual. Improper installation or use may damage the unit and/or void the warranty. Do not install or use the device outside of the temperature and humidity range listed in the environmental specifications. - Page 31 Warnings, Continued Power the controller only with new AA alkaline or lithium-ion batteries. Do not use rechargeable batteries, do not use other type batteries (e.g. zinc blend). Do not mix old and new batteries. If storing the controller for extended periods, remove the batteries.
-
Page 32: Warranty
Warranty 1 Year Limited Mechanical Device Warranty 2 Year Limited Electrical Device Warranty YoSmart warrants to the original user of this product that it will be free from defects in materials and manufacturing workmanship, under normal use, for 1 year from the date of purchase for motorized valves,valve operator and the EVO Valve Operator and for 2 years from the date of purchase for the Valve Controller 2. -
Page 33: Fcc Statement
FCC Statement This device complies with part 15 of the FCC Rules. Operation is subject to the following two conditions: (1) This device may not cause harmful interference, and (2) this device must accept any interference received, including interference that may cause undesired operation. - Page 34 RF exposure requirement. The device can be used in portable exposure condition without restriction. PRODUCT NAME: VALVE CONTROLLER 2 PARTY: YOSMART, INC. TELEPHONE: 831-292-4831 MODEL NUMBER: YS5003-UC ADDRESS: 25172 ARCTIC OCEAN DRIVE, SUITE 106 LAKE FOREST, CA 92630 USA EMAIL: SERVICE@YOSMART.COM...
-
Page 35: Ic Statement
IC Caution -English: This device complies with Industry Canada licence-exempt RSS standard(s). Operation is subject to the following two conditions: (1) This device may not cause interference, and (2) This device must accept any interference, including interference that may cause undesired operation of the device. -
Page 36: Contact Us
Support Home Page Finally, if you have any feedback or suggestions for us, please email us at feedback@yosmart.com Thank you for trusting YoLink! YoLink Customer Support 25172 Arctic Ocean Drive, Suite 106 Lake Forest, CA 92630 © 2024 YOSMART INC. CALIFORNIA, USA...
Need help?
Do you have a question about the YS5003-UC and is the answer not in the manual?
Questions and answers