
Related Manuals for Yolink YS4102-UC


Summary of Contents for Yolink YS4102-UC
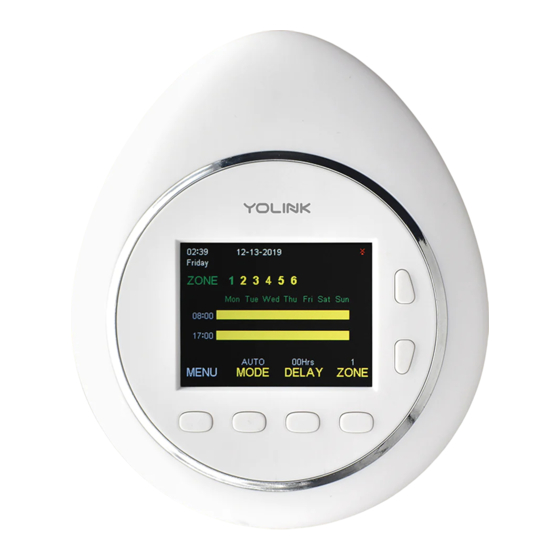
- Page 1 User Guide YS4102-UC 09:35 AM 11-01-2019 Wednesday ZONE 1 2 3 4 5 6 08:00 A 05:00 P AUTO 00Hrs MENU MODE DALAY ZONE Smart Sprinkler Controller...
-
Page 2: Table Of Contents
Set Up mart Sprinkler Controller····················· ················· ··· ···· ·5 · Install the S mart Sprinkler Controller ·············································9 Using YoLink A with mart Sprinkler Controller ···························15 Set the Smart Sprinkler Controller··············································22 Maintaining the Smart Sprinkler Controller ·········· ···· ········· ········36 ·... -
Page 3: What's In The Box
What’s In The Box Wall Screw * 4 Drywall Anchor * 4 1 2 3 4 5 6 M C C R Smart Sprinkler Controller * 1 Quick Start Guide * 1 Backplate * 1... -
Page 4: Product Required
Product Required (not included) Electric Screwdriver YoLink Hub A smartphone or tablet Screwdriver (Connecting to internet) running iOS 9.0 or higher; Android 4.4 or higher) -
Page 5: Introduction
Introduction YoLink Smart Sprinkler Controller replaces old controller, just a tap of the button on the device or YoLink App lets you remotely access, change or set your watering schedules at anytime anywhere. Only 2 schedules per day in weekly for 4 seasons are allowed. Maximum 6 zones and 1 master valve (not all systems have a master valve) can be connected to Smart Sprinkler Controller. -
Page 6: Features
- Will not run watering during delay time. - Automatically delay watering in rainy days according to the ECO setting. - Set up rules for “If this then do that” function via YoLink App. If the triggered Automation condition is met, then action device will run automatically according to the setting. -
Page 7: Set Up Mart Sprinkler Controller
Set Up Smart Sprinkler Controller Follow the steps below to set up your Smart Sprinkler Controller via YoLink App. Step 1: Set up YoLink App Download the YoLink App from the Apple App Store or Google Play. - Page 8 Step 2: Log in or sign up with YoLink account Open the App. Log in your YoLink account. If you don’t have a YoLink account, tap Sign up for an account and follow the steps to sign up an account.
- Page 9 - Choose a room for Smart Sprinkler Controller. c. Favourite - Click “ ” icon to add/remove from Favourite. Tap the “Bind Device” to add the device to your YoLink account. Note Please add your Smart Sprinkler Controller to YoLink App first before...
- Page 10 Step 4: Connect to the cloud Power on the Smart Sprinkler Controller and your device will connect to the cloud automatically. Note Make sure your hub is connected to internet either wired or wireless. Internet 09:35 AM 11-01-2019 Wednesday ZONE 1 2 3 4 5 6 Cloud 08:00 A...
-
Page 11: Install The Smart Sprinkler Controller
Install the Smart Sprinkler Controller Step 1: Turn off power This protects you and avoids blowing a fuse in your equipment. Press any button on your old sprinkler controller to make sure your system is off. Turn off the power... - Page 12 Step 2: Remove the old Photograph the wiring inside your existing controller to reference during installation. Remove your old controller from the wall. Photograph wiring Remove the old...
- Page 13 Step 3: Mount the backplate M o u n t t h e b a c k p l a t e b y s c r e w i n g i t o n t o t h e w a l l u s i n g t h e p r o v i d e d s c r e w s . Wa l l a n c h o r s a r e i n c l u d e d f o r d r y w a l l .
- Page 14 Step 4: Connect your wires While referencing the photo of your previous wiring, insert the wires into the appropriate terminals. Connect the wires in ordered to make sure your controller works well. Live Wires. Live Wires are often labeled “R” or “Live”. You can insert them into any of the “R”...
- Page 15 Wiring diagram 24V AC Adapter 24V AC Output 24V AC Common Wire (C) 24V AC Live Wire (R) Common Wire (C) 1 2 3 4 5 6 M C C R Zone 1 (1) Common Wire (C) Zone 2 (2) Master Valve (M) Zone 3 (3) Zone 6 (6)
- Page 16 Step 5: Install the new and turn on power Gently push the new, wired sprinkler controller back onto the backplate and turn power Note Only 24V AC power access is supported. Install the new Turn on the power...
-
Page 17: Using Yolink A Pp With Mart Sprinkler Controller
Using YoLink App with Smart Sprinkler Controller Controls Show you the current watering mode and progress of watering for each zone. There will be a green leaf on the screen when ECO mode is on. - Page 18 - Check the history log for the Smart Sprinkler Controller. f. Delete - Current device will be remove from your YoLink account. Tap the “Smart Sprinkler Controller” in App to go to its controls. Tap the “ ” icon at the top-right corner to go to details.
- Page 19 Mode You can set watering mode according to your need. Tap the “Smart Sprinkler Controller” in App to go to its controls. Tap “Mode” to switch mode: Auto, Manual, Off. a . A u t o - D i s p l a y t h e l a t e s t w a t e r i n g a n d n e x t w a t e r i n g s c h e d u l e . b.
- Page 20 Schedule You can set 2 schedules per day in weekly for each season. Tap the “Smart Sprinkler Controller” in App to go to its controls. Tap “Schedule” and select “Edit Schedule” to open the Edit Schedule screen. Within the schedule screen, set start date and two watering time a day for the season, duration of watering, and repeating frequency.
- Page 21 Delay Delay watering is available only in auto watering mode. Sprinkler controller will not run schedules during the delay time. You can set delay time according to your need. Tap the “Smart Sprinkler Controller” in App to go to its controls. Tap “Delay”...
- Page 22 ECO will help you to save money by delay watering automatically if it rains in the day with one hour local weather checks. Tap the “Smart Sprinkler Controller” in App to go to its controls. Tap “ECO” to open the ECO screen. Click “...
- Page 23 Automation A u t o m a t i o n a l l o w s y o u t o s e t u p “ I f t h i s t h e n d o t h a t ” r u l e s s o t h e d e v i c e s c o u l d a c t a u t o m a t i c a l l y.
-
Page 24: Set The Smart Sprinkler Controller
Set the Smart Sprinkler Controller HOME Display the date & time, network signal, available zones, watering days, watering time, running mode and delay watering time. 09:35 AM 11-01-2019 09:35 AM 11-01-2019 Wednesday Wednesday ZONE 1 2 3 4 5 6 ZONE 1 2 3 4 5 6 08:00 A... - Page 25 MENU You can set watering setting, date & time, season define, display, factory reset, and check device information. a. Watering Setting - Set zone max, watering time max, watering days, watering time and manual watering time. b. Date & Time - Set time for your sprinkler controller.
- Page 26 Watering Setting a. General - Set the number of available zone (1-6, default is set to be 6), maximum watering time (0-99 minutes, default is set to be 60 minutes). Select Watering Setting, tap ENTER to enter the Watering Setting screen. Select General, tap ENTER to enter the General screen.
- Page 27 b. Watering Days - Enable or disable watering schedules at the day in the season. Select Watering Setting, tap ENTER to enter the Watering Setting screen. Select Watering Days, tap ENTER to enter the Watering Days screen. Tap “ ” and “ ”...
- Page 28 c. Watering Time - Set 2 schedules per day for each zone in each season. Select Watering Setting, tap ENTER to enter the Watering Setting screen. Select Watering Time, tap ENTER to enter the Watering Time screen. Tap Zone to switch zones. Tap “...
- Page 29 d. Manual Watering - Set manual watering time for each available zone. Select Watering Setting, tap ENTER to enter the Watering Setting screen. Select Manual Watering, tap ENTER to enter the Manual Watering screen. Tap “ ” and “ ” to switch settings. Tap “...
- Page 30 Date & Time You can set time for your sprinkler controller. When auto update is on, date & time will update automatically. When auto update is off, date & time will run according to your settings. Select Date & Time, tap ENTER to enter the Date & Time screen. Tap “...
- Page 31 Season Define You can set start date for each season. Select Season Define, tap ENTER to enter the Season Define screen. Tap “ ” and “ ” to switch settings. Tap “ ” and “ ” to adjust values. Tap DONE to save the setting. Tap BACK to cancel the setting. Menu Selection Season Define Watering Setting...
- Page 32 Display You can set BG color, brightness or BL timeout. Select Display, tap ENTER to enter the Display screen. Tap “ ” and “ ” to switch settings. Tap “ ” and “ ” to adjust values. Tap DONE to save the setting. Tap BACK to cancel the setting. Menu Selection Display Display...
- Page 33 Factory Reset Factory reset will erase all your settings and bring it back to default. After the factory reset, your device will still in your Yolink account. Network reset will manually let your device connect to the cloud. Select Factory Reset, tap ENTER to enter the Factory Reset screen.
- Page 34 About Display information about YoSmart Inc. and your sprinkler controller. Select About, tap ENTER to enter the About screen. Tap “ ” and “ ” to switch settings. Tap BACK to back to MENU. Menu Selection YoSmart Inc. Date & Time YoSmart - Make your life easier Season Define Smart Sprinkler Controller...
- Page 35 MODE You can set watering mode according to your need. a . A u t o - A u t o w a t e r i n g a c c o r d i n g t o w a t e r i n g s e t t i n g s . b.
- Page 36 DELAY Delay watering is available only in auto watering mode with 7 delay watering options. No watering will be carried out during delay time. Tap DELAY to switch delay watering time. 09:35 AM 11-01-2019 09:35 AM 11-01-2019 Wednesday Wednesday ZONE 1 2 3 4 5 6 ZONE 1 2 3 4 5 6...
- Page 37 ZONE Switch to view watering progress for each zone. Tap ZONE to switch zone. 09:35 AM 11-01-2019 09:35 AM 11-01-2019 Wednesday Wednesday ZONE 1 2 3 4 5 6 ZONE 1 2 3 4 08:00 A 08:00 A 05:00 P 05:00 P AUTO 00Hrs...
-
Page 38: Maintaining The Smart Sprinkler Controller
Maintaining the Smart Sprinkler Controller Firmware Update To ensure our customer have the best user experience, we highly recommend you could update our newest version firmware. Tap the “Smart Sprinkler Controller” in App to go to its controls. Tap the “ ”... -
Page 39: Specifications
Factory Reset Please refer to the Factory Reset in Set the Smart Sprinkler Controller part. Specifications Voltage: 24V AC Environment: Working Temperature: -10°C~50°C (14°F~122°F) Working Humidity: 0%~100% non-condensing... -
Page 40: Troubleshooting
Troubleshooting Problem Possible Reason Solution Please reconnect your hub to the Internet Hub is offline. and refer to the Factory Reset in Set the Smart Sprinkler part to manually let your device connect to the cloud if your sprinkler controller is failed to connect to the cloud automatically. -
Page 41: Warning
WARNING This product is powered by AC24V only. Please do not connect the product to the high or wrong voltage. Keep away from high temperature or fire. Keep away from dusty, wet or dirty. This product is not waterproof, please keep it dry. To avoid dust entering the product and affect the usage of the product, do not use strong chemicals or cleaning agents to clean this product, please use a clean, dry cloth to wipe this product. -
Page 42: Customer Service & Warranty
If you are unable to get your smart sprinkler controller working Please contact Our Customer Service during business hours US Live Tech Support: 1-949-825-5958 M-F 9am - 5pm PST Email: support@YoSmart.com YoSmart Inc. 17165 Von Karman Avenue, Suite 105, Irvine, CA 92614 WARRANTY 1 Year Limited Electrical Warranty YoSmart warrants to the original residential user of this product that it will be free from defects in materials... - Page 43 FCC Statement This equipment has been tested and found to comply with the limits for a Class B digital device, pursuant to part 15 of the FCC Rules. These limits are designed to provide reasonable protection against harmful interference in a residential installation. This equipment generates, uses and can radiate radio frequency energy and, if not installed and used in accordance with the instructions, may cause harmful interference to radio communications.
- Page 44 FCC RF Radiation Exposure Statement This equipment complies with FCC RF radiation exposure limits set forth for an uncontrolled environment. This device and its antenna must not be co-located or operating in conjunction with any other antenna or transmitter. “To comply with FCC RF exposure compliance requirements, this grant is applicable to only Mobile Configurations.
Need help?
Do you have a question about the YS4102-UC and is the answer not in the manual?
Questions and answers