Table of Contents
Advertisement
Available languages
Available languages
Quick Links
H-9272
POWERED
STAIR CLIMBER
2
4
5
6
7
8
9
10
11
WARNING! Ensure no one is below the unit on
the stairs.
• Always secure load with appropriate accessories.
• Never reach into lifting mechanism with battery
installed.
• Always remove battery when unit is not in use,
during transit and prior to maintenance procedures
to prevent accidental operation.
• Always use included battery charger to charge
battery.
PAGE 1 OF 19
1-800-295-5510
uline.com
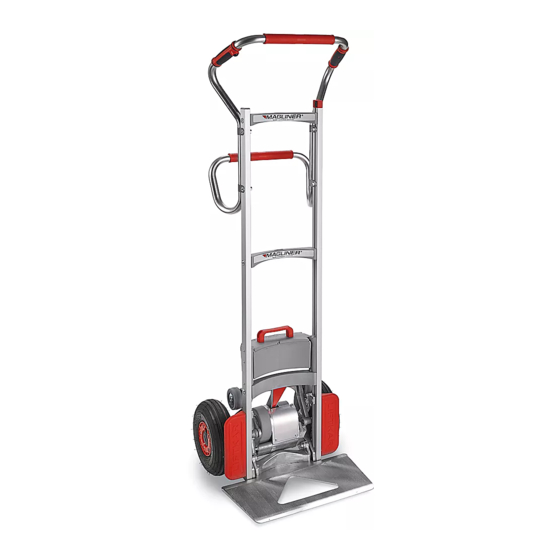
PARTS
1
3
16
15
14
13
12
SAFETY
Pour le français, consulter les pages 14-19.
PARTS
#
DESCRIPTION
1
Upper Handle
2
Red Handle Grips and O-Rings
3
Round-Up Switch
4
Control Box
5
Lower Handle
6
Upper Crossbar
7
Snap-On Battery
8
Plug Socket
9
Safety Flap
10
Small Gray Wheel
11
Swing Arm
12
Main Wheel
13
Nose Plate
14
Wheel Guard
15
Drive Unit
16
Main Switch
• Never use battery charger to charge NiCd, NiMH
batteries, or primary cells. Battery charger is
designed to charge lead storage batteries filled
with liquid gel and AGM (absorbed glass mat)
electrolytes only.
• Only use charging unit if protected from direct
sunlight and moisture.
• During normal operation, locking hooks securely
hold battery. A strong, vertical pull is required to
remove it. Moving backward very quickly and
striking a high step or similar equipment abuse
could result in battery ejecting from its location.
Para Español, vea páginas 7-13.
QTY.
1
2
1
1
1
1
1
1
1
2
1
2
1
2
1
1
0524 IH-9272
Advertisement
Table of Contents

Related Manuals for U-Line H-9272


Summary of Contents for U-Line H-9272
- Page 1 Para Español, vea páginas 7-13. Pour le français, consulter les pages 14-19. H-9272 1-800-295-5510 uline.com POWERED STAIR CLIMBER PARTS PARTS DESCRIPTION QTY. Upper Handle Red Handle Grips and O-Rings Round-Up Switch Control Box Lower Handle Upper Crossbar Snap-On Battery Plug Socket...
-
Page 2: Charger Safety
SAFETY CONTINUED CHARGER SAFETY • Only charge batteries that comply with EN directives and show a CE or GS mark. WARNING! Explosive gases. Protect from fire and sparks. • Charger unit is designed exclusively for charging lead acid batteries containing liquid, gel-type and •... -
Page 3: Control Box
CONTROLS CONTINUED CONTROL BOX SAFETY BEEP For use in high traffic areas. INDICATOR LIGHT • To turn on, press and hold ascend/descend button • Constant Green: Unit is in ascend mode and for approximately 30 seconds until unit beeps. round-up switch in upper handle is active. Lifting mechanism operates when round-up switch is •... -
Page 4: Operation
CONTROLS CONTINUED BATTERY HOLDER WITH AC CHARGER COMPENSATION/TRICKLE CHARGING When battery is fully charged, charging unit switches to CHARGING: compensation/trickle charge. 1. Connect charging unit to battery. • When LED is constant green: Battery is fully charged. 2. Turn battery on by main switch on battery. NOTE: Charger can be left connected to the battery after full charge without risk of 3. -
Page 5: Descending Stairs
OPERATION CONTINUED 4. As main wheels rest on stair, immediately pull unit • During descent, indicator light changes to constant back to touch rise of next step up. red. After reaching descend position, indicator light changes back to flashing green. CAUTION! Holding unit too flat on stairs may result in partially trapping support wheels •... -
Page 6: Load Balance
OPERATION CONTINUED LOAD BALANCE • To eliminate any major forward movements, lower unit backward about 15° before support wheels • When ascending, load balance changes as soon begin to lift. as support wheels start lifting load. CAUTION! Once battery is discharged, unit goes into overload even with loads below •... - Page 7 H-9272 800-295-5510 uline.mx DIABLITO ELÉCTRICO CON ADITAMENTO PARA ESCALERAS PARTES PARTES DESCRIPCIÓN CANT. Asa Superior Agarraderas Rojas y Tóricos Interruptor de Reanudación Caja de Control Asa Inferior Barra Transversal Superior Batería a Presión Enchufe Pestaña de Seguridad Llanta Gris Pequeña...
-
Page 8: Seguridad Del Cargador
CONTINUACIÓN DE SEGURIDAD SEGURIDAD DEL CARGADOR • Solo cargue baterías que cumplan con las directrices EN y muestren una marca de CE o GS. ¡ADVERTENCIA! Gases explosivos. Proteja del • La unidad del cargador está diseñada fuego y chispas. exclusivamente para cargar baterías de ácido de •... -
Page 9: Caja De Control
CONTINUACIÓN DE CONTROLES CAJA DE CONTROL SONIDO DE SEGURIDAD LUZ INDICADORA Para uso en áreas de alto tráfico. • Para encender, presione y mantenga presionado • Verde Fijo: La unidad está en modo de ascenso el botón de ascenso/descenso durante y el interruptor de reanudación del asa superior aproximadamente 30 segundos hasta que la está... - Page 10 CONTINUACIÓN DE CONTROLES • La temperatura óptima para cargar la batería es de INDICADOR DEL ESTADO DE CARGA 18°-24°C (68°-77°F). Las temperaturas fuera de este La luz LED indicadora del cargador muestra el estado rango pueden reducir la capacidad de la batería. de carga.
- Page 11 CONTINUACIÓN DE FUNCIONAMIENTO 4. Mientras las llantas principales descansan 3. Cuando las llantas principales aterrizan en el escalón sobre la escalera, jale la unidad hacia atrás inferior, las llantas de apoyo giran automáticamente inmediatamente para tocar la elevación del a la posición de descenso para bajar al siguiente siguiente escalón.
- Page 12 CONTINUACIÓN DE FUNCIONAMIENTO CARGAR EQUILIBRIO DE LA CARGA ¡IMPORTANTE! No sobrecargue la unidad. • Al ascender, el equilibrio de la carga cambia tan Exceder la capacidad de carga activa el pronto como las llantas de apoyo comienzan a modo de sobrecarga, lo que hace que levantarla.
-
Page 13: Especificaciones
ESPECIFICACIONES BATERÍA ADITAMENTO PARA ESCALERAS Fusible Interno para Apagones Capacidad 171 kg (375 lbs.) Fusible (30 amperios) Velocidad Máxima (Escalones/Min) Enchufe para Cargador Entrada DC ø 2.1 x 9.5 Peso sin Batería 16 kg (35 lbs.) Peso 4 kg (9 lbs.) Alto Máximo del Escalón 20 cm (8") Capacidad... - Page 14 H-9272 1 800 295-5510 uline.ca MONTE-ESCALIER MOTORISÉ PIÈCES PIÈCES DESCRIPTION QTÉ Poignée supérieure Poignées rouges et joints toriques Interrupteur rond Boîtier de commande Poignée inférieure Barre transversale supérieure Batterie amovible Fiche de connexion Rabat de sécurité Roulette grise Bras pivotant...
-
Page 15: Sécurité Du Chargeur
SÉCURITÉ SUITE • En fonctionnement normal, les crochets de • Ne laissez pas les enfants ou les personnes verrouillage maintiennent la batterie en toute invalides utiliser des appareils électriques sans sécurité. Une forte traction verticale est nécessaire surveillance et sans formation adéquate. pour l'enlever. -
Page 16: Commandes Suite
COMMANDES SUITE BOÎTIER DE COMMANDE SIGNAL SONORE DE SÉCURITÉ À utiliser dans les zones à forte circulation. VOYANT LUMINEUX • Pour l'activer, appuyez longuement sur le bouton • Vert continu : L'appareil est en mode de montée et de montée/descente pendant environ 30 secondes l'interrupteur rond situé... -
Page 17: Installation
COMMANDES SUITE • La température optimale pour recharger la batterie AFFICHAGE DE L'ÉTAT DE CHARGE est entre 18 et 24 °C (68 et 77 °F). Les températures L'affichage DEL sur le chargeur indique l'état de charge. en dehors de cette plage peuvent réduire la capacité... - Page 18 FONCTIONNEMENT SUITE 4. Lorsque les roues principales reposent sur l'escalier, • Pendant la descente, le voyant lumineux passe au rouge continu. Après avoir atteint la position tirez immédiatement l'appareil vers l'arrière pour de descente, le voyant lumineux repasse au vert toucher la prochaine contremarche.
-
Page 19: Spécifications
FONCTIONNEMENT SUITE ÉQUILIBRAGE DES CHARGES • Pour éliminer tout mouvement important vers l'avant, abaissez l'appareil vers l'arrière d'environ 15° avant • En montée, l'équilibre de la charge change dès le soulèvement des roues de support. que les roues de support commencent à soulever la MISE EN GARDE! Une fois la batterie déchargée, charge.
Need help?
Do you have a question about the H-9272 and is the answer not in the manual?
Questions and answers