Table of Contents
Advertisement
Available languages
Available languages
Quick Links
H-9272
POWERED
STAIR CLIMBER
2
4
5
6
7
8
9
10
11
WARNING! Ensure no one is below the unit on
the stairs.
• Always secure load with appropriate
accessories.
• Never reach into lifting mechanism with
battery installed.
• Always remove battery when unit is not in
use, during transit and prior to maintenance
procedures to prevent accidental operation.
PAGE 1 OF 18
1-800-295-5510
uline.com
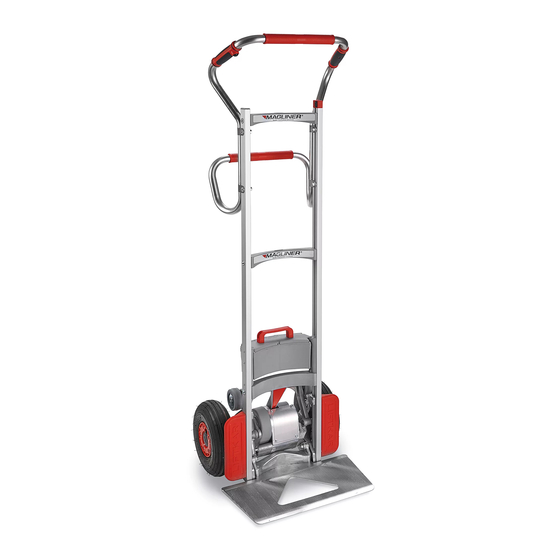
PARTS
1
3
16
15
14
13
12
SAFETY
Pour le français, consulter les pages 13-18.
PARTS
#
DESCRIPTION
1
Upper Handle
2
Red Handle Grips and O-Rings
3
Round-Up Switch
4
Control Box
5
Lower Handle
6
Upper Crossbar
7
Snap-On Battery
8
Plug Socket
9
Safety Flap
10
Small Gray Wheel
11
Swing Arm
12
Main Wheel
13
Nose Plate
14
Wheel Guard
15
Drive Unit
16
Main Switch
• Always use included battery charger to
charge battery.
• Never use battery charger to charge NiCd,
NiMH batteries or primary cells. Battery
charger is designed to charge lead storage
batteries filled with liquid gel and AGM
(absorbed glass mat) electrolytes only.
• Only use charging unit if protected from direct
sunlight and moisture.
Para Español, vea páginas 7-12.
QTY.
1
2
1
1
1
1
1
1
1
2
1
2
1
2
1
1
0321 IH-9272
Advertisement
Table of Contents

Subscribe to Our Youtube Channel
Related Manuals for U-Line Magliner H-9272

Summary of Contents for U-Line Magliner H-9272
- Page 1 Para Español, vea páginas 7-12. Pour le français, consulter les pages 13-18. H-9272 1-800-295-5510 uline.com POWERED STAIR CLIMBER PARTS PARTS DESCRIPTION QTY. Upper Handle Red Handle Grips and O-Rings Round-Up Switch Control Box Lower Handle Upper Crossbar Snap-On Battery Plug Socket Safety Flap Small Gray Wheel Swing Arm...
-
Page 2: Safety Flap
CONTROLS SAFETY FLAP CONTROL BOX It may be necessary to use foot to assist in tilting INDICATOR LIGHT back loaded powered stair climber. Use swing arm, • Constant Green: Unit is in ascend mode and main wheel or lower portion of drive unit. Safety flap round-up switch in upper handle is active. -
Page 3: Installing Battery
CONTROLS CONTINUED SAFETY BEEP 2. Snap battery forward to engage locking hooks. (See Figure 7) NOTE: For use in high traffic areas. • To turn on, press and hold ascend/descend button Figure 7 for approximately 30 seconds until unit beeps. Locking Hook •... -
Page 4: Before Operation
CONTROLS CONTINUED BATTERY CHARGERS To charge battery with this charger: 1. Connect charging unit to battery. BATTERY HOLDER WITH AC CHARGER 2. Turn battery on by main switch on battery. • Charger comes standard with every powered stair climber. 3. Plug charging unit into AC type wall outlet. •... -
Page 5: Descending Stairs
OPERATION CONTINUED DESCENDING STAIRS • Do not overload unit. Exceeding load capacity activates overload mode, causing it to stop and Press ascend/descend button briefly again until lower main wheels slowly to lower step. Indicator indicator light flashes green. Unit is now in descend light flashes red for about three seconds after which mode. -
Page 6: Protective Features
OPERATION CONTINUED PROTECTIVE FEATURES After battery charger automatically shuts off: Unplug charger from AC wall outlet. • An electronic protection circuit prevents damage if charging clips are short circuited. First bar on 2. Disconnect charger from battery. display blinks if this occurs. 3. - Page 7 H-9272 800-295-5510 uline.mx DIABLITO ELÉCTRICO CON ADITAMENTO PARA ESCALERAS PARTES PARTES DESCRIPCIÓN CANT. Asa Superior Agarraderas Rojas y Anillos O Interruptor de Reanudación Caja de Control Asa Inferior Barra Transversal Superior Batería a Presión Enchufe Pestaña de Seguridad Llanta Gris Pequeña Brazo Oscilante Llanta Principal Base...
-
Page 8: Caja De Control
CONTROLES PESTAÑA DE SEGURIDAD CAJA DE CONTROL Puede ser necesario usar el pie para inclinar el diablito LUZ INDICADORA cargado cuando se use en escaleras. Utilice el brazo • Verde Fijo: La unidad está en modo de ascenso oscilante, las llantas principales o la parte inferior de y el interruptor de reanudación del asa superior la unidad de transmisión. - Page 9 CONTINUACIÓN DE CONTROLES SONIDO DE SEGURIDAD 2. Encaje la batería hacia adelante para trabarla en los ganchos de bloqueo. (Vea Diagrama 7) NOTA: Para uso en áreas de alto tráfico. Diagrama 7 • Para encender, presione y mantenga presionado Gancho de el botón de ascenso/descenso durante Bloqueo aproximadamente 30 segundos hasta que la...
- Page 10 CONTINUACIÓN DE CONTROLES CARGADORES DE LA BATERÍA Para cargar la batería con este tipo de cargador: 1. Conecte la unidad de carga a la batería. PORTABATERÍA CON CARGADOR DE CORRIENTE 2. Encienda la batería con el interruptor principal. ALTERNA 3. Enchufe la unidad de carga en un tomacorriente •...
- Page 11 CONTINUACIÓN DE FUNCIONAMIENTO BAJAR ESCALERAS • Se debe tener cuidado Diagrama 9 en el punto donde Presione el botón de ascenso/descenso brevemente las llantas de apoyo otra vez hasta que la luz indicadora parpadee en levantan la carga durante verde. La unidad se encuentra ahora en modo el ascenso.
- Page 12 CONTINUACIÓN DE FUNCIONAMIENTO CARACTERÍSTICAS PROTECTORAS • Durante el funcionamiento normal, los ganchos de bloqueo sujetan firmemente la batería. Se requiere • Un circuito de protección electrónico evita daños si un jalón vertical fuerte para quitarla. Si se mueve los clips de carga hacen cortocircuito. La primera hacia atrás muy rápido, se golpea en un escalón barra de la pantalla parpadea si esto ocurre.
- Page 13 H-9272 1-800-295-5510 uline.ca MONTE-ESCALIER MOTORISÉ PIÈCES PIÈCES DESCRIPTION QTÉ Poignée supérieure Poignées rouges et joints toriques Interrupteur arrondi Boîtier de commande Poignée inférieure Barre transversale supérieure Batterie enclenchable Fiche de connexion Rabat de sécurité Roulette grise Bras pivotant Roue principale Bavette Protège-roue Dispositif d'entraînement...
-
Page 14: Boîtier De Commande
COMMANDES RABAT DE SÉCURITÉ REMARQUE : L'alimentation s'éteint automatiquement après 10 minutes de Il peut être nécessaire de s'aider du pied pour incliner non-utilisation. le monte-escalier motorisé chargé vers l'arrière. Utilisez BOÎTIER DE COMMANDE pour ce faire le bras pivotant, la roue principale ou la partie inférieure du dispositif d'entraînement. -
Page 15: Commandes Suite
COMMANDES SUITE BOUTON DE MONTÉE/DESCENTE 2. Enclenchez la batterie vers l'avant pour engager les crochets de verrouillage. (Voir Figure 7) • Appuyez brièvement dessus pour passer en mode de montée ou de descente. (Voir Figure 3) Figure 7 Crochet de REMARQUE : L'appareil s'éteint si vous appuyez verrouillage sur le bouton pendant trois secondes ou plus. -
Page 16: Avant L'utilisation
COMMANDES SUITE CHARGEURS DE BATTERIE 2. Allumez la batterie avec l'interrupteur principal situé sur la batterie. SUPPORT DE BATTERIE AVEC CHARGEUR CA 3. Branchez le chargeur dans une prise murale de type CA. • Le chargeur est livré de série avec tout monte- 4. - Page 17 FONCTIONNEMENT SUITE POUR DESCENDRE LES ESCALIERS • Il faut faire attention Figure 9 au moment où les 1. Appuyez à nouveau brièvement sur le bouton roues de support de montée/descente jusqu'à ce que le voyant prennent la charge lumineux clignote en vert. L'appareil est alors pendant la montée.
-
Page 18: Dispositifs De Protection
FONCTIONNEMENT SUITE DISPOSITIFS DE PROTECTION • En fonctionnement normal, les crochets de verrouillage maintiennent la batterie en toute • Un circuit de protection électronique empêche tout sécurité. Une forte traction verticale est nécessaire dommage en cas de court-circuit des cosses de pour l'enlever.
Need help?
Do you have a question about the Magliner H-9272 and is the answer not in the manual?
Questions and answers