
Related Manuals for ETS NORD NORDcanopy SF


Summary of Contents for ETS NORD NORDcanopy SF
- Page 1 NORDcanopy SF Integrated Supply Air Fan Installation and Maintenance Guide SF Retrofit Installation Guide For canopies without supply air ducts. Suitable for HR, HV and HM kitchen canopies...
-
Page 2: Table Of Contents
® NORDcanopy | Table of contents SF Integrated Supply Air Fan Installation and Maintenance Guide Warnings! Check the product shipment 1. Electrical connections 2. Maintenance – changing the filter SF Retrofit Installation Guide 1. Opening the front panel 2. Removing the supply air adjustment plate 3. -
Page 3: Sf Integrated Supply Air Fan Installation And Maintenance Guide
In the event that goods purchased from ETS NORD have defects for which ETS NORD is responsible, we will undertake to repair or replace the defective items. Should repair or replacement not be feasible, ETS NORD will reimburse the buyer for all costs related to such items as per the terms of the sales contract. -
Page 4: Electrical Connections
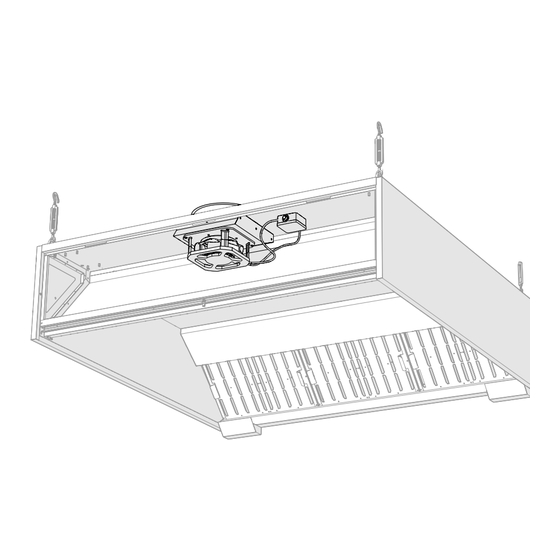
® NORDcanopy | SF Integrated Supply Air Fan 1. Electrical connections Risk of electric shock! Electrical connections to the system may only be made by a qualified and authorized electrician. Connect the power cable together with the canopy’s lighting power supply. V2 DALI 230V Electrical diagram:... -
Page 5: Maintenance - Changing The Filter
® NORDcanopy | SF Integrated Supply Air Fan 2. Maintenance – changing the filter Supply air fan’s filter should be checked visually once every 3 months, in case of visible dirt, change the filter to a new one. Filter information: Material –... -
Page 6: Sf Retrofit Installation Guide
® NORDcanopy | SF Retrofit SF Retrofit Installation Guide 1. Opening the front panel In case of perforated front panel(s) one must find a way to turn these blind, to keep the “AirGrip” air nozzle system operational The panel locks automatically. ATTN! At the end on the installation make sure that the panels are correctly fixed. -
Page 7: Removing The Supply Air Adjustment Plate
® NORDcanopy | SF Retrofit 2. Removing the supply air adjustment plate Remove the adjustment plate from the supply air connection by drilling through the rivets on the side of the spigot. 3. Installing the cable grommet For cable grommet drill a d=22 mm hole above the supply chamber for the cable entry and install the cable grommet. -
Page 8: Installing The Sf Fan To The Supply Chamber
® NORDcanopy | SF Retrofit 4. Installing the SF fan to the supply chamber 4.1 Install the fan housing from below to the supply air connection spigot and drill holes for rivets. 4.2 Fasten with rivets. www.etsnord.com RDM-109-0524... -
Page 9: Install The Ngm Protective Net To The Supply Air Connection
® NORDcanopy | SF Retrofit 5. Install the NGM protective net to the supply air connection 5.1 Supply chamber with multiple supply air connections If the supply chamber has more than one supply air connections, install the NALM end cap to the open connections. -
Page 10: Electrical Connections
® NORDcanopy | SF Retrofit 6. Electrical connections Risk of electric shock! Electrical connections to the system may only be made by a qualified and authorized electrician. Pull the power cable of the fan through the cable grommet and connect it together with the canopy’s lighting power supply. -
Page 11: Setting The Supply Fan Air Volumes
® NORDcanopy | SF Retrofit Electrical diagram: Canopy luminaire ballast Junction 3G0,75 mm2 Power for another canopy luminaires Supply air chamber Power for canopy luminaire Potentiometer Supply fan 7. Setting the supply fan air volumes R&D department R&D department Connection diagram Docum HV grease canopy with Docu... -
Page 12: Attaching The Potentiometer To The Supply Chamber Ceiling
® NORDcanopy | SF Retrofit 8. Attaching the potentiometer to the supply chamber ceiling Install the potentiometer to the supply chamber ceiling with double-mounting tape. 9. Adding a sound dampener to the front panel (optional) If desired, a sound dampening mat can be added inside the front panel to dampen the fan noise. This must be acquired by the installer. -
Page 13: Maintenance - Changing The Filter
® NORDcanopy | SF Retrofit 10. Maintenance – changing the filter Supply air fan’s filter should be checked visually once every 3 months, in case of visible dirt, change the filter to a new one. Filter information: Material – EU4 Dimensions –... - Page 14 ETS NORD AS Address: Peterburi tee 53 11415 Tallinn Estonia Phone: +372 680 7360 info@etsnord.ee www.etsnord.ee ETS NORD Finland Address: Pakkasraitti 4 04360 Tuusula Finland Phone: +358 40 18 42 842 info@etsnord.fi www.etsnord.fi ETS NORD Sweden Address: Järsjögatan 7 69235 Kumla...
Need help?
Do you have a question about the NORDcanopy SF and is the answer not in the manual?
Questions and answers