
Related Manuals for Henkelman Aura


Summary of Contents for Henkelman Aura
- Page 1 User Manual Vacuum Packaging Machine Aura Art No. 0894860 Version 03-'24 Original Instrucons for Use www.henkelman.com...
- Page 2 Henkelman BV accepts no liability for damage and/or problems arising from the use of spare parts not supplied by Henkelman BV. This user manual has been compiled with all possible care. Henkelman BV assumes no responsibility for any errors in this manual and/or the consequences of an erroneous interpretation of the instructions.
-
Page 3: Table Of Contents
5 Installation...........................20 5.1 Transportation and Installation.....................20 5.2 Connecting the Machine...................... 20 5.3 Prior to the First Use......................21 6 Operation.............................22 6.1 Aura Control System......................23 6.1.1 Control Panel........................23 6.1.1.1 Favourites......................24 6.1.1.2 Product programs....................25 6.1.1.3 Function programs....................27 6.1.1.4 Manual use......................28 6.1.2 Settings.........................29... - Page 4 /h...................61 7.7.5 Running the Pump Cleaning Program................. 62 8 Troubleshooting and Error Codes................... 63 9 Disposal............................65 10 Appendices..........................66 10.1 Technical Data........................66 10.1.1 Aura series......................... 66 10.2 Electrical Installation......................67 10.3 Vapour Pressure Curve of Water..................68 10.4 Logbook..........................69 Contents...
-
Page 5: List Of Figures
List of Figures Figure 1: Overview of the Main Components................. 15 Figure 2: Overview of the Sealing System..................19 Figure 3: Replacing the Printer Roll....................48 Figure 4: Aligning the Printer......................49 Figure 5: Printing the First Label....................49 Figure 6: Replacing the Sealing Wire..................... 52 Figure 7: Replacing the Silicone Rubber of the Silicone Holders........... -
Page 6: Preamble
Preamble This is the manual for your Henkelman Vacuum Packaging Machine series: Aura. This manual is intended for anyone who works with or services the machine. This manual contains information and instructions for installation, operation and maintenance of the machine. We recommend that you carefully read this manual before use and follow the procedures and instructions strictly. -
Page 7: Storing The Manual
The warranty is subject to the following limitations. The warranty period for products supplied by Henkelman BV is from the date indicated on the purchase document. This warranty is limited to manufacturing and machining defects and therefore does not cover breakdowns involving any part of the product that is exposed to any form of wear and tear. -
Page 8: Liability
Liability • We exclude all liability insofar as far as it is not required by law. • Our liability shall never exceed the total amount of the machine value in question. • With the exception of the applicable legal regulations of public order and good faith, we are not liable to pay for any damage of any sort whatsoever to the opposite party or to third parties, directly or indirectly, including lost profits, damage to movable or immovable property or personal injury. -
Page 9: Safety
Safety Your Vacuum Packaging Machine has been carefully designed and expertly built to be operated safely. This is corroborated by the CE-marking. However, there are always dangers and safety risks that cannot be eliminated. These dangers and risks are the result of the use functions of the machine and operation of the machine by the user. -
Page 10: General Warnings
General Warnings • All persons responsible for the operation of this machine must at least fully read and understand the chapters Safety on page 9 and Operation on page 22. • Failure to follow or disregard of the safety instructions may result in serious injury. •... -
Page 11: Warnings During Use
Warnings During Use • Before starting the machine, make sure no work is being performed on the installation and that the machine is ready for use. • The machine may not be operated by unauthorised persons. This should be monitored by the machine operator(s). -
Page 12: Warnings For Operating Personnel
Warnings for Operating Personnel • Operating personnel must be 18 years or older. • Only authorised persons are allowed to perform work on or with the machine. • Personnel may only perform work for which it was trained. This applies to both maintenance and normal use. -
Page 13: Introduction
Introduction Henkelman BV is a supplier of ultra-modern vacuum packaging machines. Our machines are developed and manufactured to meet the highest standards. They combine a sleekly build and functional design with optimal ease of use and a long service life. After mounting the plug, it is just a matter of "plug &... -
Page 14: Description Of The Machine
If detailed information is available in this manual, you will be referred to the specific sections. Aura series Basic vacuum packaging machines for basic packaging needs. The Aura series represent a range of compact table-top models. All Aura models are equipped: •... -
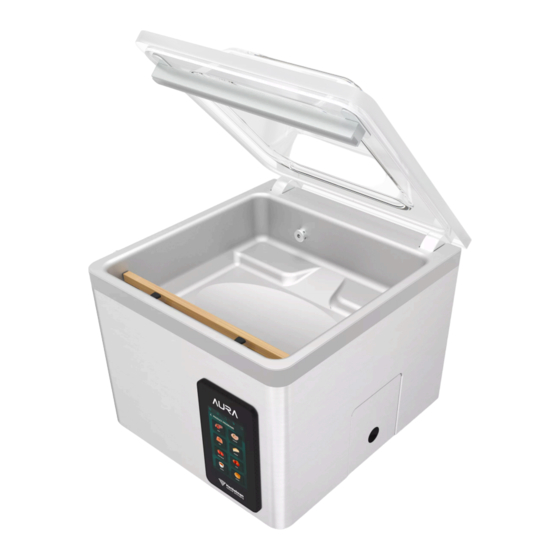
Page 15: Overview Of The Main Components
4.1.1 Overview of the Main Components The figure below shows the main components of the Aura series. The model shown may differ from your machine. Figure 1: Overview of the Main Components Machine housing The machine housing contains all the components necessary for the functioning of the machine. -
Page 16: Description Of The Packaging Process/Machine Functions
Control panel This serves to operate the available control functions. Description of the Packaging Process/Machine Functions This section provides an overview of the packaging process and available machine functions. See Configure Product programs on page 32 for information about setting the parameters to the correct values. - Page 17 Step Process phase Operation Liquid Control With the Liquid Control option, the system is controlled by a highly sensitive sensor. The sensor is able to detect the mo- ment that liquids from the product or the product itself begin to evaporate (boil). At that time the system will proceed to the next step in the process.
-
Page 18: General Functions
Step Process phase Operation Sealing The sealing bars are pressed against the vacuum bag and melt the bag closed. Seal During the sealing process, the material of the vacuum bag is heated and pressed together to create a hermetic seal. Optionally, a cut-off wire is available. -
Page 19: Sealing System
Sealing System The sealing system closes the opening(s) of the bag to retain the vacuum and/or gas in the bag. The end of the bag can optionally be cut off by the sealing bar. Figure 2: Overview of the Sealing System Sealing bar The sealing bar consists of the following components: •... -
Page 20: Installation
Installation Consult Technical Data on page 66 for the specifications of the machine. Before installing the machine, carefully read the safety instructions in Safety on page 9. Failure to follow or disregard of the safety instructions may result in serious injury. Transportation and Installation The machine must be moved and transported in an upright position. -
Page 21: Prior To The First Use
Prior to the First Use See Vacuum Pump maintenance on page 55 for more information how to perform these steps. Prior to the first use, the following steps must be performed: Failure to do so may result in unrepairable damage to the machine. Check the oil sight glass to see if the amount of oil in the pump is sufficient. -
Page 22: Operation
Operation • All persons responsible for the operation of this machine must at least fully read and understand the chapters Safety on page 9 and Operation on page 22. • Failure to follow or disregard of the safety instructions may result in serious injury. Operation... -
Page 23: Aura Control System
Standby button Serves to turn off the display of the Aura. A LED will light up when the AURA is in standby mode. Operation... -
Page 24: Favourites
6.1.1.1 Favourites To assist the user a list of favourites are available. This allows the user to have a specific set of programs on speed dial. Operation... -
Page 25: Product Programs
6.1.1.2 Product programs To assist the user a set of product programs are predefined. Users are guided with selecting the most ideal program, starting off with the product category. From the home page, product programs can be selected. Next the product category can be selected.. The next step is to make the product selection. - Page 26 6.1.1.2.1 Chefs note To provide some support during the selection process a chefs note can be added. This specific note can include advice on what to keep in mind when packaging the product, what additional product functions are advised and many more. 6.1.1.2.2 Mark favourites When the Star icon is pressed the selected program will be marked as favourite and is added to...
-
Page 27: Function Programs
6.1.1.3 Function programs The function programs menu provides quick access to a selection of functions that are not directly related to a specific product. The amount of parameters available under the function program is condensed to the most influential, so that the user can quicky start the process. Operation... -
Page 28: Manual Use
6.1.1.4 Manual use Selecting the 'MANUAL USE' from the home screen allows the user to completely define the programs as desired. Swiping through the menus will give you all the changeable parameters regarding vacuuming, gas flush , sealing, aerating, print label info as well as the parameters that define the product functions such as tenderizing and marinating. -
Page 29: Settings
6.1.2 Settings Access to the settings menu is possible directly from the home screen, as demonstrated in Chapter Control Panel on page 23 In the settings menu, you will find options that don't require daily adjustments. This menu also offers extended customization possibilities for those seeking to fine-tune their preferences. 6.1.2.1 User management The user management menu facilitates the creation, modification, and viewing of user profiles. -
Page 30: User Settings
6.1.2.2 User settings Within the user settings menu, users can access a secondary level of personalization. This advanced level of customization allows users to modify aspects related to the display, including the visibility of programs and functions. 6.1.2.2.1 Company profile By selecting a company profile, you create a better fitting initial configuration of the programs and functions. - Page 31 6.1.2.2.2 Configure favourites This menu is responsible for configuring the product programs listed in the favorites menu. By using the up and down buttons, you can rearrange the order in which programs appear in the favorites menu on the home screen. If you wish to remove a product from the list, simply select the program and deselect the star button.
- Page 32 6.1.2.2.3 Configure Product programs To improve the efficiency and user comfort product programs can be ordered, hidden and deleted. Use the eye button to show or hide a product program, hidden programs will not be visible in the product program menu. Use the left and right arrow buttons to change the order of the product programs.
- Page 33 6.1.2.2.4 Configure function programs Optimizing the arrangement of function programs and concealing unnecessary ones enhances the overall user experience. You can utilize the up and down arrow buttons to determine the order in which functions are presented, while the eye button allows you to hide functions that are not needed.
- Page 34 6.1.2.2.5 Configure functions The number of functions available for use is determined within the functions menu. When a function is switched off, it becomes invisible and cannot be further configured, except in cases where it has already been utilized in pre-existing programs 6.1.2.2.6 Configure labels If the machine is equipped with a label printer a default label can be defined.
- Page 35 6.1.2.2.7 Configure Date&Time, Language and Units The date and time settings can be changed to all the standard formats. The set date and time is also linked to HACCP data and can be printed on the labels. A selection of languages and units can be chosen. Units for temperature and vacuum also define the way they are displayed on the printed labels.
- Page 36 6.1.2.2.8 Configure display Depending on the environment where the machine is used, a specific level brightness can be desired. The display configuration screen provides settings for: • Brightness • Inactivity-timer for dimming the display • Inactivity tmer for switching off the display •...
-
Page 37: Maintenance & Service
6.1.2.3 Maintenance & Service The machine is equipped with multiple maintenance indicators to ensure its optimal performance. These indicators will signal when it's time to replace the oil. oil mist filter, or when the pump cleaning program should be initiated. The underlying menus have the following information and settings available: •... - Page 38 6.1.2.3.1 Logbook A logbook has been integrated to aid service providers in managing service data. It contains a summary of maintenance cycles and recorded logs. Service providers can request users to share this logbook, which can be achieved by exporting the logs to a USB drive and forwarding them via email.
-
Page 39: Import & Export
6.1.2.4 Import & Export By incorporating various import and export capabilities, machines can easily be upgraded to the latest standards. This combined with continuous improvements in the software, pre-programs and functions, result in a better general user experience. Operation... - Page 40 Software updates are divided into two categories: GUI (Graphical User Interface) and firmware. Firmware is responsible for defining the operation and communication of the Aura with hardware components, while the GUI dictates the visual interface and its interactions with various on-screen elements.
- Page 41 6.1.2.4.2 Import & Export settings Settings define all things that are configurable, adjustable and that can be set. A settings file can consist of all settings, but can also consist of only some settings, like (some) product programs or contact details. Importing and exporting settings allows quick and easy synchronization of machines.
-
Page 42: Test
6.1.2.5 Test A variety of tests have been integrated to identify malfunctions or evaluate the machine's condition. These tests range from a basic output test, leak assessment, to a comprehensive service analysis. These can: • Reveal the presence and extent of machine leaks •... -
Page 43: Basic Operation
6.1.4 Basic operation 6.1.4.1 Starting the machine Plug in the machine (see Electrical Installation on page 67). The display will light up and is ready for use. When the vacuum pump needs to be cleaned, the machine shows the warning message “pump cleaning needed”... -
Page 44: During The Vacuum Cycle
6.1.4.3 During the vacuum cycle When the lid is closed the vacuum cycle will start. The cycle can always be terminated by pressing the STOP button. Steps can be skipped/ended prematurely by pressing the Next Step button. When packaging moisture-containing products, such as soups and sauces, it is important to closely monitor the vacuuming process. -
Page 45: External Vacuum
6.1.5 External vacuum The External Vacuum function allows special food containers to be vacuum extracted outside of the machine. Check in advance whether the relevant gastronorm container can withstand and hold a vacuum. To select the External Vacuum option, follow the steps below. Select the External Vacuum program. - Page 46 Function Range Conditions Vacuum 30 – 99.8% Rule of thumb: the higher the vacuum, the less oxygen re- mains in the package and the longer the shelf life of the product. There are exceptions to this rule. Vacuum+ 0 – 60 seconds This is the time the vacuuming will continue after the max- imum vacuum has been reached.
-
Page 47: Printer
Function Range Conditions Seal time 0.1-4.0 seconds This is the time that the sealing wire and/or the cut-off wire are heated. The longer the time, the more heat is transferred to the bag. Cleaning of the 15 minutes Fixed value. pump The vacuum in the chamber must be at least 30% at the moment of sealing. -
Page 48: Replacing A Printer Roll
You can also select the number of labels you require per cycle. If you require an additional label after the complete cycle has ended and all labels have already been printed, select the Print extra label option. This will print the last printed label again. 6.2.2 Replacing a Printer Roll Follow the steps below to place the label roll in the printer. -
Page 49: Aligning The Printer
6.2.3 Aligning the Printer Switch on the printer and make sure the indication light is green. Press the Pause and Cancel button simultaneously for 2 seconds. Figure 4: Aligning the Printer The printer will print several labels and determine the correct position. Press the Feed and Cancel button simultaneously for 2 seconds. -
Page 50: Maintenance
Maintenance When carrying out maintenance work, always observe the following safety rules. • Always disconnect the power supply by disconnecting the plug. • Always disconnect the gas supply (if applicable). • Only trained technicians are authorised to perform the described maintenance activities. •... -
Page 51: Cleaning The Machine
Activity * 1-D 1-W 1-M 6-M Replacement Replace the sealing wires. Replace the silicone rubber of the silicone holders. Replace the lid gasket. Replace the oil exhaust filter. Contact your dealer for professional servicing. Replace the plastic lid (if applicable). * 1-D = Daily, 1-W = Weekly, 1-M = Every month, 6-M = Every 6 months, 1-Y = Annually, 4-Y = Every 4 years ** In case of packing damp products this is not enough, then this should be done daily. -
Page 52: Figure 6: Replacing The Sealing Wire
Table 1: Removing the sealing bar Table 2: Remove the sealing bar by lifting it from the cylinders. See Replacing the Sealing Wire on page 51. Figure 6: Replacing the Sealing Wire Remove the Teflon tape (1) that protects the sealing wire. Remove the screws (2) at the bottom of the sealing bar and remove the sealing wires (3). -
Page 53: Replacing The Silicone Rubber Of The Silicone Holders
Clean the sealing bar with a dust-free cloth. Apply a new piece of Teflon tape of the same length on the sealing bar. Replace the sealing wires. Cut a new piece of sealing wire or cutting wire at the length of the sealing bar plus approximately 15 cm. -
Page 54: Replacing The Lid Gasket
Ensure that the silicone rubber is fully and uniformly placed in the recess. It is also important that the surface of the silicone rubber is smooth after it is in place, and that it shows no signs of stress. Replacing the Lid Gasket The lid gasket ensures the vacuum chamber is fully closed during the machine cycle. -
Page 55: Inspecting The Lid Springs
Inspecting the Lid Springs Check the fastenings of the lid springs for wear, corrosion and damage. Check the lid springs for wear and damage. In the case of leakage, please contact your service dealer. Vacuum Pump maintenance The vacuum pump creates the vacuum. Regular maintenance of the pump is very important. 7.7.1 Overview Depending of the configuration the machine is equipped with one of the following pumps:... -
Page 56: Busch Pump 16 - 21 M /H
7.7.1.2 Busch pump 16 - 21 m Figure 10: Overview of the Busch pump Vacuum pump - Creates the vacuum for the process. Oil exhaust filter - Filters the air by capturing oil vapours. Oil sight glass - Indicates the maximum and minimum oil levels of the vacuum pump. Oil drain plug - Removing the oil drain plug allows the oil to be drained. -
Page 57: Becker Pump 16 - 21 M /H
7.7.1.3 Becker pump 16 - 21 m Figure 11: Overview of the Becker pump Vacuum pump - Creates the vacuum for the process. Oil exhaust filter - Filters the air by capturing oil vapours. Oil sight glass - Indicates the maximum and minimum oil levels of the vacuum pump. Oil drain plug - Removing the oil drain plug allows the oil to be drained. -
Page 58: Service Hatch
7.7.2 Service hatch A maintenance hatch can be found on the side of the machine. When the two protruding heads are slid towards each other followed by a downward sliding motion the hatch can be removed, revealing the oil fill and drain openings of the pump. 7.7.3 Removing Oil, Refilling Oil This section describes how to remove oil from the pump and how to refill the oil. -
Page 59: Replacing The Oil Exhaust Filter
7.7.4 Replacing the Oil Exhaust Filter The use of Personal protection Equipment with the corresponding CE marking is recommended. The oil exhaust filter prevents oil vapours from being emitted from the vacuum pump with the exhaust air. If the filter becomes saturated, the maximum vacuum level can no longer be reached. Replace the filter in case of vacuum problems or as specified in Maintenance Schedule on page 7.7.4.1 Busch pump 8 m... -
Page 60: Busch Pump 16 - 21 M /H
7.7.4.2 Busch pump 16 - 21 m Figure 13: Replacing the Oil Exhaust Filter Follow the steps below to remove the old oil exhaust filter: Remove the filter cover (4) of the vacuum pump (1) and put it aside. Remove the leaf spring (3) and put it aside. Remove the old filter (2). -
Page 61: Becker Pump 16 - 21 M /H
7.7.4.3 Becker pump 16 - 21 m Figure 14: Replacing the Oil Exhaust Filter Follow the steps below to remove the old oil exhaust filter: Loosen the four screw (3) holding the filter cover (4) and remove the cover. Turn the old filterer (2) 90 counter clockwise and pull it out of the pump housing (1). -
Page 62: Running The Pump Cleaning Program
7.7.5 Running the Pump Cleaning Program The pump cleaning program runs the vacuum pump for 15 minutes. During the program, the pump and the oil reach the operating temperature. Moisture in the pump is absorbed by the oil. The high temperature causes any moisture in the pump to evaporate, and minimises the risk of corrosion. -
Page 63: Troubleshooting And Error Codes
Troubleshooting and Error Codes The tables below show the possible malfunctions and the corresponding causes as well as the steps to be taken. Malfunction Activity More information Control panel does not illumin- • Connect the machine to the Connecting the Machine on ate. - Page 64 Malfunction Activity More information Vacuum bag is not sealed cor- • Pull the sealing bar out Operation on page 22. rectly. of the machine and clean Replacing the Sealing Wire on the contact surfaces in the page 51. mounting holes of the seal- Replacing the Silicone Rubber ing bar.
-
Page 65: Disposal
Disposal Do not dispose of oil and components as household waste. When repla- cing oil or components at the end of the service life, ensure that all ma- terials are collected and disposed or reused in a legal and environment- ally sound manner. -
Page 66: Appendices
Appendices 10.1 Technical Data 10.1.1 Aura series Aura 42XL 42XL+ General Ambient temperature 5 to 30°C 5 to 30°C 5 to 30°C 5 to 30°C 5 to 30°C 5 to 30°C during operation Machine working con- 10-90% 10-90% 10-90% 10-90%... -
Page 67: Electrical Installation
Figure 15: Overview of the Electrical Installation Power connection This serves to connect the machine to the power supply. Control panel This serves to operate the control functions. Your machine has the following control option: • Aura Control System on page 23 Appendices... -
Page 68: Vapour Pressure Curve Of Water
10.3 Vapour Pressure Curve of Water Figure 16: Vapour Pressure Curve of Water Appendices... -
Page 69: Logbook
10.4 Logbook This logbook must include: • Annual maintenance work • Major replacements and emergencies • Modifications • Tests of the emergency stop buttons and safety devices Date: Performed by: Description: (authority, technician) (nature of the activities, which parts have been replaced) Appendices... - Page 70 Date: Performed by: Description: (authority, technician) (nature of the activities, which parts have been replaced) Appendices...
- Page 74 Henkelman BV Sales support Titaniumlaan 10 info@henkelman.com 5221 CK 's-Hertogenbosch Service/technical support The Netherlands service@henkelman.com +31 (0)73 621 3671...
Need help?
Do you have a question about the Aura and is the answer not in the manual?
Questions and answers