
Related Manuals for Erbauer ERH12-Li


Summary of Contents for Erbauer ERH12-Li
- Page 1 EAN: 5059340010694 ERH12-Li ORIGINAL INSTRUCTIONS V100421 / BX220IM MNL_Erbauer_GB_12V Rotary Hammer_V10_210422.indd 1 4/22/21 6:25 PM...
-
Page 2: Table Of Contents
Safety instructions Product description Assembly Care & maintenance Guarantee Declaration of conformity MNL_Erbauer_GB_12V Rotary Hammer_V10_210422.indd 2 4/22/21 6:25 PM... - Page 3 WARNING! Please read all safety warnings carefully and be sure that they are fully understood before handling the tool. MNL_Erbauer_GB_12V Rotary Hammer_V10_210422.indd 3 4/22/21 6:25 PM...
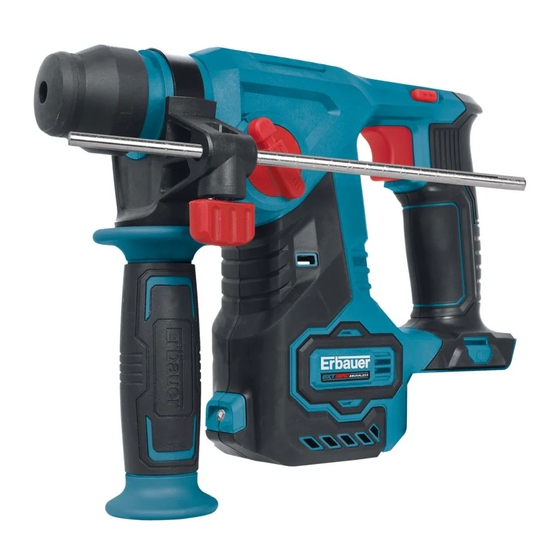
- Page 4 Product description MNL_Erbauer_GB_12V Rotary Hammer_V10_210422.indd 4 4/22/21 6:25 PM...
- Page 5 76-100% 51-75% 26-50% 5-25% <5% MNL_Erbauer_GB_12V Rotary Hammer_V10_210422.indd 5 4/22/21 6:25 PM...
- Page 6 MNL_Erbauer_GB_12V Rotary Hammer_V10_210422.indd 6 4/22/21 6:25 PM...
-
Page 7: Safety Instructions
Safety instructions GENERAL POWER TOOL SAFETY WARNINGS WARNING! Read safety warnings, instructions, illustrations and specifications provided with this power tool. Failure to follow all instructions listed below may result in electric shock, fire and/or serious injury. Save all warnings and instructions for future reference. - Page 8 c) Do not expose power tools to rain or wet conditions. Water entering a power tool will increase the risk of electric shock. d) Do not abuse the cord. Never use the cord for carrying, pulling or unplugging the power tool. Keep cord away from heat, oil, sharp edges or moving parts.
- Page 9 e) Do not overreach. Keep proper footing and balance at all times. This enables better control of the power tool in unexpected situations. f) Dress properly. Do not wear loose clothing or jewellery. Keep your hair, clothing and gloves away from moving parts.
- Page 10 e) Maintain power tools and accessories. Check for misalignment or binding of moving parts, breakage of parts and any other condition that may affect the power tool’s operation. If damaged, have the power tool repaired before use. Many accidents are caused by poorly maintained power tools.
- Page 11 e) Do not use battery pack or tool that is damaged or modified. Damaged or modified batteries may exhibit unpredictable behaviour resulting in fire, explosion or risk of injury. f) Do not expose a battery pack or tool to fire or excessive temperature.
- Page 12 e) Firmly tighten the auxiliary handle, hold the machine firmly with both hands while working and keep proper footing and balance at all times. The machine is securely guided with both hands. f) Switch off the power tool immediately when the tool insert jams.
- Page 13 When using this product it is essential that the following rules for use are followed: • When drilling it is common that the core / drill bit jams in the material being drilled. This will result in the product trying to rotate around the drill bit and potentially come out of your grip.
- Page 14 b) Do not connect the positive terminal and negative terminal of the battery to each other with any metal object (such as wire). c) Do not carry or store battery together with necklaces, hairpins or other metal objects. d) Do not pierce the battery with nails, strike the battery with a hammer, step on the battery or otherwise subject it to strong impacts or shocks.
- Page 15 q) Keep battery pack out of the reach of children. r) Retain the original product literature for future reference. s) Remove the battery from the drill or charger when not in use. The following information applies to professional users only but is good practice for all users: ADDITIONAL SAFETY WARNING FOR CONSTRUCTION DUST The updated Control of Substances Hazardous to Health...
- Page 16 To protect the lung, the COSHH Regulations sets a limit on the amount of these dusts that you can breathe (called a Workplace Exposure Limit or WEL) when averaged over a normal working day. These limits are not a large amount of dust: when compared to a penny it is tiny –...
- Page 17 WARNING! Some dust particles created by power sanding, sawing, grinding, drill and other construction jobs contain chemicals known to cause cancer, birth defects or other reproductive harm. Some examples of these chemicals are: • Lead from lead-based paints. • Crystalline silica from bricks and cement and other masonry products.
- Page 18 The declared vibration total value has been measured in accordance with a standard test method and may be used for compare one tool with another. The declared vibration total value may also be used in a preliminary assessment of exposure. WARNING! The vibration emission during actual use of the power tool can differ from the declared total value depending on the ways in which the tool...
- Page 19 WARNING! Identify safety measures to protect the operator that are based on an estimation of exposure in the actual conditions of use (taking account of all parts of the operating cycle such as the times when the tool is switched off and when it is running idle in addition to the trigger time).
- Page 20 c) Use correct attachments for the product and ensure they are in good condition. d) Keep tight grip on the handles/grip surface. e) Maintain this product in accordance with these instructions and keep it well lubricated (where appropriate). f) Plan your work schedule to spread any high vibration tool use across a longer period of time.
-
Page 21: Product Description
b) Injuries and damage to property due to broken attachments or the sudden impact of hidden objects during use. c) Danger of injury and property damage caused by flying objects or poor power tool accessories. Product description Part index The index below refers to Fig. 1 on page 4. 1. - Page 22 Technical specifications > Rated voltage : 12 V d.c. > Chuck type : SDS plus > Speed : 0-1100 min > Impact rate : 0-5300 min : 1.1 J > Impact energy > Max drilling capacity In concrete / brick : 16 mm : approx.
-
Page 23: Assembly
Rating label explanation ERH12-Li = Model number E = Erbauer RH = Rotary Hammer 12 = 12 V d.c. Li = LITHIUM ION Assembly Symbols On the product, the rating label and within these instructions you will find among others the following symbols and abbreviations. - Page 24 WEEE symbol. Waste electrical products should not be disposed of with household waste. Please recycle where facilities exist. Check with your Local Authority or local store for recycling advice. Crossed out dust bin. Batteries and battery packs should not be disposed of with household waste.
- Page 25 NOTE: Take care of small parts that are removed during assembly or when making adjustments. Keep them secure to avoid loss. Setup BATTERY PACK (NOT INCLUDED) Release / Attach 1. To remove the battery pack, press down the release button (10a) and pull out the battery pack (10) from the battery pack holder (9a) (Fig.
- Page 26 NOTE: To achieve good control and stability, the auxiliary handle should be mounted at an angle of 90 degrees to the main body of the tool. DEPTH STOP 1. Turn the wing nut (14) anticlockwise until the depth stop (4) can be inserted (Fig. F, step 1).
-
Page 27: Use
NOTE: When inserting the drill bit, take care that the dust protection cap (2) is not damaged. Have a damaged dust protection cap replaced by a qualified specialist. 3. The automatic chuck sleeve (3) allows for quick assembling of drill bit. 4. - Page 28 Controls Switching On/Off Ensure the forward / reverse rotation control (7) is not on centre lock position. 1. Switch the product on by pressing the On/Off switch (8) (Fig. I). 2. Switch the product off by releasing the On/Off switch (8). The On/Off switch (8) is fitted with a brake function which stops the drill chuck (1) immediately when you quickly release the On/Off switch (8).
- Page 29 Rotate the mode selector switch (6) to align it with icon of the drill/ hammer drill on the housing, depending on the desired function (Fig. M). WARNING! Only change the mode settings when the product is switched off and has come to a complete stop! Always ensure that the mode selector switch (6) is adjusted to the correct position depending on the intended operation! Do not attempt to use a keyed chuck for SDS hammer drilling!
- Page 30 Automatic work light The LED work light (13) will illuminate when the trigger of On/Off switch (8) is depressed slightly, and will automatically turn off a short while after the trigger of On/ Off switch (8) is released (Fig. N). This provides additional light on the surface of the workpiece for operation in lower light situations.
- Page 31 Drilling General drilling WARNING! During operation fine dust will be generated! Some dusts are highly inflammable and explosive! Do not smoke during operation, keep heat sources and open flames out of the working area! Always wear a dust mask to protect yourself against hazards resulting from fine dust! 1.
-
Page 32: Care & Maintenance
1. Set the mode selector switch (6) to the correct position. 2. Insert a suitable SDS+ drill bit. Drilling mode Use this function for drilling holes into wood, wood similar materials, plastic or metal. 1. Use a suitable keyed/keyless drill chuck and SDS+ adapter (not provided) and set the mode selector switch (6) to the correct position. - Page 33 Clean 1. Clean the product with a dry cloth. Use a brush for areas that are hard to reach. 2. In particular clean the switches and air vents after every use with a cloth and brush. 3. Remove stubborn dust with high pressure air (max. 3 bar). 4.
- Page 34 Troubleshooting Suspected malfunctions are often due to causes that the users can fix themselves. Therefore check the product using this section. In most cases the problem can be solved quickly. WARNING! Only perform the steps described within these instructions! All further inspection, maintenance and repair work must be performed by an authorised service centre or a similarly s specialist if you cannot solve the problem yourself! Problem...
- Page 35 Problem Possible cause Solution 5. Excessive 5.1. Drill bit is dull / damaged 5.1. Replace with a new ones vibration or noise Recycling and disposal Waste electrical products should not be disposed of with household waste. Please recycle where facilities exist. Check with your local authority or local store for recycling advice.
-
Page 36: Guarantee
Guarantee We take special care to select high quality materials and use manufacturing techniques that allow us to create products incorporating design and durability. This product Rotary hammer) has a manufacturer’s guarantee of 3 years against manufacturing defects, from the date of purchase (if bought in store) or date of delivery (if bought online), at no additional cost. - Page 37 Batteries and battery chargers are not covered under the Erbauer 3 Year Warranty and will have a guarantee period of 2 years from the date of purchase. If the product is defective, we will, within a reasonable time, repair or replace it.
-
Page 38: Declaration Of Conformity
Declaration of conformity MNL_Erbauer_GB_12V Rotary Hammer_V10_210422.indd 38 4/22/21 6:25 PM... - Page 39 MNL_Erbauer_GB_12V Rotary Hammer_V10_210422.indd 39 4/22/21 6:25 PM...
- Page 40 MNL_Erbauer_GB_12V Rotary Hammer_V10_210422.indd 40 4/22/21 6:25 PM...
- Page 41 EU manufacturer: Kingfisher International Products B.V. Rapenburgerstraat 175E 1011 VM Amsterdam The Netherlands www.diy.com | www.screwfix.com | www.screwfix.ie To view instruction manuals online, visit www.kingfisher.com/products Customer Helpline: UK 03301248111 erbauer@powertoolservicing.co.uk Eire 0035312479977 erbauer@powertoolservicing.co.uk MNL_Erbauer_GB_12V Rotary Hammer_V10_210422.indd 41 4/22/21 6:25 PM...
Need help?
Do you have a question about the ERH12-Li and is the answer not in the manual?
Questions and answers