Table of Contents
Advertisement
Quick Links
Advertisement
Table of Contents

Subscribe to Our Youtube Channel
Related Manuals for Erbauer ERI691COM


Summary of Contents for Erbauer ERI691COM
- Page 1 ERI691COM 18V BRUSHLESS COMBI DRILL ERI691COM...
- Page 2 Original Instructions (Version 2.0)
- Page 3 Congratulations on your purchase of a quality power tool from Erbauer (UK) Ltd. This product should give you reliable service but for your peace of mind this power tool does carry a 2 year guarantee, the terms of which are detailed below.
-
Page 4: General Power Tool Safety Warnings
GENERAL POWER TOOL SAFETY WARNINGS WARNING! Read all safety warnings and all instructions. Failure to follow the warnings and instructions may result in electric shock, fire and/or serious injury. Save all warnings and instructions for future reference. The term “power tool” in the warnings refers to your mains-operated (corded) power tool or battery-operated (cordless) power tool. - Page 5 The correct power tool will do the job better and safer at the rate for which it was designed. b) Do not use the power tool if the switch does not turn it on 18V BRUSHLESS COMBI DRILL ERI691COM...
- Page 6 and off. Any power tool that cannot be controlled with the switch is dangerous and must be repaired. c) Disconnect the plug from the power source and/or the battery pack from the power tool before making any adjustments, changing accessories, or storing power tools. Such preventive safety measures reduce the risk of starting the power tool accidentally.
- Page 7 10. Do not incinerate or burn the battery pack, it may explode. 11. Do not charge a damaged battery pack. 12. Replace any damaged supply cords on your charger. 13. Always disconnect the charger power supply before making or breaking the connections to the battery pack. 18V BRUSHLESS COMBI DRILL ERI691COM...
- Page 8 14. Battery pack and charger will be warm during charging this is normal. 15. When not in use, remove a charged battery pack from the charger. 16. Always remove the battery pack from the charger immediately after re-charging is completed. 17.
- Page 9 12. Do not place the battery in or near fire, on stoves or other high temperature locations. Do not place the battery in direct sunlight, or use or store the battery inside cars in hot weather. Heating 18V BRUSHLESS COMBI DRILL ERI691COM...
- Page 10 the battery can damage the safety circuitry, which can cause additional heating, rupture or ignition of the battery. Using the battery in this manner may also result in a loss of performance and a shortened life expectancy. 13. Do not place the battery in microwave ovens, high-pressure containers or on induction cookware.
- Page 11 Your risk from these exposures varies, depending upon how often you do this type of work. To reduce your exposure to these chemicals: • Work in a well-ventilated area. • Work with approved safety equipment, such as those dust masks that are specially designed to filter microscopic particles. 18V BRUSHLESS COMBI DRILL ERI691COM...
- Page 12 VIBRATION The European Physical Agents (Vibration) Directive has been brought in to help reduce hand arm vibration syndrome injuries to power tool users. The directive requires power tool manufacturers and suppliers to provide indicative vibration test results to enable users to make informed decisions as to the period of time a power tool can be used safely on a daily basis and the choice of tool.
- Page 13 Be sure the supply is the same as the voltage given on the rating plate for the charger. The charger is fitted with a two-core cable and plug. Remove the mains plug from socket before carrying out any adjustment or servicing. 18V BRUSHLESS COMBI DRILL ERI691COM...
- Page 14 SYMBOLS To reduce the risk of injury, user must read instruction manual Warning Wear ear protection Wear eye protection Wear dust mask Do not burn Do not expose to rain or water Waste electrical products must not be disposed of with household waste. Please recycle where facilities exist.
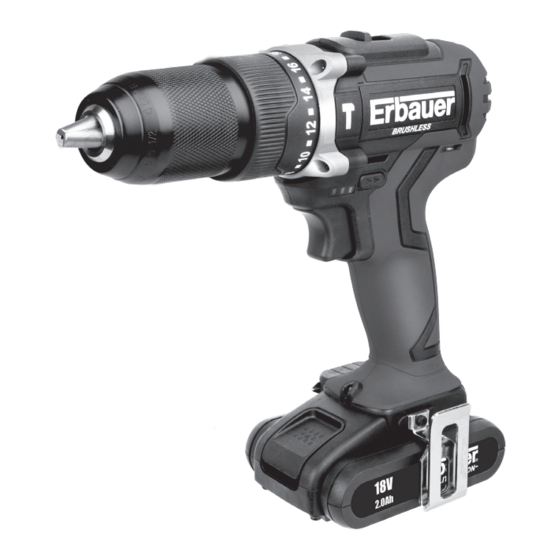
- Page 15 KEYLESS CHUCK TORQUE ADJUSTMENT RING TWO-SPEED GEAR CONTROL FORWARD/REVERSE ROTATION CONTROL BELT CLIP BATTERY PACK BATTERY PACK RELEASE BUTTON SIGHT LIGHT ON/OFF SWITCH LED BATTERY CAPACITY INDICATOR 18V BRUSHLESS COMBI DRILL ERI691COM...
-
Page 16: Technical Data
TECHNICAL DATA Battery voltage No load speed 0-450/0-1600/min impact rate 0-7200/0-25600/min clutch position 21+1+1 Max. torque 40 N.m Chuck capacity 13mm Max. drilling capacity Wood 35mm Steel 10mm masonry 13mm Battery capacity 2.0Ah Li-ion 36Wh Charging time 48min Charger Input 100-240V~ 50/60Hz 78W Charger Output 14.4--20V... -
Page 17: Intended Use
If the new battery pack displays the same problem as the original Battery Pack, have the charger tested at an authorized service center. Fig. B2 18V BRUSHLESS COMBI DRILL ERI691COM... -
Page 18: Operation
Fig. B2 ON/OFF Light Status flash Defective Battery Red on Battery Temperature Protection The temperature of battery - - - - - pack is less than 0 C or more Red flash than 45 Fully Charged Fig. C1 Green on - - - - - - Charging Green... - Page 19 To open the chuck jaws rotate the front section of the chuck. Insert the drill bit between the chuck Fig. H jaws and rotate the front section in the opposite direction. Ensure the drill bit is in the center of the 18V BRUSHLESS COMBI DRILL ERI691COM...
- Page 20 Fig. H chuck jaws. Finally, firmly rotate the front chuck section in the opposite directions. Your drill bit is now clamped in the chuck. 6. TORQUE ADJUSTMENT (SEE Fig I) (Screw driving force of your drill driver) The torque is adjusted by rotating the torque adjustment ring.
-
Page 21: Led Light Indicator
Reverse Rotation Control is on right/left position. 11. DISPOSAL OF AN EXHAUSTED BATTERY PACK To preserve natural resources, please recycle or dispose of the battery pack properly. This battery pack contains Lithium batteries. Consult your local waste authority for 18V BRUSHLESS COMBI DRILL ERI691COM... -
Page 22: Problem Solution
information regarding available recycling and/or disposal options. Discharge your battery pack by operating your drill, then remove the battery pack from the drill housing and cover the battery pack connections with heavy-duty adhesive tape to prevent short circuit and energy discharge. Do not attempt to open or remove any of the components. -
Page 23: Maintenance
ENVIRONMENTAL PROTECTION Waste electrical products should not be disposed of with household waste. Please recycle where facilities exist. Check with your Local Authority or retailer for recycling advice. For further information visit www.recycle-more.co.uk. 18V BRUSHLESS COMBI DRILL ERI691COM... -
Page 24: Plug Replacement
PLUG REPLACEMENT (UK & IRELAND ONLY) If you need to replace the fitted plug then follow the instructions below. IMPORTANT The wires in the mains lead are coloured in accordance with the following code: BLUE =NEUTRAL Brown = Live As the colours of the wires in the mains lead of this appliance may not correspond with the coloured markings identifying the terminals in your plug, proceed as follows. -
Page 25: Declaration Of Conformity
EN 60335-2-29 EN 62233 EN 61000-3-2 EN 61000-3-3 Authorised Signatory and technical file holder Date: 02/11/16 Signature: Name / title: John Fretwell / Quality Assurance Manager Erbauer (UK) Ltd. Trade House, Mead Avenue, BA22 8RT 18V BRUSHLESS COMBI DRILL ERI691COM...
Need help?
Do you have a question about the ERI691COM and is the answer not in the manual?
Questions and answers