
Related Manuals for Teeter FreeStep LT1


Summary of Contents for Teeter FreeStep LT1
- Page 1 GET STARTED Assembly & User Guide FreeStep Recumbent Cross Trainer ® Follow along with these instructions Scan to download the free BILT app and search ‘Teeter’ in app. 3D Interactive Instructions...
-
Page 2: Table Of Contents
If you have any questions concerning assembly or if any parts are missing, DO NOT RETURN THE ITEM TO THE STORE OR CONTACT THE RETAILER. Our dedicated product service experts can help! Contact Teeter Customer Service at 800-847-0143, or via online forms or Live Chat at teeter.com. -
Page 3: Important Safety Instructions
BEFORE YOU BEGIN: Review all steps before beginning assembly and read all precautions before using the Teeter FreeStep. Carefully adhere to the Assembly Instructions and User Guide to help ensure safety and product integrity. IMPORTANT SAFETY INSTRUCTIONS READ ALL INSTRUCTIONS BEFORE USING THE TEETER FREESTEP WARNING FAILURE TO FOLLOW INSTRUCTIONS AND WARNINGS COULD RESULT IN SERIOUS INJURY OR DEATH. -
Page 4: Items For Assembly
I T E M S FO R A S SE M B LY Parts are not shown to scale. Parts may vary slightly from images depending on model. ITEM NO. ITEM NAME ITEM NO. ITEM NAME Base / Resistance Grip Handle Support Tubes SE2108 Handle Support Tube (2) -
Page 5: A Guide To Your Freestep
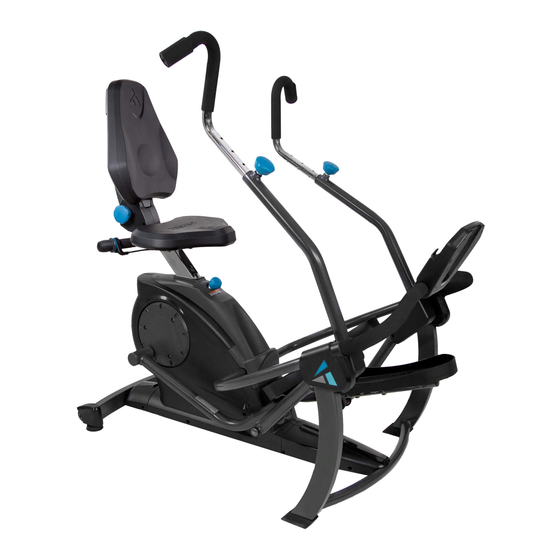
A G U I DE TO YO U R F RE E STE P Before reading further, study the drawing below to familiarize yourself with the important components of your Teeter FreeStep. Back Left Right Front Your actual model may vary from the model shown. -
Page 6: Safety Warning Labels And Product Specifications . . . . . . . . . . . . . . . . 4
This drawing indicates the locations of the warning labels found on your product (image and labels below not shown at actual size). If a label is missing, illegible or is removed, contact Teeter Customer Service to request a complimentary replacement label. WARNING... -
Page 7: Assembly Steps
L E T ’ S GE T STA RTE D Unpack and Prepare Your Workspace Follow the instructions on the outside of the box for the easiest unpacking process. If possible, assemble the equipment at or near the space in which you intend to use it to avoid moving it later. Unpack all parts and support materials. - Page 8 Attach Rear Stabilizer Cover Set Part 1 Figure 3: Locate the Rear Stabilizer Cover Set, noting the Right and Left markings, and the Step 1b Hardware Kit. Part 1 Complete this first before Part 2. Attach the Right Rear Stabilizer Cover by loosely tightening the 1 x Machine Screw.
- Page 9 Figure 7: Locate the Pedals, noting that both pedals are marked with both Left and Right markings. This means it does not matter which side the Pedals are installed on. When installing the Pedals, be sure that the L/R markings are pointing toward the Front of the FreeStep.
- Page 10 S T E P 3 A S S E M B LE SE AT FIGURE 4 Seat Installation - Model LT3 only MODEL LT3 ONLY: Seat Position Options Forward Position Holes Skip this step for Model LT1. Back Position Holes Figure 9: The Model LT3 has two Lower Seat assembly options.
- Page 11 S T E P 4 ASSEMBLE SU PP O RTS Console Front Support Bar Installation IMPORTANT: Do not pull or pinch the Speed Sensor Wire during the Console Front Support Bar Installation. Open the Battery Compartment Figure 13: located on the back of the console. Ensure that the battery contacts and compartment are clean.
- Page 12 PARTS LIST ITEM QTY NET DIMENSIONS/DESCRIPTION NOTE MATERIAL Handle Support Tube Installation Locate the Handle Support Figure 16a-16b: Tubes, noting Right and Left markings. Insert the bottom of each Handle Support Tube into the top of the Upper Pedal Arm. LEFT / RIGHT LEFT/RIGHT Figure 16a...
- Page 13 S T E P 5 A S S E M B LE COVE R SE TS Upper Front Leg Cover Sets Installation Phillips Head Screw IMPORTANT: Make sure the Speed Sensor Wire sits under the Left Upper Front Leg Cover Set and is not pinched during installation.
- Page 14 S T E P 6 A S S E M B LE H A N D L E S Handle Installation Loosen the Handle Adjustment Figure 22: Knobs on the right and left Handle Support Tubes by turning the knobs counter-clockwise, then pulling outward.
-
Page 15: Use Instructions
US E R G U I D E Leveling Figure 26: Make sure your FreeStep is on a flat, stable surface. Locate the 2 × Leveling Feet as shown. If any of the feet are not resting flat on the ground, rotate them clockwise to lower them until they reach the ground. -
Page 16: User Guide
USE R GU I D E CAUTION ALWAYS adjust Seat height first before use to avoid injury to the knees. Proper feet placement and seat height will ensure that your knees never travel over your toes when bent, and that your leg does not lock out in full extension. Set Seat Height Figure 30: To properly set the Seat height, start with the seat in the lowest position. - Page 17 U SE R G U ID E Set Seat Back Position The Seat Back can recline to offer support for the lower back while targeting different muscle groups during your workout. To properly set the Seat Back position, start with the seat in the fully upright position. Figure 36: To adjust the Seat Back position, first push in on the Seat Back Adjustment Figure 36...
- Page 18 U S E R GU I D E Handle Length Adjustment Figure 40: Loosen the Handle Adjustment Knob by turning it counter-clockwise. Figure 40 Figure 41: Release the auto-locking mechanism by pulling outward on the spring- loaded Handle Adjustment Knob. Figure 41 Figure 42: Continue holding the Handle Adjustment Knob outward while pulling or...
- Page 19 USE R G U I DE Grip Position The handles can be rotated to an Upright Grip or Lower Grip to target different muscle groups. Figure 45: To change grip position, loosen the Handle Adjustment Knob by turning it counter- clockwise.
- Page 20 US E R GU I D E Figure 48 Figure 49 Figure 50 Standard Use Legs Only Arms Only Figure 50: Target your upper Figure 48: For a balanced, full- Figure 49: Target your lower body workout, use both your body by only using your legs.
- Page 21 USE R G U I DE Adjust Resistance NOTE: The FreeStep ships to you preset in the highest resistance setting. Dial the Resistance Grip to the lowest resistance setting to start out. Figure 51: To decrease resistance, dial the Resistance Grip counter-clockwise (or backward as you are using the equipment).
-
Page 22: Warranty And Registration
Warranty in no way extends the original Warranty period. Under no circumstances shall Teeter, or any other party involved in the sale of this product, have any liability for incidental or consequential damage arising from breach of an express or implied warranty on any Teeter product. - Page 23 This page intentionally left blank.
-
Page 24: Terms And Conditions
Teeter also offers a 30-Day Price Match Guarantee. If at any time within 30 days of placing your order, you find the same, new-condition model advertised in print or online by a Teeter authorized dealer for a lower price, send Teeter customer service a copy of the ad (dated and published within 30 days of placing your order) and they will either adjust your future payments for the new price or refund you the difference. - Page 25 Sites or these materials, whether or not the circumstances giving rise to such cause may have been within the control of Teeter or of any vendor providing software or services. In no event will Teeter or any such parties be liable to you, whether in contract or tort, for any direct, special, indirect, punitive, consequential or incidental damages, attorney fees, or any other damages of any kind even if Teeter or any other such party has been advised of the possibility thereof.
- Page 26 This page intentionally left blank.
- Page 27 Coaching Every Step of the Way Access workouts and instructions anytime, anywhere. Our guided personal training is available to you with the free Teeter Move app. Designed to help you stay motivated and moving forward in your strength, endurance, and mobility training.
- Page 28 800-847-0143 U.S. and Foreign Patents Apply. Teeter and Teeter logo are registered trademarks of Teeter. Specifications subject to change without notice. © COPYRIGHT 2024 Teeter. International Law Prohibits Any Copying. SE2342 0424-4...
Need help?
Do you have a question about the FreeStep LT1 and is the answer not in the manual?
Questions and answers
i HAVE BEEN USING MINE 5 OUT OF 7 DAYS FOR 60 MINUUTES AND AFTER YEAR OF CONSTINT USE IT IS MAKING HORRIBLE NOISE AND SEEMS LIKE SOMETHING HAS COME LOSE INSIDE THE BIG BOX. hOW DO I FIX THAT?