Advertisement
Quick Links
Advertisement

Subscribe to Our Youtube Channel
Related Manuals for Motic B3-223ASC


Summary of Contents for Motic B3-223ASC
- Page 1 Instruction Manual B3 Series Copyright © 02/02 Motic Microscopes, European Division...
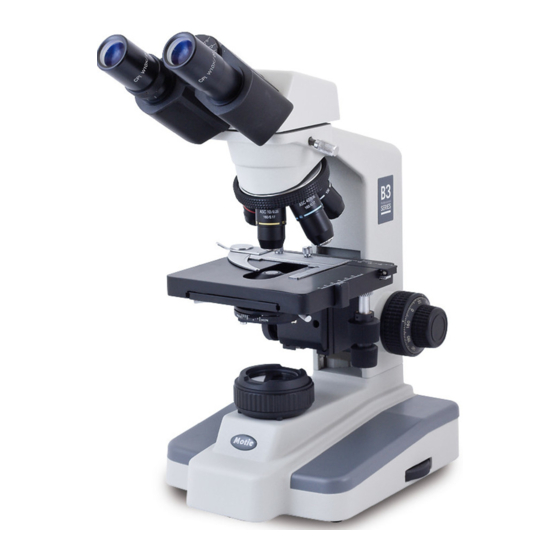
- Page 2 1. Eyepiece 12. Head 2. Interpupillary Scale 13. Eyepiece holder 14. Knurled head locking screw 3. Revolving nosepiece 4. Moveable finger 5. Objectives 15. Arm 6. Specimen holder mechanism 7. Slide holder 16. Coarse focus knob 8. Stage 9. Opening 17.
- Page 3 Introduction Thank you for your purchase of a Motic microscope. Motic microscopes are precision instruments, subjected to meticulous examination in order to reach you in perfect condition. Their design combines easy management and optimum functioning with minimum maintenance. The information contained in this manual is likely to go beyond what the average user needs to know to use the microscope, however, it is provided to answer any queries that may arise.
- Page 4 Assembly Eyepiece Eyepiece Head Head Objectives Slide holder mechanism Abbe condenser All the steps described for the assembly of the microscope must be undertaken with extreme care, and without forcing the placement of the distinct parts and elements of the microscope. A.
- Page 5 c. Unscrew the locking screws, that also center the condenser (Fig. 2). Positioning pivot Centralising and locking screws Fig. 2 Fig. 3 d. Insert the condenser in the support, so that the slot on the collar lines up with the positioning pivot.
- Page 6 Operation A. Starting Up 1. Before using the microscope, adjust the light intensity control (20) to minimum position. This should be repeated every time the microscope is switched on or off to prolong the use of the bulb. 2. Switch to position ON. (Fig. 4) 3.
- Page 7 E. Köehler illumination. The ideal level of illumination when all illumination elements are brought into proportion, basically, by the condenser and the field diaphragm. 1. Focus on a sample with the 10X objective (5).. 2. Close the field diaphragm (11) turning the ring situated on the illuminator (19), until it appears in the field of vision.
- Page 8 b. If air bubbles appear, they can be removed by moving the revolving nosepiece (3) slightly back and forth. c. After using the microscope, all parts that have come into contact with immersion oil must be cleaned. Using a soft cotton cloth lightly dampened with Xylene. If the 100X objective is not cleaned, oil could dry on the lens surface resulting in the view being blocked, and possible damage occurring.
- Page 9 To adapt a video camera, an adapter tube is required. (Fig. 5). This adapter includes a 0,5X lens for videos that measures the correct parfocality between the images of the binocular and vertical ports shown as an image on the TV monitor. The adapter tube also includes a “C” knurled ring and a “CS” type ring to accommodate different types of video cameras.
- Page 10 5. Cleaning the condenser. a. Only clean the top lens surface of the condenser (10) using any of the methods mentioned above for cleaning the eyepieces or objectives. 6. Cleaning the illuminator lens. a. Only clean the top lens of the illuminator (19) using any of the methods mentioned above for cleaning the eyepieces or objectives.
- Page 11 C. Mechanical maintenance. 1. Adjusting the tension of the coarse focus control. The tension adjustment control (Fig. 8) is located between the coarse focus knob (16) and the arm (15). The coarse focus nov comes pre-adjusted by the manufacturer. The ideal tension point is that which permits coarse focus knob to move as loosely as possible, without the stage (8) moving down on its own.
- Page 12 Troubleshooter ELECTRICAL PROBLEM CAUSE SOLUTIÓN Bulb does not work. Plug outlet does not work Repair by a qualified specialised technician. Cable not connected Connect cable. Bulb burned out. Replace bulb. Fuse blown. Replace fuse. Wrong bulb. Replace by the correct bulb. Bulb burns out in short time.
- Page 13 Bulbs and fuses are not under warrantee. The warrantee service is provided by MOTIC, or its authorised distributors. Defective products will be repaired free of charge when returned to MOTIC, or one of its distributors. Transport costs will be covered by the purchaser.
- Page 14 Using Phase-contrast microsocopy It is applied mainly to the contrast of unstained specimens. Common illumination effects are directed at the objective. In the case of phase contrasting, the procedure is slightly different because the objective itself plays a part in the illumination. Special phase contrast objectives are required which are engraved additionally with the letters iePhlr.
Need help?
Do you have a question about the B3-223ASC and is the answer not in the manual?
Questions and answers