Table of Contents
Advertisement
Quick Links
Advertisement
Table of Contents

Related Manuals for Motic BA80 Series


Summary of Contents for Motic BA80 Series
- Page 2 We are constantly endeavouring to improve our instruments and to adapt them to the requirements of modern research techniques and testing methods. This involves modification to the mechanical structure and optical design of our instruments. Therefore, all descriptions and illustrations in this instruction manual, including all specifications are subject to change without notice.
-
Page 3: Table Of Contents
Table of Contents Name of Components Introduction Unpacking Description of Components Setting up the instrument Assembly Operation Maintenance Troubleshooting Moving the microscope Repair Warning Label Warrantee... -
Page 4: Name Of Components
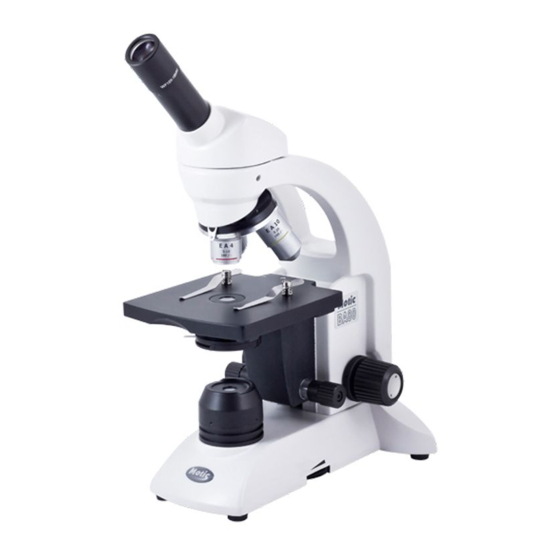
Name of Components BA80 (Monocular) 1. Eyepiece 9. Base 2. Revolving nosepiece 10. Eyepiece tube 3. Objectives 11. Head 4. Fixed stage clip 12. Arm 13. Knobs controlling movement 5. Diaphragm 6. Stage 14. Fine focus knob 7. Condenser 15. Light intensity control 8. -
Page 5: Introduction
Introduction Thank you for your purchase of a Motic microscope. Motic microscopes are precision instruments, subjected to stringent quality control in order to reach you in perfect condition. Their design combines easy management and optimum functioning with minimum maintenance. The information contained in this manual is likely to go beyond what the average user needs to know to use the microscope, however, it is provided to answer any queries that may arise. -
Page 6: Unpacking
Unpacking All components of the microscope have been carefully packed to ensure they reach you in perfect condition. We recommend that you do not discard any packing containers in case you need to return the microscope, store it for long periods of time;... -
Page 7: Description Of Components
Description of Components 1. Head — Monocular head rotating 360º to avoid the necessity of moving the microscope, should another user wish to use it. 2. Eyepiece — The group of lenses closest to the eye, magnifying the image formed by the objectives. In the monocular models, the eyepiece contains a pointer to single out any particular element of the sample to another user. -
Page 8: Setting Up The Instrument
Setting up the instrument Avoid placing the instrument in locations exposed to direct sunlight, dust, vibration, high temperature and high humidity 1 Operating Enviroment Indoor use. Altitude : Max 2000 meters Ambient temperature : 15°C to 35°C Maximum relative humidity : 75% for temperature up to 31ºC decreasing linearly to 50% relative humidity at 40ºC Supply voltage fluctuations : Not to exceed ±10% of the normal voltage Pollution degree : 2 (in according with IEC60664) -
Page 9: Assembly
Assembly All the steps described for the assembly of the microscope must be undertaken with extreme care, and without forcing the placement of the distinct parts and elements of the microscope. A. Specimen holder mechanism for models with built in mechanical stage: Rotate the coarse focusing knob to move the stage to its lowest position. -
Page 10: Operation
Operation A. Starting Up 1. Before using the microscope, adjust the light intensity control to minimum position. This should be repeated every time the microscope is switched on or off to prolong the use of the bulb. 2. Press switch to position ON. (Fig. 1) Fig. - Page 11 1. Charge the rechargeable batteries before using. Even if the rechargeable batteries are not charged, you can use the microscopes as long as the charger is connected and turned on. 2. To maintain a longer life span of the rechargeable batteries and to save energy, switch off the power supply if not in use.
- Page 12 C. Adjusting the aperture of the diaphragm The diaphragm should not be used to regulate the light intensity. Its function is to obtain a high resolution of the specimen and to provide contrast in the image. Smaller apertures will deliver higher contrast to image, although closing the aperture too much will reduce resolution.
- Page 13 c. When viewing is complete, all parts that have come into contact with the oil must be cleaned using a soft cotton cloth, lightly dampened with Xilene. If the 100X objective is not cleaned, the oil will dry, and it will not be possible to see through it;...
-
Page 14: Maintenance
Maintenance WARNING: FOR YOUR OWN SAFETY, SWITCH OFF AND DISCONNECT THE MICROSCOPE FROM ANY ELECTRICAL SOURCE BEFORE ATTEMPTING ANY MAINTENANCE PROCEDURE TO AVOID THE RISK OF ELECTROCUTION. IF THE MICROSCOPE REQUIRES ANY MAINTENANCE OR REPAIR NOT APPEARING IN THIS MANUAL, CONSULT YOUR DISTRIBUTOR. A. - Page 15 B. Illumination maintenance 1. Replacing the LED a. To open the LED lamp housing, please use the Allen key provided as shown in Fig.2 to loosen the screw on the side of the lamp housing and pull the housing up Fig.3. Fig.3 b.
- Page 16 Fig.6 d. Put back the lamp housing on its holder and secure it with the original Allen screw and Allen key provided. C. Mechanical maintenance 1. Adjusting the tension of the coarse focus knob. The collar to adjust coarse focus tension (Fig.7) is situated between the coarse focus knob and the arm.
- Page 17 Fig.7 2. Adjusting the rack stop. 40X and 100X(optional) objectives use a retractable security system to avoid damage to the specimen slide or to the front of the lens, should the two come into contact. Additionally, as a security measure, the microscope includes a rack stop screw that regulates the upward movement of the stage.
-
Page 18: Troubleshooting
Troubleshooting ELECTRICAL PROBLEMS Problem Cause Solution The bulb does not work Outlet inoperative. Repair through a qualified technician. Cable not connected. Connect. Bulb burned out. Replace bulb. The bulb burns out in a Very high voltage. Reduce light to short time minimum before turning microscope on or off. - Page 19 IMAGE QUALITY Problem Cause Solution No image. Nosepiece badly Turn, until it clicks into positioned. position. Image too bright. Reduce light intensity. Poor resolution. Objective lens dirty. Clean objective. Eyepiece lens dirty. Clean eyepiece. Specimen slide up Place slide with slip side down.
-
Page 20: Moving The Microscope
MECHANICAL PROBLEMS Problem Cause Solution Does not stay in focus. The stage drops down. Adjust coarse focus tension. Does not stay in focus. The rack stop of the Readjust rack stop ascending movement of screw. the stage is badly adjusted. Moving the microscope If possible, avoid moving the microscope. -
Page 21: Warning Label
Bulbs and fuses are not under warrantee. The warrantee service is provided by Motic, or its authorised distributors. Defective products will be repaired free of charge when returned to Motic, or one of its distributors. Transport costs will be covered by the purchaser.
Need help?
Do you have a question about the BA80 Series and is the answer not in the manual?
Questions and answers