
Related Manuals for WamBam VG26300


Summary of Contents for WamBam VG26300
- Page 1 VG26300 ASSEMBLY INSTRUCTIONS 6’ WIDE ASSEMBLY INSTRUCTIONS PRIVACY VG26300 VINYL GATE 60 MIN Want to see a video on how to assemble this product? Scan the QR code WWW.WAMBAMFENCE.COM WWW.WAMBAMFENCE.COM VER. 110822...
- Page 2 VG26300 ASSEMBLY INSTRUCTIONS GENERAL IMPORTANT INFORMATION Check the inside of the larger pieces in your box for other materials packed inside. unobstructed assembling. components. MISSING VISIT OUR WEBSITE FIRST, PARTS? DAMAGED SO WE CAN HELP YOU RIGHT AWAY! Although great care has been taken to ensure proper packaging care department.
- Page 3 VG26300 ASSEMBLY INSTRUCTIONS INFORMATION GENERAL understand your fence. 1. That you have everything necessary to complete the gate. 2. That you will have assembled the gate frame in the correct order. 4. The gate height and width are similar to the measurements shown on page one.
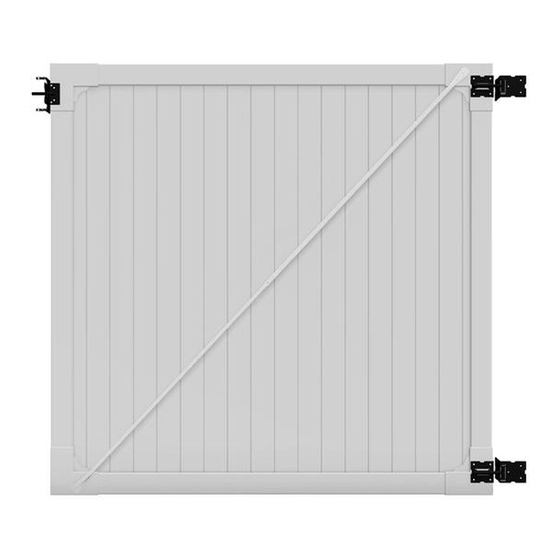
- Page 4 VG26300 ASSEMBLY INSTRUCTIONS DETAILED PRODUCT DIMENSIONS AND SPECIFICATIONS 72in. 72in. 48in. 2in. Ground Ground 3in. 74in. 42in. 79in. Center to Center WamBam Anchor (Large) 1.5in. 1.5in. 3.5in. 3.5in. 3.5in. 1.5in. Top Rail Bottom Rail Vertical Stile .090in. wall thickness WWW.WAMBAMFENCE.COM...
- Page 5 VG26300 ASSEMBLY INSTRUCTIONS MATERIALS STEP 1: 2¾” Gate Tension Pin (2) Metal Post Hinge (2) (20) Gate Jig (24) Gate Rail (2) WWW.WAMBAMFENCE.COM...
- Page 6 VG26300 ASSEMBLY INSTRUCTIONS STEP 2: STEP 2.1 STEP 2.2 Stabilizer and pound it into the ground. into the metal post stabilizer and determine Note: Metal post 5½” stabilizer to be used only on hinge post. STEP 2.3 STEP 2.4 post stabilizer.
- Page 7 VG26300 ASSEMBLY INSTRUCTIONS STEP 2.7 Make sure to fasten the fence panels STEP 3: STEP 3.1 Insert a Gate Rail STEP 3.2 STEP 3.3 they hit the opposite corner bracket. gate rail. WWW.WAMBAMFENCE.COM...
- Page 8 VG26300 ASSEMBLY INSTRUCTIONS INSERT STEP 4: STEP 4.1 STEP 4.2 Insert the tongue inside the gate rail. GATE FRAME TOP STEP 5: STEP 5.1 STEP 5.2 WWW.WAMBAMFENCE.COM...
- Page 9 VG26300 ASSEMBLY INSTRUCTIONS STEP 6: STEP 6.2 STEP 6.1 (M). ” STEP 7: STEP 7.1 STEP 7.2 onto the brackets Fasten the Latch Finger onto the corner per hinge. less WWW.WAMBAMFENCE.COM...
- Page 10 VG26300 ASSEMBLY INSTRUCTIONS STEP 8: STEP 8.1 STEP 8.2 the gate brace into place as illustrated. WWW.WAMBAMFENCE.COM...
- Page 11 VG26300 ASSEMBLY INSTRUCTIONS STEP 9: STEP 9.1 Align gate to horizontal fence rails. Note: Both fence & gate horizontal rail spacing can be adjusted freely to lower heights. STEP 9.2A per hinge. Note: See next page on the post side of the hinge.
- Page 12 VG26300 ASSEMBLY INSTRUCTIONS STEP 9.2B drill slightly as illustrated. Top View Note: Angle your drill to of post as illustrated. STEP 9.2C STEP 9.2D STEP 9.2E inside faces of the post for the 9.2C for the second hinge. 9.2E for the second hinge.
- Page 13 VG26300 ASSEMBLY INSTRUCTIONS LEVEL STEP 10: STEP 10.1 STEP 10.2 Fasten gate hinges. STEP 10.3 STEP 10.4 Note: Adjust the spring tension in gates as necessary. Use the included 4” Gate Tension Pin (I). Note: To set the tension insert the 4”...
- Page 14 VG26300 ASSEMBLY INSTRUCTIONS STEP 11: STEP 11.1 Align and fasten the Latch Catch WWW.WAMBAMFENCE.COM...
- Page 15 VG26300 ASSEMBLY INSTRUCTIONS OVER A ALTERNATIVE APPLICATION: STEP 1.1 STEP 1.2 STEP 1.3 STEP 1.4 If the side temporary spacer. STEP 1.5 Sidewalk/path STEP 1.5 STEP 1.6 STEP 1.7 plate of anchor interferes with the sidewalk as necessary. WWW.WAMBAMFENCE.COM...
- Page 16 VG26300 ASSEMBLY INSTRUCTIONS OVER A ALTERNATIVE APPLICATION: STEP 2.1 STEP 2.2 STEP 2.3 (purchase separately). Sidewalk/path Use the gate jig to ensure proper spacing. STEP 2.4 STEP 2.5 STEP 2.6 WWW.WAMBAMFENCE.COM...
- Page 17 VG26300 ASSEMBLY INSTRUCTIONS 6935 Reames Rd. Ste. K. hmmm@wambamfence.com 704-892-5222 877-778-5733 WWW.WAMBAMFENCE.COM WWW.WAMBAMFENCE.COM...
Need help?
Do you have a question about the VG26300 and is the answer not in the manual?
Questions and answers