
Related Manuals for sauter JCT 100


Summary of Contents for sauter JCT 100
- Page 1 Sauter GmbH Ziegelei 1 Tel.: +49-[0]7433- 9933-0 D-72336 Balingen Fax: +49-[0]7433-9933-149 E-Mail: info@kern-sohn.com Internet: www.sauter.eu Manual SAUTER JCT 100 V. 1.0 09/2023 JCT100-BA-en_2310.docx...
-
Page 2: Table Of Contents
V. 1.0 09/2023 Manual Congratulations on your purchase of a digital coating thickness gauge from SAUTER. We hope you enjoy your quality-measuring device with its wide range of functions. If you have any questions, requests or suggestions, please do not hesitate to contact us. - Page 3 Calculated Values ........................13 Quick Test Mode ........................13 9.5.1 Single Point ..........................14 9.5.2 Multi-Point ..........................14 Calibration ..........................14 9.6.1 Zero-Point Calibration....................... 15 9.6.2 Two-Point Calibration ....................... 15 Certificate of Compliance ................16 JCT100-BA-en-2310.docx...
-
Page 4: Introduction
SAUTER measuring devices. SAUTER offers the software and accessories as an option to make the measuring device more versatile in use. Please enquire with SAUTER or your SAUTER dealer or visit our website at www.sauter.eu. 2 Check before Use... -
Page 5: Scope Of Delivery
Clean the gauge casing with a soft cloth and mild detergent. Do not use abrasives or solvents to avoid damage to the gauge. Do not disassemble or modify the gauge. When the LCD displays the low battery symbol " ", charge the product in time. ... - Page 6 If there is no connection for 5 Searching time 5 min minutes, the Bluetooth function will be automatically turned off. ≥10m Transmission distance Probe measuring force 0.3~1.5N Probe measuring force range 2” color TFT screen Display Color display According to the built-in gravity Auto rotatable screen 4 directions: 0°, 90°, 180°...
-
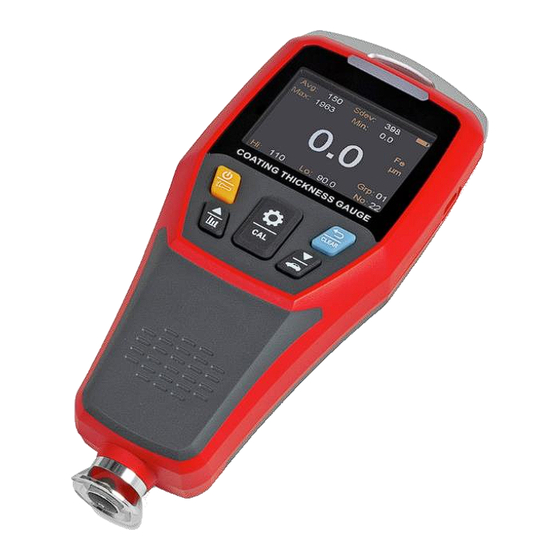
Page 7: Controls
7 Controls LED alarming light Power/Flashlight Confirm/menu Repeat/delete Down/automobile mode Up/histogram Sensor Hand strap buckle 10 USB/charging interface 11 Flashlight 12 Loudspeaker 8 LCD Display 8.1 Menu Icons Auto rotate screen Units Probe modes Measurement Storage location Upper limit modes Voice Lower limit LED alarm... -
Page 8: Main Interface
Note: When the icon color becomes white, users can adjust the setting items. When the icon is brown, users can only browse the setting items. 8.2 Main Interface 8.3 Single point 8.4 Multi point JCT100-BA-en-2310.docx... -
Page 9: Operating Instructions
9 Operating Instructions 9.1 Power on/off Long press to turn on/off the gauge. 9.2 Measurement Note: Keep the probe away from metal objects before turning on the product. Long press to power on. It will enter the main interface after initialization ... -
Page 10: Menu
9.3 Menu In the main interface, short press to open the menu: 9.3.1 Auto Rotate Screen In the menu, press to select the auto rotate screen icon , and then short press to enter its setting interface. Press to select to turn on/off the auto rotate function, and short press to confirm or to exit. -
Page 11: Data Storage Location
9.3.4 Data Storage Location In the menu, press to select the data storage location icon Group, and then short press to enter its setting interface. Press to select the group number, and short press to confirm or to exit. Note: There are 55 groups, and for each group, 60 data can be stored. 9.3.5 Continuous Measurement In the menu, press to select the continuous measurement icon... -
Page 12: Led Alarm
9.3.8 LED Alarm In the menu, press to select the LED alarm icon , and then short press to enter its setting interface. Press to select to turn on/off the LED alarm, and short press to confirm or to exit. 9.3.9 Voice Broadcast In the menu, press to select the voice broadcast icon... -
Page 13: Backlight Brightness
9.3.13 Backlight Brightness In the menu, press to select the backlight brightness icon , and then short press to enter its setting interface. Press to adjust the brightness, and short press to confirm or to exit. 9.3.14 Bluetooth In the menu, press to select the Bluetooth icon , and then short press to enter its setting interface. -
Page 14: Single Point
9.5.1 Single Point Press to set the target thickness value, and then press confirm Press to set the tolerance, and short press to enter the single point quick test mode; Measure the coating thickness of the measured object; ... -
Page 15: Zero-Point Calibration
9.6.1 Zero-Point Calibration Place the gauge vertically on the uncoated matrix, as shown in below picture Pick up the gauge after 2 seconds, the screen displays the value 0.0, as shown in Figure 2, and the gauge automatically returns to the main interface; ... -
Page 16: Certificate Of Compliance
10 Certificate of Compliance To have a look at the CE Declaration of Conformity, please click onto the following link: https://www.kern-sohn.com/shop/de/Downloads JCT100-BA-en-2310.docx...
Need help?
Do you have a question about the JCT 100 and is the answer not in the manual?
Questions and answers