Table of Contents
Advertisement
Quick Links
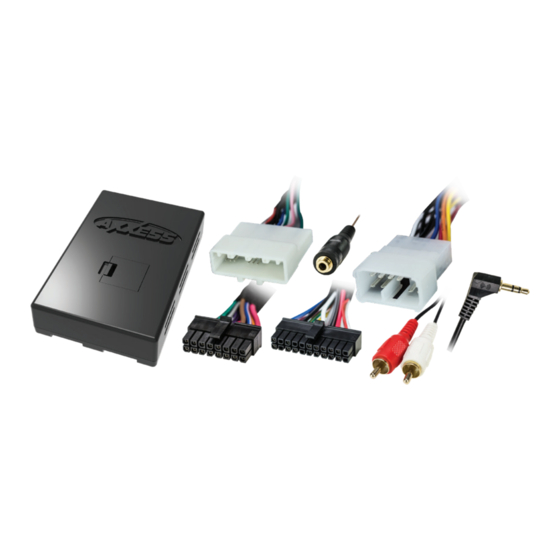
INTERFACE COMPONENTS
• AXDIS-TY2 interface
• AXDIS-TY2 harness
• Female 3.5mm connector with stripped lead
APPLICATIONS
TOYOTA
Avalon *
2013-Up
Highlander
4-Runner
2014-Up
Prius 3rd Gen (w/ nav) 2012-2015
Camry
2014-2017
Plug-In (PHV) (w/ nav) 2012-2015
Camry (w/ nav)
2012-2013
Prius V
* Only for models with a JBL amplifier
AxxessInterfaces.com
Toyota Amp Interface with SWC
*Visit AxxessInterfaces.com for up-to-date vehicle specific applications.
INTERFACE FEATURES
• Retains audio controls on the
steering wheel
• Provides NAV outputs (reverse)
• Retains the factory AUX-IN jack
2014-Up
Rav-4
2014.5-Up
Sequoia
Sequoia (w/ nav)
2012-2017
Sienna
© COPYRIGHT 2020 METRA ELECTRONICS CORPORATION
2012-Up*
• Designed for amplified models
• Retains balance
• Micro-B USB updatable
Tacoma
2014-Up
2014-Up
Tundra *
2014-Up
2013
Venza
2015-Up
Venza (w/ HDD based nav) 2013-2014
AXDIS-TY2
I N S TA L L AT I O N I N S T R U C T I O N S
TABLE OF CONTENTS
Connections to be made ....................................2-3
Installing the AXDIS-TY2 ........................................3
Programming the AXDIS-TY2 ................................4
Adjusting the AXDIS-TY2 .......................................4
Steering wheel control settings ........................5-7
- L.E.D. feedback ....................................................5
- Changing radio type ...........................................5
Troubleshooting .....................................................8
TOOLS REQUIRED
• Wire cutter • Crimp tool • Solder gun • Tape
• Connectors (example: butt-connectors, bell
caps, etc.) • Small flat-blade screwdriver
CAUTION!
All accessories, switches, climate
controls panels, and especially air bag indicator
2015
lights must be connected before cycling the
ignition. Also, do not remove the factory radio
with the key in the on position, or while the
vehicle is running.
REV. 1/23/20 INSTAXDIS-TY2
Advertisement
Table of Contents

Subscribe to Our Youtube Channel
Related Manuals for Axxess AXDIS-TY2


Summary of Contents for Axxess AXDIS-TY2
- Page 1 TABLE OF CONTENTS Connections to be made ........2-3 *Visit AxxessInterfaces.com for up-to-date vehicle specific applications. - 3.5mm jack steering wheel control retention ...3 Installing the AXDIS-TY2 ........3 INTERFACE FEATURES Programming the AXDIS-TY2 ........4 • Retains audio controls on the • Designed for amplified models Adjusting the AXDIS-TY2 ........4...
- Page 2 CONNECTIONS TO BE MADE From the 16-pin harness with stripped leads to the aftermarket radio: From the AXDIS-TY2 harness to the aftermarket radio: • Connect the Blue/White wire to the amp turn on wire. This wire must be connected to hear •...
- Page 3 • For all other radios: Connect the 3.5mm jack from the AXDIS-TY2 harness into the jack on the aftermarket radio designated for an external steering wheel control interface. Please refer to the aftermarket radios manual if in doubt as to where the 3.5mm jack goes to.
- Page 4 • With a small flat-blade screwdriver, adjust the potentiometer clockwise to raise the audio level; counterclockwise to lower the audio level. 2. Connect the AXDIS-TY2 harness to the wiring harness in the vehicle. • Once at a desired level, audio level adjustment is complete.
- Page 5 * Note: If the AXDIS-TY2 flashes Red (7) times, and you do not have an Alpine radio connected to 5. Once the desired radio number has been selected, press and hold the Volume-Down button it, that means the AXDIS-TY2 does not detect a radio connected it.
- Page 6 (1) second until the L.E.D. comes on, and then release the Volume-Up button. 1. Eclipse (Type 1) 7. Alpine 13. LG This will tell the AXDIS-TY2 that this function is not available and it will move on to the next 2. Kenwood 8. Visteon 14. Parrot function.
- Page 7 6. ATT/Mute 11. Play/Enter 15. Fan-Up * The AXDIS-TY2 has the capability to assign (2) functions to a single button, except Volume-Up and Volume-Down. Follow the steps below to program the button(s) to your liking. 7. Preset-Up 2. Not allowed 12.
- Page 8 Tech Support line at 1-800-253-TECH. Before doing so, look over the instructions a second time, and make sure the Resetting the AXDIS-TY2 installation was performed exactly as the instructions are stated. Please have the vehicle apart and ready to perform troubleshooting 1.
Need help?
Do you have a question about the AXDIS-TY2 and is the answer not in the manual?
Questions and answers