Table of Contents
Advertisement
Quick Links
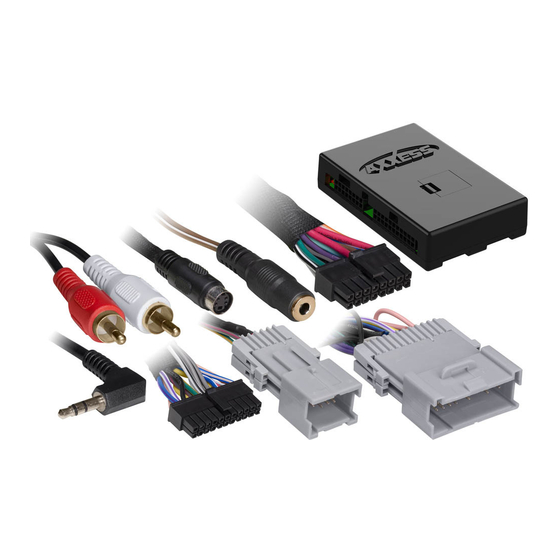
INTERFACE COMPONENTS
• AXDIS-CL2 interface • AXDIS-CL2 harness
• 16-pin harness with stripped leads • 4-pin harness with stripped leads
• Female 3.5mm connector with stripped leads
TOOLS REQUIRED
• Wire cutter • Crimp tool • Solder gun • Tape • Connectors (example: butt-connectors, bell caps, etc.) • Small flat-blade screwdriver
APPLICATIONS
See inside front cover
AxxessInterfaces.com
GM Data Interface with SWC 2000-2013
INTERFACE FEATURES
• Provides accessory power
• Retains the factory AUX-IN jack
(12-volt 10-amp)
• Retains RSE (rear seat
• Retains R.A.P. (retained
accessory power)
• Retains SAT (satellite radio)
• Provides NAV outputs (parking
• Can be used in non-amplified,
brake, reverse, speed sense)
• Retains chimes
• Retains audio controls on the
• Retains balance and fade
steering wheel
• Retains OnStar / OE Bluetooth
• Micro "B" USB updatable
• Adjustable OnStar level
* The RSE must be activated by the factory radio
© COPYRIGHT 2020 METRA ELECTRONICS CORPORATION
I N S TA L L AT I O N I N S T R U C T I O N S
TABLE OF CONTENTS
Connections ........................................................ 3-6
- For models without an amplifier .......................3
- For models with an analog amplifier ................4
- For models with a digital amplifier ...................5
entertainment) *
Installation .............................................................6
Programming ...........................................................6-7
Adjustments ...........................................................8
or analog/digital amplified
Extra features .....................................................8-9
models
Steering wheel control settings ......................9-12
- L.E.D. feedback ....................................................9
(excludes digital amplified
- Changing radio type ......................................... 10
models)
- Remapping ...............................................................10
- Dual assignment instructions .................................11-12
Troubleshooting ....................................................12
Product Info
AXDIS-CL2
REV. 1/21/20 INSTAXDIS-CL2
Advertisement
Table of Contents

Related Manuals for Axxess AXDIS-CL2


Summary of Contents for Axxess AXDIS-CL2
-
Page 1: Table Of Contents
• Micro “B” USB updatable • Adjustable OnStar level - Dual assignment instructions .........11-12 • AXDIS-CL2 interface • AXDIS-CL2 harness Troubleshooting ............12 • 16-pin harness with stripped leads • 4-pin harness with stripped leads * The RSE must be activated by the factory radio •... - Page 2 APPLICATIONS BUICK CHEVROLET (CONT) OLDSMOBILE Century 2004-2005 Express 2003-2007 Canyon 2004-2012 Alero 2001-2004 Impala 2000-2005 LaCrosse 2005-2009 Envoy * 2002-2004 Bravada * 2002-2004 Kodiak C4500-C8500 2003-2009 Rainier * 2004 Envoy 2005-2009 Intrigue 2002 Malibu 2001-2003 Rainier 2005-2007 Savana 2003-2007 PONTIAC Malibu Classic 2004-2005 Regal...
-
Page 3: Connections
• Connect the Blue/Pink wire to the VSS/speed sense wire. sense wire. Note: There are (2) speed sense wires. If the Blue/Pink wire on the AXDIS-CL2 harness is • Connect the Red and White RCA jacks to the audio AUX-IN jacks of the aftermarket radio. -
Page 4: For Models With An Analog Amplifier
If you are unsure if your vehicle is factory Note: There are (2) speed sense wires. If the Blue/Pink wire on the AXDIS-CL2 harness is populated on the factory side, use that wire instead. -
Page 5: For Models With A Digital Amplifier
If you are unsure if your vehicle is factory ampli- Note: There are (2) speed sense wires. If the Blue/Pink wire on the AXDIS-CL2 harness is fied or not, please contact your local dealership. -
Page 6: Mm Jack Steering Wheel Control Retention
2001-2004 Relay 2005-2007 • For all other radios: Connect the 3.5mm jack from the AXDIS-CL2 into the jack on the aftermarket radio designated for an external steering wheel control interface. Please refer to the aftermarket radios Intrigue 2002 manual if in doubt as to where the 3.5mm jack goes to. -
Page 7: Programming
Note: The L.E.D. will turn on solid Green for a moment, and then turn off under normal operation 10. If the interface fails to function, refer to Resetting the AXDIS-CL2, then resume from step 7. after the key has been cycled. -
Page 8: Adjustments
• If your vehicle comes equipped with AUX-IN, rear seat entertainment, or satellite radio, the • With the vehicle and radio turned on, turn the volume up 3/4 of the way. AXDIS-CL2 can retain these features. • With a small flat-blade screwdriver, adjust the potentiometer clockwise to raise the audio •... -
Page 9: Steering Wheel Control Settings
SOURCE button is pressed for 2 seconds the source will change. The sequence of sources are * Note: If the AXDIS-CL2 flashes Red (7) times, and you do not have an Alpine radio connected to SAT/RSE/AUX-IN. The AX-LCD will provide a visual confirmation of what source you are on. -
Page 10: Changing Radio Type
Follow the steps below to remap the steering wheel control buttons: programmed. 1. Ensure the AXDIS-CL2 is visible so you can see the L.E.D. flashes to confirm button 4. Press and hold the Volume-Up button until the L.E.D. goes solid, and then release. Repeat recognition. -
Page 11: Dual Assignment Instructions
The AXDIS-CL2 has the capability to assign (2) functions to a single button, except Volume-Up This will tell the AXDIS-CL2 that this function is not available and it will move on to the next and Volume-Down. Follow the steps below to program the button(s) to your liking. -
Page 12: Troubleshooting
Monday - Friday: 9:00 AM - 7:00 PM Saturday: 10:00 AM - 7:00 PM TROUBLESHOOTING Sunday: 10:00 AM - 4:00 PM Resetting the AXDIS-CL2 1. The Blue reset button is located inside the interface, between the two connectors. The button is accessible outside the ® NOWLEDGE IS...
Need help?
Do you have a question about the AXDIS-CL2 and is the answer not in the manual?
Questions and answers