Table of Contents
Advertisement
Quick Links
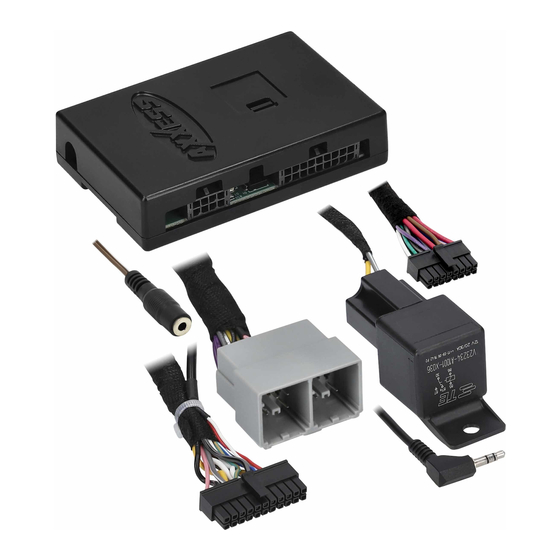
INTERFACE COMPONENTS
• AXDIS-GMLN31 interface • AXDIS-GMLN31 harness
• 16-pin harness with stripped leads
• Female 3.5mm connector with stripped leads
APPLICATIONS
Chevrolet
Camaro (IOR) *** †
2019-Up
Cruze
Cheyenne (IOR) †
2019-Up
Equinox (IOR) †
Colorado (IOR)
2019-Up
Malibu (IOR) †
*** No Backup Camera Retention
†
For extension, use AXEXH-GM31
AxxessInterfaces.com
GM Data Interface with SWC
INTERFACE FEATURES
• Provides accessory power
(12-volt 10-amp)
• Retains R.A.P. (retained
accessory power)
• Provides NAV outputs (parking
brake, reverse, speed sense)
2019-Up
Silverado (IOR) †
2019-Up
2019-Up
Sonic
2019-Up
2019-Up
Spark (IOR)
2019-Up
© COPYRIGHT 2021 METRA ELECTRONICS CORPORATION
AXDIS-GMLN31
I N S TA L L AT I O N I N S T R U C T I O N S
2019-Up
TABLE OF CONTENTS
Connections to be made ....................................2-3
Installing the AXDIS-GMLN31 .................................3
• Retains audio controls on the
Programming the AXDIS-GMLN31 .........................4
steering wheel
Steering wheel control settings ........................5-7
• Non-amplified models only
- L.E.D. feedback ....................................................5
• Rearview camera retention
- Changing radio type ...........................................5
• Retains balance and fade
• Micro-B USB updatable
- Dual assignment instructions ............................7
Troubleshooting .....................................................8
TOOLS REQUIRED
• Wire cutter • Crimp tool • Solder gun • Tape
• Connectors (example: butt-connectors, bell
caps, etc.) • Small flat-blade screwdriver
Product Info
GMC
Canyon (IOR)
2019-Up
Sierra 1500 (IOR) †
2019-Up
Terrain (IOR) †
2019-Up
REV. 3/18/21 INSTAXDIS-GMLN31
Advertisement
Table of Contents

Related Manuals for Axxess AXDIS-GMLN31


Summary of Contents for Axxess AXDIS-GMLN31
-
Page 1: Table Of Contents
- Dual assignment instructions ......7 Troubleshooting .............8 INTERFACE COMPONENTS TOOLS REQUIRED • AXDIS-GMLN31 interface • AXDIS-GMLN31 harness • Wire cutter • Crimp tool • Solder gun • Tape • 16-pin harness with stripped leads • Connectors (example: butt-connectors, bell • Female 3.5mm connector with stripped leads caps, etc.) •... -
Page 2: Connections To Be Made
CONNECTIONS TO BE MADE From the 16-pin harness with stripped leads to the aftermarket radio: From the AXDIS-GMLN31 harness to the aftermarket radio: • Connect the Red wire to the accessory wire. • Connect the Black wire to the ground wire. -
Page 3: Mm Jack Steering Wheel Control Retention
For the radios listed below, connect the included female 3.5mm connector with stripped leads, to the male 3.5mm SWC jack from the AXDIS-GMLN31 harness. Any remaining wires tape off and disregard. Attention! Do not connect the AXDIS-GMLN31 harness to the wiring harness in the vehicle just yet. •... -
Page 4: Programming The Axdis-Gmln31
L.E.D. • Start the vehicle. • Connect the AXDIS-GMLN31 harness to the wiring harness in the vehicle. • The L.E.D. will initially turn on solid Green, then turn off for a few seconds while it auto detects the radio installed. -
Page 5: Steering Wheel Control Settings
* Note: If the AXDIS-GMLN31 flashes Red (7) times, and you do not have an Alpine radio connected 5. Once the desired radio number has been selected, press and hold the Volume-Down button to it, that means the AXDIS-GMLN31 does not detect a radio connected it. -
Page 6: Remapping The Steering Wheel Control Buttons
(1) second until the L.E.D. comes on, and then release the Volume-Up button. This 1. Eclipse (Type 1) 7. Alpine 13. LG will tell the AXDIS-GMLN31 that this function is not available and it will move on to the next 2. Kenwood 8. Visteon 14. Parrot function. -
Page 7: Dual Assignment Instructions
STEERING WHEEL CONTROL SETTINGS (CONT) Dual assignment instructions (long button press) Dual assignment legend The AXDIS-GMLN31 has the capability to assign (2) functions to a single button, except Volume- 1. Not allowed 6. ATT/Mute 11. Play/Enter 15. Fan-Up * Up and Volume-Down. Follow the steps below to program the button(s) to your liking. -
Page 8: Troubleshooting
Having difficulties? We’re here to help. TROUBLESHOOTING Contact our Tech Support line at: 386-257-1187 Resetting the AXDIS-GMLN31 Or via email at: 1. The Blue reset button is located inside the interface, between the two connectors. The techsupport@metra-autosound.com button is accessible outside the interface, no need to open the interface.
Need help?
Do you have a question about the AXDIS-GMLN31 and is the answer not in the manual?
Questions and answers