
Related Manuals for Crestron CEN-SWPOE-5AC


Summary of Contents for Crestron CEN-SWPOE-5AC
- Page 1 View this document in HTML crestron.com/docs/9448 Product Manual CEN-SWPOE-5AC 5-Port PoE Network Switch Crestron Electronics, Inc.
- Page 2 Certain Crestron products contain open source software. For specific information, please visit www.crestron.com/opensource. Crestron and the Crestron logo are either trademarks or registered trademarks of Crestron Electronics, Inc. in the United States and/or other countries. UL and the UL logo are either trademarks or registered trademarks of Underwriters Laboratories, Inc. in the United States and/or other countries.
-
Page 3: Table Of Contents
Determine Mounting Orientation and Line Power Location Mount to Electrical Box Mount to DIN Rail in DIN Cabinet Mount to Flat Surface Replace a CEN-SW-POE-5 Connections Resources Crestron Support and Training Programmer and Developer Resources Product Certificates Product Manual — Doc. 9448A Contents • iii... -
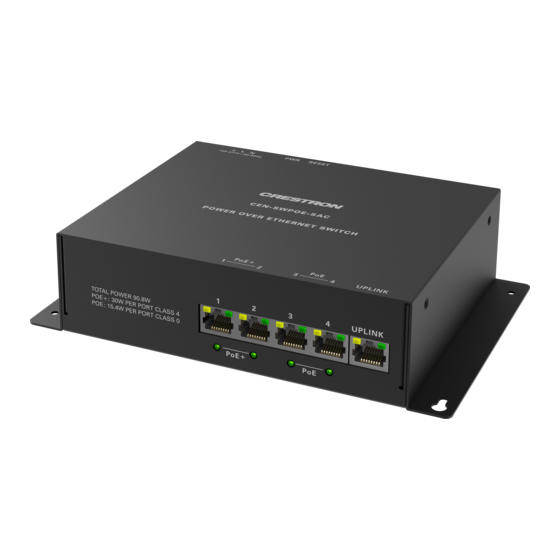
Page 4: Overview
Using the CEN-SWPOE-5AC, there is no need to install a separate power supply at each networked device location. The CEN-SWPOE-5AC can simply be mounted at a convenient location on a wall or in an equipment rack, providing a single power source for four separate 802.3af/at compliant PoE powered devices. -
Page 5: Specifications
Specifications Product specifications for the CEN-SWPOE-5AC. Product Specifications Ethernet Ports (5) 100BASE-TX/1000BASE-T Ethernet Network IEEE 802.3, 802.3u, 802.3ab, 802.3x, & 802.3af /at Standards Transmission Method Store-and-forward Indicators PoE 1 – 4 (4) green LEDs, indicate a PoE powered device is connected to each corresponding... - Page 6 Dimensions Height 4.72 in. (120 mm) Width 7.34 in. (187 mm) Depth 1.85 in. (47 mm) Weight 30 oz (850 g) Compliance Regulatory Model: M202214001 FCC Part 15 Class B, IC Class B, CE, UL® Standards for US and Canada Product Manual — Doc. 9448A CEN-SWPOE-5AC • 6...
-
Page 7: Dimension Drawings
Dimension Drawings 7 • CEN-SWPOE-5AC Product Manual — Doc. 9448A... -
Page 8: Installation
Installation The CEN-SWPOE-5AC PoE switch can be installed to a four-inch square electrical box or 68 mm (2.68 in.) standard round EU electrical box, DIN Rail, or the flat surface of a cabinet. WARNINGS: To avoid fire, shock, or death, turn off the power at the circuit breaker or fuse and test that... -
Page 9: In The Box
In the Box Qty. Description CEN-SWPOE-5AC, 5-Port PoE Network Switch Additional Items Backplate Terminal block connector (2062404) DIN rail adapters (2062406) M3 X 6 mm screws (2062403) (for attaching the switch to the backplate) M3 X 10 mm flathead sheet metal screws (2062405) -
Page 10: Determine Mounting Orientation And Line Power Location
Determine the mounting location and verify the proper orientation of the backplate and the CEN-SWPOE-5AC. There are two location options for connecting the line power: the bottom of the switch, which can still be accessed when the backplate is attached, and the side of the switch. Out of the box, both locations are covered by a shield. - Page 11 1. Remove the two screws securing the shield to uncover the power connection (the bottom power connection is shown below). 2. Wire the line power to the terminal block connector. For details, refer to Connections on page 11 • CEN-SWPOE-5AC Product Manual — Doc. 9448A...
- Page 12 3. Plug the wired terminal block connector into the switch and tighten the screws to secure it. Product Manual — Doc. 9448A CEN-SWPOE-5AC • 12...
-
Page 13: Mount To Electrical Box
Mount to Electrical Box The CEN-SWPOE-5AC can be installed to a four-inch square electrical box or 68 mm (2.68 in.) standard round EU electrical box. Install the electrical box as described in the manufacturer’s instructions and feed the wiring through the electrical box. - Page 14 Screw Holes for Standard Round EU Electrical Box To mount the CEN-SWPOE-5AC to an electrical box: 1. Refer to Determine Mounting Orientation and Line Power Location on page 10. If using the bottom power connection, make sure the connection is made before mounting the switch.
- Page 15 Ensure the countersink screw holes face the switch. Ensure the terminal block cutout aligns with the connection on the switch. The backplate should not cover the terminal block or shield screws. Mount to Four-Inch Square Electrical Box 15 • CEN-SWPOE-5AC Product Manual — Doc. 9448A...
- Page 16 Mount to Standard Round EU Electrical Box Product Manual — Doc. 9448A CEN-SWPOE-5AC • 16...
- Page 17 5. Secure the CEN-SWPOE-5AC to the backplate with two or four 6 mm M3 screws (included). NOTES: If the backplate is flush with a flat surface, use 3 mm washers (not included) when securing the M3 screws. Ensure the countersink screw holes face the switch.
- Page 18 Installed Assembly with Four-Inch Square Electrical Box Installed Assembly with Standard Round EU Electrical Box 6. Make connections necessary for the application. For details, refer to Connections on page Product Manual — Doc. 9448A CEN-SWPOE-5AC • 18...
-
Page 19: Mount To Din Rail In Din Cabinet
Mount to DIN Rail in DIN Cabinet To mount the CEN-SWPOE-5AC to a DIN rail: 1. Refer to Determine Mounting Orientation and Line Power Location on page 10. Because the DIN rail covers the bottom of the switch, the side line power location is recommended. - Page 20 Installed Assembly Product Manual — Doc. 9448A CEN-SWPOE-5AC • 20...
- Page 21 3. Secure the CEN-SWPOE-5AC to the backplate with four 6 mm M3 screws (included). NOTES: Ensure the countersink screw holes face the switch. Ensure the terminal block cutout aligns with the connection on the switch. The backplate should not cover the terminal block or shield screws.
- Page 22 7. Tilt the bottom of the DIN rail adapters toward the DIN rail until they snap into place. Product Manual — Doc. 9448A CEN-SWPOE-5AC • 22...
-
Page 23: Mount To Flat Surface
2. Align the backplate to the mounting location on the flat surface. 3. Secure the CEN-SWPOE-5AC to the backplate and the flat surface with 3 mm washers (not included) and four M3 10 mm screws (included). -
Page 24: Replace A Cen-Sw-Poe-5
Replace a CEN-SW-POE-5 To replace a wall mounted CEN-SW-POE-5 with a CEN-SWPOE-5AC: 1. Remove the CEN-SW-POE-5. 2. For the CEN-SWPOE-5AC, refer to Determine Mounting Orientation and Line Power Location on page 10. If using the bottom power connection, make sure the connection is made before mounting the switch. - Page 25 Ensure screw holes with countersink face the switch. Ensure the cutout for the terminal block aligns with the connection on the switch. The backplate should not cover the screws for the terminal block or shield. 25 • CEN-SWPOE-5AC Product Manual — Doc. 9448A...
- Page 26 5. Secure the CEN-SWPOE-5AC to the backplate with four 6 mm M3 screws (included). NOTES: If the backplate is flush with a flat surface, use 3 mm washers (not included) when securing the M3 screws. Ensure the countersink screw holes face the switch.
-
Page 27: Connections
Connections Make connections to the CEN-SWPOE-5AC as appropriate for the application. 27 • CEN-SWPOE-5AC Product Manual — Doc. 9448A... -
Page 28: Resources
Resources The following resources are provided for the CEN-SWPOE-5AC. NOTE: You may need to provide your Crestron.com web account credentials when prompted to access some of the following resources. Crestron Support and Training Crestron True Blue Support Crestron Resource Library Crestron Online Help (OLH) Crestron Training Institute (CTI) Portal... - Page 29 Crestron Electronics, Inc. Product Manual — Doc. 9448A 15 Volvo Drive, Rockleigh, NJ 07647 01/26/24 Tel: 888.CRESTRON Specifications subject to Fax: 201.767.7656 change without notice. www.crestron.com...
Need help?
Do you have a question about the CEN-SWPOE-5AC and is the answer not in the manual?
Questions and answers