Table of Contents
Advertisement
Available languages
Available languages
Quick Links
SOKI plus
Deutsch
Solar-Kompaktinstallation
Gebrauchs- und Montageanweisung
Polski
Kompaktowa instalacja solarna
Instrukcja obsługi i montażu
English
Compact solar installation
Installation and operating instructions
Nederlans
Compacte zonne-installatie
Gebruiks- en montagehandleiding
Français
Installation solaire compacte
Mode d'emploi et instructions de montage
Español
Instalación solar compacta
Instrucciones de uso y montaje
Česky
Solární kompaktní instalaci
Návod k použití a k montáži
Advertisement
Table of Contents

Related Manuals for STIEBEL ELTRON SOKI plus


Summary of Contents for STIEBEL ELTRON SOKI plus
- Page 1 SOKI plus Deutsch Français Solar-Kompaktinstallation Installation solaire compacte Gebrauchs- und Montageanweisung Mode d‘emploi et instructions de montage Español Polski Instalación solar compacta Kompaktowa instalacja solarna Instrucciones de uso y montaje Instrukcja obsługi i montażu English Česky Compact solar installation Solární kompaktní instalaci Installation and operating instructions Návod k použití...
- Page 2 Die Montage (Wasser- und Elektroinstal- Deutsch lation) sowie die Erstinbetriebnahme und die Wartung dieses Gerätes dürfen nur von Gebrauchsanweisung einem zugelassenen Fachmann entsprechend Montageanweisung dieser Anweisung ausgeführt werden. Umwelt und Recycling Kundendienst und Garantie Adressen und Kontakte Montaż (podłączenia do instalacji wodnej Polski i elektrycznej), pierwsze uruchomienie oraz konserwacja urządzenia powinny...
- Page 3 1 ... 13 l/min (Standard) SOL 20 SI: bis max. 6. St. 1.3 Lieferumfang Druckverlustdiagramm 88,2 ● 1 x Solarkompaktinstallation SOKI plus ● 1 x Schlauchtülle mit Überwurf für KFE- 78,4 Hahn 3/4“ und Verschlusskappe 3/4“ ● Schrauben und Dübel zur Befestigung 68,6 ●...
-
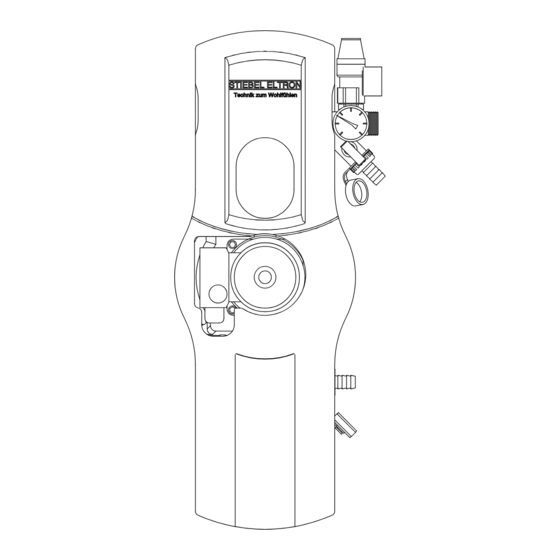
Page 4: Hydraulischer Anschluss
Montageanweisung (für den Fachmann) 2.1 Wandmontage ● Vordere Isolierschale (12) abnehmen. Die SOKI mit der hinteren Isolierschale (2) verschraubt lassen! ● Die Bohrlöcher durch die Isolierung an- zeichnen, mit einem 8 mm Bohrer bohren, ● Die SOKI mit den beiliegenden Befestigungs- schrauben (S6 x 60 mm) und Dübeln (S8) an der Wand befestigen. - Page 5 ● Den Befüllhahn schließen und die Pumpe (6) oberhalb der Pumpe (7) integriert und der Spül-und Befüllstation abschalten, die Das Stiebel Eltron-Druckausdehnungsgefäß hat einen Öffnungsdruck von 20 mbar. Einstellschraube am Volumenstrommesser ist H-30 L bzw. H-30 LS geeignet und für ei- ●...
-
Page 6: Instrukcja Obsługi
26 77 19) ● Zawór kulowy z zaworem zwrotnym (nr katalogowy 26 77 20) ● Miernik strumienia przepływu (nr katalogowy 26 77 21) ● Termometr na SOKI plus (nr katalogowy 26 77 22) ● Pompa ST 20/6 (nr katalogowy 26 78 88) -
Page 7: Instrukcja Montażu
Nie mniej jednak, przy uruchomie- niu należy skontrolować szczelność połączeń (próba ciśnieniowa). Montaż na zasobniku C SOKI plus może być przymocowany, przy użyciu zestawu przyłączeniowego SAS SOKI (należy zamawiać oddzielnie, nr katalogowy 22 04 63) bezpośrednio do zasobnika SBB... - Page 8 usunięcia powietrza z instalacji konieczne punkcie (powyżej kolektorów). Podłączenie elektryczne ● Otworzyć zawór napełniająco - spus- jest w międzyczasie krótkotrwałe otwarcie śruby nastawczej w mierniku strumienia towy w najniższym punkcie instalacji lub Wszystkie prace elektryczne przepływu (8) (nacięcie w śrubie ustawione przy zaworze płucząco –...
-
Page 9: Equipment Description
210 ... 250 V~ 1.3 Standard delivery Flow meter 1 ... 13 l/min (standard) ● 1 x compact solar assembly SOKI plus Pressure drop diagram ● 1 x hose ferrule with union nut for the fill 88,2 & drain valve 3/4“ and sealing cap 3/4“... -
Page 10: Installation Instructions
Installation instructions (for contractors) 2.1 Wall mounting ● Remove the front insulation shell (12). Keep the SOKI secured to the rear insulation shell (2). ● Mark the holes to be drilled through the insulation and drill with an 8 mm bit. ●... -
Page 11: Electrical Connection
2.5 Installing the expansion vessel opening pressure of 20 mbar. ● Draining the system requires that the The Stiebel Eltron expansion vessel is suitable the flushing and fill station OFF, then open for H-30 L or H-30 LS and approved for an the adjusting screw at the flow meter (8) gravity brake is open. - Page 12 16 stuks Debietmeter 1 ... 13 l/min (standaard) 1.3 Leveringsomvang Drukverliesdiagram ● 1 x compacte zonne-installatie SOKI plus 88,2 ● 1 x slangdoorvoer met wartelmoer voor KFE-kraan 3/4” en afsluitdop 3/4” 78,4 ● Schroeven en pluggen voor de bevestiging ●...
- Page 13 Montagehandleiding (voor de vakman) 2.1 Wandmontage ● De voorste isolatieschaal (12) afnemen. De SOKI op de achterste isolatieschaal (2) laten zitten! ● De boorgaten door de isolatie aftekenen, met een 8 mm boor boren, ● De SOKI met de bijgeleverde bevestigings- schroeven (S6 x 60 mm) en pluggen (S8) op de muur bevestigen.
- Page 14 ● De installatie boven de collectoren ontluch- zwaartekrachtrem geopend zijn. Daartoe Het Stiebel Eltron-drukexpansievat is geschikt ten, tot de installatievloeistof zonder bellen moet de greep van de kogelkraan (6) in de voor H-30 L of H-30 LS en voor een werkdruk naar buiten loopt.
-
Page 15: Possibilités D'utilisation
210 ... 250 V~ Débitmètre 1 ... 13 l/min (standard) 1.3 Matériel livré ● 1 x installation solaire compacte SOKI plus ● 1 x robinet de remplissage et de vidange 88,2 3/4’’ et capuchon de fermeture 3/4’’ ● vis et chevilles pour la fixation 78,4 ●... -
Page 16: Instructions De Montage
Instructions de montage (pour le spécialiste) Montage mural ● Déposer la coquille isolante avant (12). Laisser la SOKI vissée sur la coquille isolante arrière (2) ! ● Marquer les emplacements des perçages à travers l’isolation, percer avec un foret de 8 mm. ●... -
Page 17: Dispositif De Sécurité
SAS SOKI (non l’installation jusqu’à env. 6 bars. Lire la pression compris dans le matériel livré). Le vase d’expansion de Stiebel Eltron est de l’installation sur le manomètre (4). conçu pour H-30 L ou H-30 LS et agréé... -
Page 18: Instrucciones De Uso
SOL 27 plus: hasta un máx. de 16 unidades 1.3 Volumen de suministro Gráfi co de pérdida de carga 88,2 ● 1 x Instalación solar compacta SOKI plus ● 1 x Toma injerto con tuerca para grifo de 78,4 llenado/vaciado de 3/4“ y tapón de 3/4“... -
Page 19: Instrucciones De Montaje
Instrucciones de montaje (para el instalador) 2.1 Montaje mural ● Retire la coquilla aislante delantera (12). ¡Deje atornillada la coquilla aislante (2) trasera de la SOKI! ● Marque las perforaciones a través del aislamiento, perfore con broca de 8 mm. ●... -
Page 20: Conexión Eléctrica
6 bar. Lea la presión ● Para vaciar la instalación, el freno de gravedad El vaso de expansión Stiebel Eltron es apro- de la instalación en el manómetro (4) debe estar abierto. Para ello debe girarse el piado para el H-30 L o bien H-30 LS y admite ●... -
Page 21: Návod K Použití
1 ... 13 l/min (standardní) SOL 20 SI: max. do 6 kusů Rozsah dodávky Diagram tlakových ztrát ● 1 x solární kompaktní přístroj SOKI plus 88,2 ● 1 x hadicová objímka s přesuvem pro kohout KFE 3/4“ a uzavírací krytkou 3/4“ 78,4 ●... - Page 22 Instrukce k montáži (pro odborníka) Montáž na stěnu B ● Odeberte přední izolační část (12). Nechte přístroj SOKI se zadní izolační částí (2) přišroubovaný! ● Naznačte si skrz izolaci vrtané otvory, vyvr- tejte je pomocí vrtáku s průměrem 8 mm. ●...
- Page 23 Instalace tlakové expanzní nádoby ● Zavřete plnící kohout a vypněte čerpadlo vána v kulovém kohoutu (6) nad čerpa- Tlaková expanzní nádoba Stiebel Eltron je proplachovací a plnící stanice, otevřete dlem (7) a má otevírací tlak 20 mbar. vhodná pro kapaliny teplonosného média H- ●...
-
Page 24: Umwelt Und Recycling
Garantiefrist in Gang gesetzt. Dies Fürstenberger Straße 77, 37603 Holzminden ermittelt wird, ob ein Garantieanspruch besteht. gilt für alle von Stiebel Eltron erbrachten Garan- Im Garantiefall entscheidet allein Stiebel Eltron, auf E-Mail: kundendienst@stiebel-eltron.com tieleistungen, insbesondere für etwaige eingebaute welche Art der Fehler behoben werden soll. -
Page 25: Garantie
U dient zich te wenden tot de vestiging van country. zakupione. Naprawy gwarancyjne Stiebel Eltron of de importeur hiervan in het należy zgłaszać do zakładu betreffende land. serwisowego wymienionego w karcie The installation, electrical connec- gwarancyjnej. - Page 26 Notizen...
- Page 27 Notizen...
- Page 28 Adressen und Kontakte www.stiebel-eltron.com Adressen und Kontakte www.stiebel-eltron.com Zentrale Holzminden Stiebel Eltron Vertriebszentren Great Britain Stiebel Eltron GmbH & Co. KG Exclusive Distributor: Dortmund Dr.-Stiebel-Str. 37603 Holzminden Applied Energy Products Ltd. Oespel (Indupark) Telefon 0 5531/702-0 Morley Way GB-Peterborough PE2 9JJ Brennaborstr.
Need help?
Do you have a question about the SOKI plus and is the answer not in the manual?
Questions and answers