
Related Manuals for Thor Broadcast H-HDPerformux-4


Summary of Contents for Thor Broadcast H-HDPerformux-4
- Page 1 User Manual 4 / 8 / 16 / 24 HDMI IPTV Streaming H.264 Encoder UDP, RTP/RTSP - SPTS & MPTS Multicast & Unicast H-HDPerformux-4/8/16/24...
- Page 2 A Note from Thor Broadcast about this Manual Intended Audience This user manual has been written to help people who have to use, integrate and to install the product. Some chapters require some prerequisite knowledge in electronics and especially in broadcast technologies and standards.
-
Page 3: Table Of Contents
DIRECTORY CHAPTER 1 PRODUCT INTRODUCTION ..................4 1.1 OUTLINE ............................4 1.2 MAIN FEATURES ........................... 4 1.3 FLOW CHART..........................5 1.4 TECH SPECS ..........................5 1.5 PART NUMBERS ..........................6 1.6 APPEARANCE AND PICS ......................6 CHAPTER 2 INSTALLATION GUIDE....................8 2.1 WHAT’S IN THE BOX ........................ -
Page 4: Chapter 1 Product Introduction
Chapter 1 Product Introduction 1.1 Outline The Thor Broadcast HDMI HD-Performux network encoder is a unique solution for IP Broadcasting in high density. This unit can be ordered with 4/8/16/24 HDMI inputs with MPEG-4 AC/H264 video encoding and LC-AAC or HE-AAC or AC3 Passthrough audio encoding. Audio Multi-Channel encoder is a professional HD/SD audio &... -
Page 5: Flow Chart
H-HDPerformux-4/8/16/24 1.3 Flow Chart HDMI #1 MPEG4 AVC/H.264 Encoding 1 MPTS and 16/24 SPTS 1 ASI out HDMI #16/24 MPEG4 AVC/H.264 Encoding 1 ASI input 32 IP inputs 1.4 Tech Specs 4/8/16/24 HDMI inputs 1 ASI in for re-mux Input... -
Page 6: Part Numbers
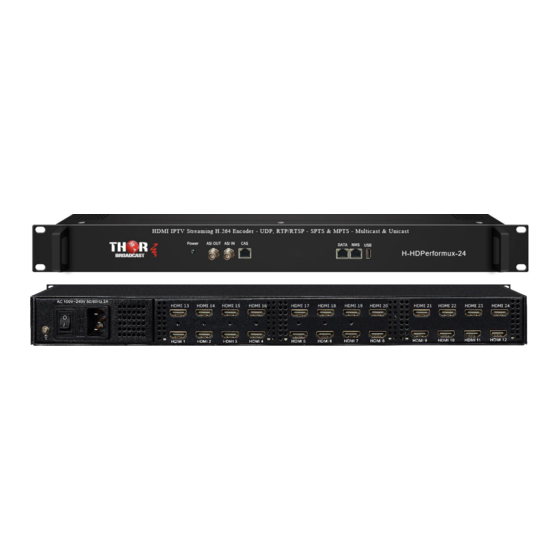
16 HDMI inputs H-HDPerformux-16 24 HDMI inputs H-HDPerformux-24 1.6 Appearance and Pics Front Panel Illustration: 1U chassis (H-HDPerformux-4/8/16/24) illustration: Power indicator ASI IN and ASI OUT interfaces NMS (Network Management Port) DATA Port (for IP Signal Input/Output) USB socket (USB Player) - Page 7 H-HDPerformux-4/8/16/24 Rear Panel Illustration: Grounding Power Switch and socket HDMI 1-8 HDMI 9-16 HDMI 17-24 Tel: (800) 521-8467 Email: sales@thorfiber.com http://www.thorbroadcast.com...
-
Page 8: Chapter 2 Installation Guide
H-HDPerformux-4/8/16/24 Chapter 2 Installation Guide 2.1 What’s in the Box Thor Broadcast will deliver the unit with the following items: H-HDPerformux-4/8/16/24 Multi-Channel Encoder Power Cord Ground lead HDMI cables If any item is missing or mismatching with the list above, please contact local dealer. - Page 9 H-HDPerformux-4/8/16/24 2.2.2 Rack Room Item Requirement When installing unit on rack, the distance between 2 rows of machine frames should be 1.2~1.5m and the distance against Machine Hall Space wall should be no less than 0.8m 5~40℃(sustainable ),0~45℃(short time), Environment...
-
Page 10: Chapter 3 Web Nms Operation
H-HDPerformux-4/8/16/24 Chapter 3 WEB NMS Operation The Thor Broadcast HD Performux Encoder series does not support front D-pad buttons or an LCD screen, you can only control and set the configuration by connecting the Encoder to a PC to web NMS Port. Make sure that the computer’s IP address is different from the Encoder’s IP address otherwise it would cause an IP conflict and you will not be able to login. - Page 11 H-HDPerformux-4/8/16/24 System information User can click any item here to enter the corresponding interface to check information or set the parameters. Figure-2 Parameters →Encoder(01-08) From the menu on left side of the webpage, clicking “Encoder(01-08)”, it displays the information of each encoding channel from the encoder as Figure-3.
- Page 12 H-HDPerformux-4/8/16/24 Select to configure logo, caption or QRcode Select program1-8 to apply the logo insertion, or you can select “all” to apply all programs Click here to confirm the LOGO you selected Browse and select Put your logo anywhere the Logo which has...
- Page 13 H-HDPerformux-4/8/16/24 Input the QRcode URL here Put the QRcode everywhere Browse and select the QR code which has been created Figure-6 Parameters → Encoder (09-16) From the menu on left side of the webpage, clicking “Encoder (09-16)”, it displays the information of each encoding channel from the encoder as Figure-7.
- Page 14 H-HDPerformux-4/8/16/24 Encoder (09-16) → OSD OSD setting is same as the one in the encoder (01-08). Figure-8 Encoder (09-16) → System Under System page, you can check the software version information of the encoder module, save, restore or load factory set the module configuration.
- Page 15 H-HDPerformux-4/8/16/24 Encoder (09-16) → Firmware Under the Firmware page, you can update the software for the encoder module. Figure-10 Parameters → Encoder (17-24) Encoder (17-24) shares the same configuration steps with encoder (09-16). Figure-11 Parameters → TS Config: From the menu on left side of the webpage, click “TS Config”, it displays the interface where you can configure the TS output parameters.
- Page 16 H-HDPerformux-4/8/16/24 TS Config→MPTS: Clicking “Stream select”, it displays the interface where users can select program(s) to multiplex out and modify program info. (Figure-12) Output Area Input Area Operation Area Figure-12 Add the IP input streams Figure-13 Configure ‘Input Area’ and ‘Output Area’ with buttons in ‘Operation Area’. Instructions are as below:...
- Page 17 H-HDPerformux-4/8/16/24 : To filter/not filter the source CA information : To enable/disable the PID remapping To refresh the input program information To refresh the output program information Select one input program first and click this button to transfer the selected program to the right box to output.
- Page 18 H-HDPerformux-4/8/16/24 TS Config→General: From the TS Config menu on up side of the webpage, clicking “General”, it displays the interface where users can enable PSI/SI table out and insert NIT etc. (Figure-15) Figure-15 TS Config → PID Bypass: You can bypass the wanted PIDs here.
- Page 19 H-HDPerformux-4/8/16/24 TS Config→SPTS: You can enter this Web page to edit the program information in SPTS out as Figure-17. Figure-17 Tel: (800) 521-8467 Email: sales@thorfiber.com http://www.thorbroadcast.com...
- Page 20 H-HDPerformux-4/8/16/24 Parameters →IP Stream H-HDPerformux-4/8/16/24 1MPTS output and 4/8/16/24 SPTS output through the DATA port. When you click “IP Stream”, it will display the interface as Figure-18 where to set IP out parameters. Figure-18 When you click “pen” button, it triggers a dialog box (Figure-19) where you can set the parameters of the corresponding IP output streams.
- Page 21 H-HDPerformux-4/8/16/24 Parameters → USB Media: Under USB Media page, user can play the TS files from the USB disk. Play Mode is selectable as the below list shows. After playing the files, the programs in the .ts files can be multiplexed out in TS Config page.
- Page 22 H-HDPerformux-4/8/16/24 System→ Network: Clicking “Network”, it will display the interface as Figure-21 where to set NMS and DATA parameters. Figure-21 System→ Cloud Platform: WE ARE STRICTLY TESTING THIS FOR NOW; NOT AVAILABLE WITH HARDWARE. Figure-22 System → Password: Clicking “Account”, it will display the screen as Figure-23 where to set the login account and password for the web NMS.
- Page 23 H-HDPerformux-4/8/16/24 System → Configuration: Clicking “Configuration”, it will display the screen as Figure-24 where to save/ restore/factory set/ backup/ load your configurations. Figure-24 Tel: (800) 521-8467 Email: sales@thorfiber.com http://www.thorbroadcast.com...
- Page 24 H-HDPerformux-4/8/16/24 System → Firmware: Clicking “Firmware”, it will display the screen as Figure-25 where to update firmware for the encoder. Figure-25 System → Date/Time: Clicking “Date/Time”, it will display the screen as Figure-26 where to set date and time for the device.
- Page 25 H-HDPerformux-4/8/16/24 System → Log: Clicking “Log”, it will display the log interface as Figure-27 where to check or export the Kernel/System log. Figure-27 Tel: (800) 521-8467 Email: sales@thorfiber.com http://www.thorbroadcast.com...
-
Page 26: Chapter 4 Troubleshooting
H-HDPerformux-4/8/16/24 Chapter 4 Troubleshooting Thor quality assurance system has been approved by CQC organization. For guarantee the products’ quality, reliability and stability. All Thor products have been passed the testing and inspection before ship out factory. The testing and inspection scheme already covers all the Optical, Electronic and Mechanical criteria which have been published by Thor. -
Page 27: Chapter 5 Packing List
H-HDPerformux-4/8/16/24 Chapter 5 Packing list H-HDPerformux-4/8/16/24 Multi-Channel Encoder HDMI cables 4/8/16/24 pcs as per HDMI model Power cord Ground lead For Further Tech Support 1-800-521-Thor(8467) support@thorfiber.com Quick Install Guide Tel: (800) 521-8467 Email: sales@thorfiber.com http://www.thorbroadcast.com... - Page 28 Quick configuration Guide for H-HDPerformux- 8/16/24 Login instructions: In order to log in to the Modulator NMS port, please set your PC's NIC Ethernet card to the following IP address: 192.168.0.100. Access Modulator GUI by typing derail IP address 192.168.0.136 in to the browser Login /password –...
- Page 29 TS Config Program Information setting This page controls which HDMI Input CH 1-24 or ASI or USB (in MPTS ) are selected and moved to the IPTV outputs By default all 24 channels are selected Stream Select SPTS ( single program transport stream or MPTS (Multiprogram transport stream selection) HDMI inputs encoded transport streams...
- Page 30 IP Stream Setup ENABLE ON/OFF Multicast or unicast IP address Port number Total Bit rate – need to be > than Video Bit rate UDP or RTP or RTSP selection Null Packet ON/OFF Function Apply IPTV streaming is sent out from the data port and can be tested using VLC player. UDP syntax example is udp://@224.2.2.2:2001 RTP syntax example is rtp://@224.2.2.2:2001 RTSP syntax example is rtsp://( DATA IP ADRESS):5000/1-4...
Need help?
Do you have a question about the H-HDPerformux-4 and is the answer not in the manual?
Questions and answers