Table of Contents
Advertisement
Quick Links
Advertisement
Table of Contents

Related Manuals for WorldWEIGH CA101 Series


Summary of Contents for WorldWEIGH CA101 Series
- Page 1 CA101 SERIES P.N. 3.02.6.6.16342, Revision A, May 2021 81320603 en...
-
Page 3: Table Of Contents
Contents INTRODUCTION ......................3 TECHNICAL SPECIFICATION .................... 4 SPECIFICATIONS FOR THE LOCAL SCALE ............... 4 SPECIFICATIONS FOR THE REMOTE SCALE ..............4 COMMON SPECIFICATIONS ..................4 INSTALLATION ......................5 LOCATING THE SCALES ....................5 SETTING UP THE SCALES .................... 6 REMOTE SCALE SET UP .................... -
Page 4: Introduction
INTRODUCTION • The CA101 series offers a range of an accurate, fast and versatile counting scales that can use one additional external platform (Remote scale) for weighing or counting of heavier items. These counting scales have the ability to use many stored information (PLU). -
Page 5: Technical Specification
TECHNICAL SPECIFICATION SPECIFICATIONS FOR THE LOCAL SCALE Model # CA101/8 CA101/16 CA101/32 Maximum 8 kg / 16 kg / 32 kg / Capacity 16 lb 35 lb 70 lb 0.0002 kg / 0.0005 kg / 0.001 kg / Readability 0.0005 lb 0.001 lb 0.002 lb -8 kg /... -
Page 6: Installation
8.9” x 10.8” 315 x 355 x 110mm Overall dimensions 12.4” x 14” x 4.3” Net weight 4.4 kg / 9.7 lb Applications Counting Scale Weighing, parts counting, accumulating memory, preset count Functions with alarm, up to 100 PLUs with description, unit & tare weight Accuracy enhancement parts... -
Page 7: Setting Up The Scales
SETTING UP THE REMOTE SCALE • The CA101 Series can be connected to any size of load cell type weighing base via the Remote scale port on the right side of the scale case. Ensure you have the correct base for the scale as each is matched for calibration. -
Page 8: Remote Scale Set Up
REMOTE SCALE CONNECTION The cable for the load cell goes to a 9 pin D-subminiature plug connector with the following connections: Pin numbers Connection Pins 1,2 - Excitation (0 V) Pins 4,5 + Excitation (+5 V) Pin 7 + Signal Pin 8 - Signal (The sense wires connections of a six wire load cell are not used and should be connected to the... -
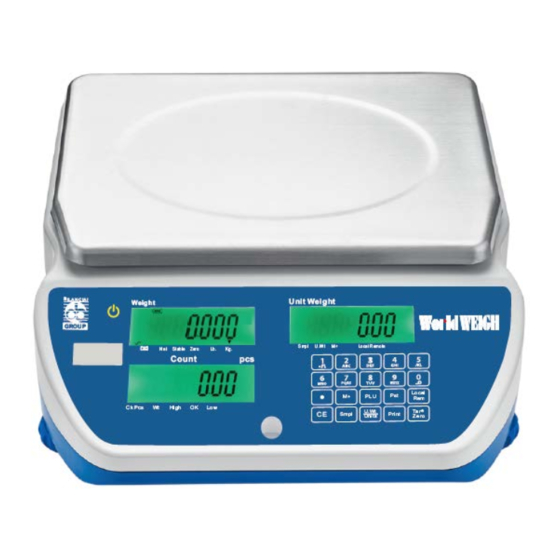
Page 9: Key Descriptions
KEY DESCRIPTIONS [0-9, •] These keys are used to manually enter a value for tare weights, unit weight and sample size. A secondary function is to enter alpha-numeric characters for PLU descriptions etc. [CE] Pressing this key clears the unit weight or an erroneous entry. It also clears the memory accumulation when the total is displayed. -
Page 10: Displays
DISPLAYS The scales have three display windows- Weight, Unit Weight and Count. WEIGHT WINDOW This consists of a 6 digit display to indicate the weight on the scale. An arrow above the symbols will indicate the following: Low battery, Net Weight Display, "Net" Stability indicator, “Stable”... -
Page 11: Count Window
COUNT WINDOW This display will show the number of items on the scale or the value of the accumulated count. See the OPERATION section. An arrow above the symbols will indicate the following: Checkweighing is active during counting, "Ck Pcs" ... -
Page 12: Zeroing And Taring The Display
ZEROING AND TARING THE DISPLAY The Tare and Zero function are combined into one key. When the gross weight is within ±2% of the zero, set at power on for either scale then a new zero is set. If the gross weight is greater than ±2% then the tare function is performed. -
Page 13: Memory Functions
SECOND METHOD OF ENTERING A TARE VALUE: • This method allows you to enter a value for the tare weight from the keypad. This is useful if all containers are the same or if the container is already full but the net weight is required and the weight of the container is known. -
Page 14: Automatic Accumulated Total
To observe the total value stored, press the [M+] key when the scale is at zero. The total will be displayed for 2 seconds. To clear the memory, first press [M+] to recall the total from the memory and then press [CE] to clear all values from the memory. -
Page 15: Entering A Known Unit Weight
• If the weight is below zero, the “Count” display will show negative count. 6.3.2 ENTERING A KNOWN UNIT WEIGHT If the unit weight is already known then it can be entered using the keypad. Enter the value of the unit weight using the numeric keys followed by pressing the [U. Wt.] key within few seconds while the display is flashing. - Page 16 For example: ACTION DISPLAYS Press [Pst] “CHECk ” “ nEt “ “ “ if currently in the weighing mode Press [U.Wt/Units] “CHECk ” “ CoUnt “ “ “ to toggle from weighing to counting “Hi cnt” “0.3 2 3 4” “ ”...
-
Page 17: Plu (Product Look Up)
PLU (Product Look Up) Product Look-Up (PLU) numbers are used to store information about the commonly used items. The Tare Weight, Description of the product and Unit Weights for a particular item are recalled by entering the PLU number for ease of operation. The scale is capable of storing values for the Tare weight, Description and Unit Weight for a maximum of up to 100 PLU numbers. - Page 18 Please find below an example for setting up “PLU 27” with Description as “M4 Nut” and Unit weight of “0.015”. DISPLAYS ACTIONS REMARKS Weight Unit weight Count Press [PLU] “PLU ” “ - -“ “ “ Press [2], [7] “PLU ” “...
-
Page 19: Entering Description Manually
6.4.2 ENTERING DESCRIPTION MANUALLY The description can be up to 12 characters long and can be a mix of numbers, symbols or letters. During the procedure to set the description the numeric keypad will work in a similar way to a mobile telephone. -
Page 20: Recalling Plu's Manually
6.4.3 RECALLING PLU’S MANUALLY To recall the PLU values the user should first select either local or remote scale as the tare value stored will be specific to the scale selected. Then press the [PLU] key, enter the PLU number (00 – 99) then press the [PLU] key again to recall the data. -
Page 21: Parameters
PARAMETERS The following parameters set up the scale as required by the user. For the Technical parameters and configuring the remote platform refer to Section 14. Enter the User Parameters section by pressing the [Pst] key during the self-test when the power is turned on or press and hold the [Pst] key for 3 seconds during normal operation. - Page 22 P Cont Sets the RS-232 interface to print continuously and the accumulation function is disabled. SEr r E Sets the RS-232 to print continuously the weight only. P bAU d b 1200 Sets the required baud b 2400 rate (speed for the RS-232 b 4800 communications).
-
Page 23: Real Time Clock
REAL TIME CLOCK The Real Time Clock (RTC) is used only for the RS-232 output. See Section 9. The Date and Time can be set as required. The scale will keep the clock running even when the power is off. Setting up the clock •... -
Page 24: Battery Operation
BATTERY OPERATION The scales can be operated from the battery. The battery life is approximately 70 hours if only the basic unit is used and the backlight is not used. If the backlight and a second platform is used the battery life will be reduced. -
Page 25: Rs-232 Output
RS-232 OUTPUT Specifications: RS-232 Connector style: USB Connector style: The RS-232 and USB interfaces are the same for input and output. Sample of output: Using M+ function Using PRINT function DATE 01/27/2011 DATE 01/27/2011 TIME 12:38:49 TIME 12:39:58 LOCAL SCALE LOCAL SCALE SID: ABS123 SID: ABS123... -
Page 26: Input Commands Format
INPUT COMMANDS FORMAT The scale can be controlled with the following commands. Input Commands: • The scale has a number of commands to either cause an action or to enter data into memory. The commands are all upper case and are summarised below. •... -
Page 27: Storing Data Via Rs232
STORING DATA VIA RS232 To store data the commands are: SUIDxxxxxx <CR> Store user ID data SSIDxxxxxx <CR> Store scale ID data SPLUxx,xxxxxxxxxxxx <CR> Store text data for PLUxx When PLU text data is stored the Scale stores current unit weight and current tare value along with the PLU number. -
Page 28: Calibration
10.0 CALIBRATION ACTION DISPLAYS Press the [Tare/Zero] key during the self-test at “ Pi n” power on. The scale will ask to enter the password. Default Password is 0000. Enter “0” four times. “ Pi n” “ - - - -” Password can be changed in technical parameters. - Page 29 Display will ask to unload any weight on the “nO L o Ad” platform. Press the [Print] key to continue. “LoAd 1 ” “ 0010” “ KiLoS” Load the first calibration weight onto the scale If the mass is different than the value shown press the [CE] key then enter the calibration weight to be used.
-
Page 30: Error Codes
11.0 ERROR CODES During the initial power-on testing or during the operation, the scale may show an error message. The meaning of the error messages are described below. If an error message is shown, repeat the procedure that caused the message, such as turning the balance on, calibration or any other functions. -
Page 31: Technical Parameters
12.0 TECHNICAL PARAMETERS The technical parameters accessed via the “tECH” prompt at the end of user parameters and are password controlled to prevent unauthorised access. These parameters set the metrology for the scales. Each scale is set independently. The parameters will set capacity, division, decimal point position, initial zero range, auto and manual zero range as well as factory calibration. - Page 32 Press the [U.Wt/Unit] to go to next menu. Press [Print] to enter. “CAP”. Scale capacity setting. Use [U.Wt/Unit] to select the decimal point position and press [Print]. “dESC” “ 0.00” To change the remote scale cap press CE to clear and then enter new value followed by [Print].
-
Page 33: Replacement Parts And Acessories
13.0 REPLACEMENT PARTS AND ACESSORIES If you need to order any spare parts and accessories, contact your supplier or manufacturer. A partial list of such items is as follows- • Power Supply Module • In use cover • Main Power cord •... - Page 34 WEEE 2012/19/EU This device may not be disposed of in domestic waste. This also applies to countries outside the EU, per their specific requirements. Disposal of batteries (if fitted) must conform to local laws and restrictions. Cet appareil ne peut être éliminé avec les déchets ménagers. L’élimination de la batterie doit être effectuée conformément aux lois et restrictions locales.
Need help?
Do you have a question about the CA101 Series and is the answer not in the manual?
Questions and answers