
Related Manuals for Leica BIOSYSTEMS VT1000


Summary of Contents for Leica BIOSYSTEMS VT1000
- Page 1 Leica VT1000 S Vibrating-blade microtome Instructions for Use English Order No.: 14 0472 80101 - Revision O Always keep this manual with the instrument. Read carefully before working with the instrument.
- Page 3 – including any electronic systems and media – requires express prior permission in writing by Leica Biosystems Nussloch GmbH. For the instrument serial number and year of manufacture, please refer to the nameplate on the back of the instrument.
-
Page 4: Table Of Contents
Adjusting the amplitude ..........................26 Working with the Leica VT1000 S on a daily basis ................... 27 Routine daily maintenance and switching off the instrument - Leica VT1000 S ......... 30 Malfunctions: Meaning and Troubleshooting ..................Cleaning and Maintenance ........................ -
Page 5: Important Information
Symbols and their meanings Caution Leica Biosystems GmbH assumes no liability for consequential loss or damage due to failure to observe the following instructions, particularly in relation to transportation and package handling, and failure to observe the instructions for handling the instrument carefully. - Page 6 Important Information Manufacturing date Symbol: Title of the symbol: Indicates the date when the device was Description: manufactured. CE Compliance Symbol: Title of the symbol: Description: The CE marking is the manufacturer's declaration that the product meets the requirements of the applicable EC directives and regulations.
- Page 7 With a pitch of 60° or more, the blue quartz sand flows into the arrow-shaped indicator window and sticks there permanently. Improper handling of the shipment is immediately detectable and can be proven definitively. Leica VT1000 S...
-
Page 8: Instrument Model
• Serial number Qualification of personnel The Leica VT1000 S should be operated by trained laboratory personnel only. The instrument is intended for professional use only. All laboratory personnel designated to operate this instrument must read these Instructions for Use carefully and must be familiar with all technical features of the instrument before attempting to operate Version 2.6, Revision O... -
Page 9: Intended Use/Improper Use
Important Information Intended use/improper use The Leica VT1000 S is used for sectioning in the fields of medicine, biology and industry, and is especially designed for sectioning fixed or unfixed fresh tissue in a buffer solution. Warning The Leica VT1000 S may be used for research purposes only. Sections made using the Leica VT1000 S... -
Page 10: Safety
Safety Safety Warning The safety and caution notes in this chapter must be observed at all times. Be sure to read these notes even if you are already familiar with the operation and use of other Leica products. Safety notes These Instructions for Use includes important information related to the operating safety and maintenance of the instrument. -
Page 11: Safety Instructions For Handling The Instrument
(at the right side of the instrument). To release the switch, turn it in the direction of the arrow. • The instrument may be opened by authorized service personnel only. • Before removing the cover, ensure that the instrument is unplugged. Leica VT1000 S... -
Page 12: Instrument Characteristics
Instrument Characteristics Instrument Characteristics Technical data Electrical Specifications Nominal supply voltage 100 V - 240 V Nominal supply frequencies 50/60 Hz Mains supply voltage fluctuations Not to exceed ± 10 % of the nominal supply voltage Power consumption 50 VA Mains input fuses 2x T1.25A L 250VAC Dimensions and Weight Specification... - Page 13 Total vertical specimen stroke 15 mm (motorized) Maximum specimen size: with standard knife holder 33 x 40 mm Section thickness selection 1 - 999 μm, in 1 μm steps Magnifier, assy. (standard accessory of the 2 x magnification configured instrument) Leica VT1000 S...
-
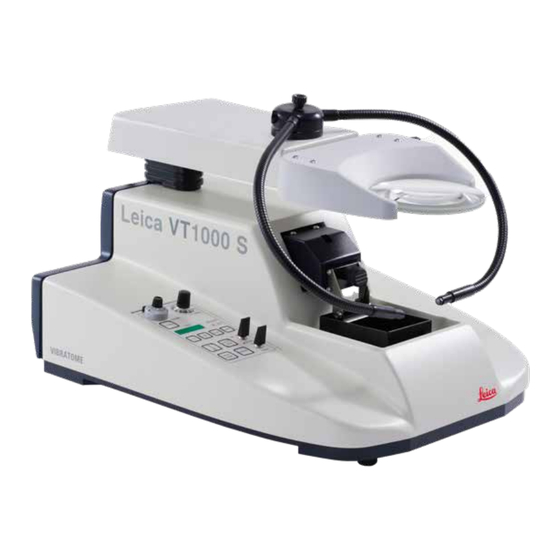
Page 14: General Overview - Leica Vt1000 S
Instrument Characteristics General overview - Leica VT1000 S Fig. 1 Fixture for magnifier support Buffer tray S Control panel Magnifier support EMERGENCY STOP switch (not visible here) Magnifier Cutting head Module Hi-Power spot, LED 1000 (optional) Knife holder 10 Module LED Hi-Power spots, 2-arm (optional) Fig. - Page 15 Start button for single / continuous sectioning 13 Selector button "Single/continuous stroke" stroke (LEDs indicate selected mode) Pause button - stops sectioning process 14 Toggle switch "Buffer tray height adjustment" (LEDs indicate limit positions) 15 Toggle switch for knife forward and return stroke Leica VT1000 S...
-
Page 16: Installation
14 0371 27414 Magnifier assy. (magnifier glass & carrier) 14 0462 31191 If the supplied local power cord is defective or lost, please contact your local Leica Biosystems representative. Note When ordering additional accessories, compare the parts received with the parts ordered. If the parts received do not match your order, contact the sales company responsible for your order immediately. -
Page 17: Unpacking And Setting Up The Instrument
(→ Fig. 4-4). • Remove the outer carton wall (→ Fig. 4-5). • Lift the instrument out of the carton by the carrying straps (→ Fig. 4-6) and place it on a suitable stable laboratory table. Fig. 4 Leica VT1000 S... - Page 18 Installation • Tilt the instrument including the baseplate (→ Fig. 5) - hold the instrument with one hand on the recess (→ Fig. 5-2) for the buffer tray! NEVER lift or hold it by the cutting head (→ Fig. 5-3)! Unscrew the screw (→...
- Page 19 • Set it on the instrument as shown in (→ Fig. • Attach the optional foot switch. • Securely plug the foot switch into the 9-pin socket (→ Fig. 8-2). Fig. 8 Note When transporting the instrument, always do so WITHOUT the magnifier support! Leica VT1000 S...
-
Page 20: Operation
Note The Leica VT1000 S is equipped with a autoranging power supply to cover voltages from 100 V to 240 V. After switching on the main switch, the instrument carries out an initial startup run: The blade returns to the rear starting position after a short forward movement. - Page 21 (→ Fig. 9-2) the Module Hi-Power spot, LED 1000. Fig. 9 8. Connect the optional foot switch at the rear of the instrument. 9. Plug the power cable into the wall socket. 10. Switch the instrument on (main switch). Leica VT1000 S...
-
Page 22: The Operating Elements And Their Function - Leica Vt1000 S
Operation The operating elements and their function - Leica VT1000 S Caution Practice working with the controls without a blade holder inserted. Only insert the knife holder when you are completely familiar with all control functions. SPEED 10-speed rotating potentiometer with scale... - Page 23 The knife stops in the rear end position. • A sectioning process, once started, will continue. Function: Immediate interruption of knife movement. • Press PAUSE once again to continue sectioning. Leica VT1000 S...
- Page 24 Operation Toggle switch Function: To move the knife towards the specimen. Can also be used for manual sectioning. Fig. 12 Because of safety aspects the FORW movement is carried out only while the toggle switch is pressed and held; the movement is carried out completely once the switch has been locked into place.
- Page 25 Once the switch is unlocked, the buffer tray is automatically raised until both signals switch off. • To select the retraction thickness, to deactivate retraction or to set the volume of the Leica VT1000 S warning signal, press the following function key combinations: Volume adjustment: •...
-
Page 26: Adjusting The Amplitude
Operation Adjusting the retraction • In programming mode, press to display the specimen DISP retraction menu. • Display: "LO". • Set specimen retraction between 1 and 999 μm via the button; Fig. 16 or disable by selecting "0". • The selected value will be displayed in the FEED window. •... -
Page 27: Working With The Leica Vt1000 S On A Daily Basis
Operation Working with the Leica VT1000 S on a daily basis • Mount the buffer tray (→ Fig. 18-1) onto the bolt (→ Fig. 18-2) inside the cooling bath (→ Fig. 18-3). • Secure the buffer tray by relocating the clamping lever (→... - Page 28 22-2). Fig. 22 Note The Leica VT1000 S does not require the readjustment of the clearance angle every time you change the blade. Make an adjustment only if required by an application for technical reasons (e.g. different type of tissue).
- Page 29 • Pull the rocker button into the UP direction and keep it UP/DOWN in the UP position until the specimen surface is shortly below the level of the blade edge (see arrow (→ Fig. 26-1)). Fig. 25 Leica VT1000 S...
-
Page 30: Routine Daily Maintenance And Switching Off The Instrument - Leica Vt1000 S
(→ Fig. 27-3). Fig. 27 Routine daily maintenance and switching off the instrument - Leica VT1000 S After all daily procedures have been finished, perform the following: • Switch off the main switch at the back of the instrument. • Place the magnifier cover on the magnifier. -
Page 31: Malfunctions: Meaning And Troubleshooting
• To reactivate the return stroke emergency stop was released movement, lock the REV/ again without releasing the FORW-button again (to REV REV/FORW button to its center position). position. Leica VT1000 S... - Page 32 Malfunctions: Meaning and Troubleshooting Error messages/symptoms Sources of error Troubleshooting Audible warning signal. • Release the button Operating error due to locking UP/DOWN function of the UP/DOWN button: to its center position. Downward stroke is not • To reactivate the downward completed.
- Page 33 • The lower limit of the specimen • After unlocking the DOWN level has been reached (height position the buffer tray is adjustment of specimen via automatically raised until the buffer tray). audible and optical signals turn off. Leica VT1000 S...
- Page 34 Malfunctions: Meaning and Troubleshooting Error messages/symptoms Sources of error Troubleshooting Audible warning signal. • User has tried to select a • Release the button. specimen thickness via the button that is below the minimum value (0 μm) or above the maximum value (999 μm). Audible warning signal.
-
Page 35: Cleaning And Maintenance
• Remove the buffer tray, empty it and rinse it separately with water (→ p. 30 – 5.6 Routine daily maintenance and switching off the instrument - Leica VT1000 Instrument and outside surfaces If necessary, the varnished outside surfaces of the control panels can be cleaned with a mild commercial household cleaner or soap water and then be wiped with a cloth. -
Page 36: Changing The Fuse
Cleaning and Maintenance Changing the fuse Warning Before changing a fuse, always switch off the instrument first and remove the instrument cable completely. The instrument must have cooled down and the paraffin tank must be empty. When changing a fuse, do NOT use any fuses other than the spare fuses supplied with the instrument. -
Page 37: Ordering Information: Spare Parts, Accessory, Consumables
230 V/60 Hz 14 0481 48438 Antifrogen N 14 0481 45443 Foot switch Foot switch The foot switch is an optional accessory which can be used instead of the START/STOP button. Order No.: 14 0463 27415 Fig. 29 Leica VT1000 S... -
Page 38: Buffer Tray
Ordering Information: Spare Parts, Accessory, Consumables Buffer tray 8.3.1 Double-walled buffer tray S Note When using the double-walled buffer tray, the flow cooler must be installed according to the assembly instructions prior to working with specimens. A clamp for holding the gassing hose for the buffer in the proper position can be added to the double-walled buffer tray. -
Page 39: Magnifier, Led Illumination
2-arm, to the Module Hi-Power spot, LED 1000. Order No.: 14 6000 04826 Fig. 32 Module Hi-Power spot, LED 1000 • Serves as a light source for the module LED Hi- Power spots, 2-arm. Order No.: 14 6000 04825 Fig. 33 Leica VT1000 S... -
Page 40: Julabo Recirculating Cooler/Chiller Fl300
Ordering Information: Spare Parts, Accessory, Consumables Julabo recirculating cooler/chiller FL300 Recirculating cooler/chiller for connection to the double-walled buffer tray in the Leica VT1000 S and Leica VT1200/Leica VT1200 S. Selectable temperature range: –20 °C to +40 °C. Recommended cooling medium:... -
Page 41: Warranty And Service
Warranty and Service Warranty Leica Biosystems Nussloch GmbH guarantees that the contractual product delivered has been subjected to a comprehensive quality control procedure based on the Leica in-house testing standards, and that the product is faultless and complies with all technical specifications and/or agreed characteristics warranted. -
Page 42: Decontamination Confirmation
Decontamination Confirmation Decontamination Confirmation Every product that is returned to Leica Biosystems or that requires on-site maintenance must be properly cleaned and decontaminated. You can find the dedicated template of the decontamination confirmation on our website www.LeicaBiosystems.com within the product menu. This template has to be used for gathering all required data. - Page 44 Leica Biosystems Nussloch GmbH Heidelberger Strasse 17 - 19 69226 Nussloch Germany Tel.: +49 - (0) 6224 - 143 0 Fax: +49 - (0) 6224 - 143 268 Web: www.LeicaBiosystems.com...
Need help?
Do you have a question about the VT1000 and is the answer not in the manual?
Questions and answers