Table of Contents
Advertisement
Available languages
Available languages
Quick Links
H-1440
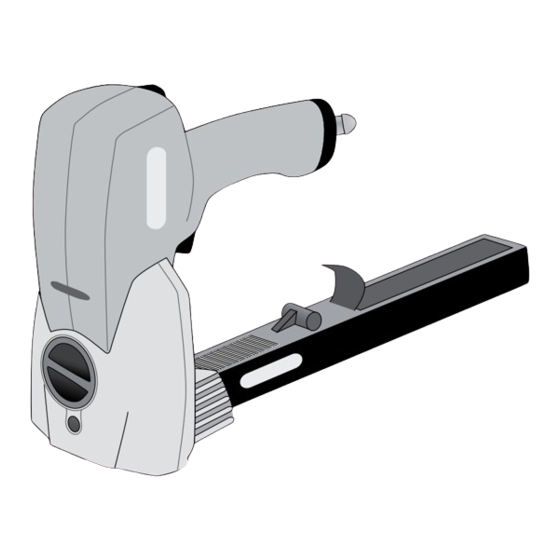
KIHLBERG PNEUMATIC
STICK STAPLER
TOOL NEEDED
2.5 mm Allen Wrench
WARNING! Read all warnings and instructions to
prevent injuries to yourself and to others.
• Use only original Kihlberg stick staples
• Wear eye protection when using tool. Always use
other personal protection equipment as required,
such as ear protection, hard hats, etc.
• Never use oxygen, combustible gases, CO
or high pressure gas tanks as power sources for the
PN-version of this tool; the tool may explode and
cause serious injury. Use only dry, clean, pressure
regulated compressed air to drive the tool.
• Always disconnect the tool from the air supply and
empty the magazine when taking a break or ending
work, when servicing the tool, troubleshooting or
repairing. Never leave a loaded tool unattended.
ATTACH COMPRESSED AIR
CAUTION! Ensure the tool is not pointed at
you or anyone else when connecting it to the
compressed air line.
NOTE: The maximum permitted air pressure for
the tool is 8 bar (116 psi). The maximum supply
pressure is 8.78 bar (127 psi).
Connect the tool to the compressed air system before
the fastener unit is loaded.
NOTE: The tool and its hose can be equipped
with a connection nipple (not included) that
automatically exhausts air from the tool after it
has been disconnected.
PAGE 1 OF 9
1-800-295-5510
uline.com
SAFETY
• Always assume that the tool is loaded. Respect the
tool as potentially dangerous. Never point the tool at
yourself or anyone else, whether it contains staples
or not. Always remove finger from trigger when not
driving staples.
• Always check tool before every use.
• Never hold your hand or another part of your body
, steam
under the tool.
2
• Position yourself in a firmly balanced position when
using or handling the tool.
• Do not modify the tool or set it up in a jig without
manufacturer's approval.
• Use stapler with cardboard only. No other use is
permitted without the approval of the manufacturer.
OPERATION
Ensure the minimum internal diameter of the air hose is
10 mm (3/8") and that of the nipple is a minimum of
5 mm (6/32"). This prevents incorrect operation due to
excessive pressure drop.
AIR PRESSURE
Adjust the air pressure to the lowest setting that will
bend the staples correctly.
1. Start at 5.0 bar (72 psi).
2. Raise pressure by 0.5 bar (7 psi) increments
until correct pressure for the job is found.
Para Español, vea páginas 4-6.
Pour le français, consulter les pages 7-9.
CAUTION! Never exceed 8 bar (116 psi).
0424 IH-1440
Advertisement
Table of Contents

Related Manuals for U-Line KIHLBERG H-U40


Summary of Contents for U-Line KIHLBERG H-U40
- Page 1 Para Español, vea páginas 4-6. Pour le français, consulter les pages 7-9. H-1440 1-800-295-5510 uline.com KIHLBERG PNEUMATIC STICK STAPLER TOOL NEEDED 2.5 mm Allen Wrench SAFETY • Always assume that the tool is loaded. Respect the WARNING! Read all warnings and instructions to tool as potentially dangerous.
- Page 2 OPERATION CONTINUED STAPLE PENETRATION DEPTH LOADING Push knob in and turn to the desired position: 1. Pull and lock pusher to rear of magazine. (See Figure 1) (See Figure 5) – For shallow stapling Figure 5 = For deep stapling Pusher Figure 1 STAPLE LEG LENGTH...
-
Page 3: Maintenance
OPERATION CONTINUED STAPLING 2. Pull the trigger. NOTE: One staple will be dispensed per 1. Place tool against box and press down until surface trigger pull. is compressed. MAINTENANCE CLEARING JAMS WARNING! Always disconnect the tool from the air supply, empty magazine and read safety Generally, you will not need to disassemble any parts warnings before starting any maintenance. -
Page 4: Herramienta Necesaria
H-1440 800-295-5510 uline.mx KIHLBERG ENGRAPADORA NEUMÁTICA EN TIRAS HERRAMIENTA NECESARIA Llave Allen de 2.5 mm SEGURIDAD ¡ADVERTENCIA¡ Lea todas las advertencias e • Siempre suponga que la herramienta está cargada. instrucciones para prevenir lesiones a usted Trate la herramienta como potencialmente y a otros. - Page 5 CONTINUACIÓN DE FUNCIONAMIENTO ALCANCE DE PENETRACIÓN DE LAS GRAPAS CARGAR Presione la perilla y gírela a la posición deseada: 1. Jale y asegure la barra de empuje a la parte (Vea Diagrama 1) posterior del cargador. (Vea Diagrama 5) – Para engrapado a Diagrama 5 poca profundidad = Para engrapado...
-
Page 6: Mantenimiento
CONTINUACIÓN DE FUNCIONAMIENTO ENGRAPAR 2. Accione el gatillo. NOTA: Se despachará una grapa por 1. Coloque la herramienta contra la caja y presione accionamiento del gatillo. hasta que la superficie quede comprimida. MANTENIMIENTO ELIMINAR OBSTRUCCIONES ¡ADVERTENCIA! Siempre desconecte la herramienta del suministro de aire, vacíe el En general, no se necesita desarmar ninguna parte cargador y lea las advertencias de seguridad para eliminar obstrucciones en la placa de la boquilla. -
Page 7: Consignes De Sécurité
H-1440 1-800-295-5510 uline.ca KIHLBERG – AGRAFEUSE PNEUMATIQUE À BANDES OUTIL REQUIS Clé Allen de 2,5 mm CONSIGNES DE SÉCURITÉ AVERTISSEMENT! Lisez tous les avertissements • Supposez toujours que l'outil est chargé. Respectez ARRÊT et les instructions pour prévenir le risque de l'outil en tant qu'article potentiellement dangereux. - Page 8 FONCTIONNEMENT SUITE PROFONDEUR DE LA PÉNÉTRATION D'AGRAFE CHARGEMENT Poussez et tournez le bouton à la position souhaitée : 1. Tirez le poussoir vers l'arrière jusqu'à ce qu'il (Voir Figure 1) s'enclenche dans le magasin. (Voir Figure 5) – Pour agrafage peu Figure 5 profond = Pour agrafage profond...
-
Page 9: Entretien
FONCTIONNEMENT SUITE AGRAFAGE 2. Appuyez sur la détente. REMARQUE : Une agrafe sera distribuée par 1. Positionnez l'outil contre la boîte et appuyez jusqu'à pression sur la détente. ce que la surface se comprime. ENTRETIEN DÉGAGEMENT DES OBSTRUCTIONS AVERTISSEMENT! Déconnectez toujours l'outil ARRÊT de l'alimentation d'air, videz le magasin et En règle générale, il n'est pas nécessaire de démonter...
Need help?
Do you have a question about the KIHLBERG H-U40 and is the answer not in the manual?
Questions and answers