Table of Contents
Advertisement
Available languages
Available languages
Quick Links
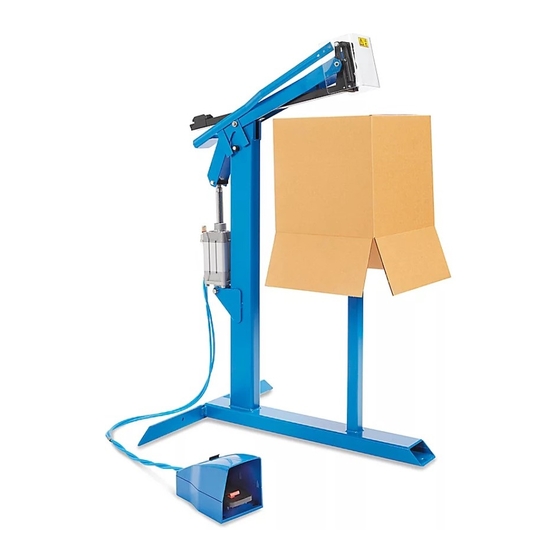
π H-3070
KIHLBERG PNEUMATIC
BOTTOM STAPLER
LOADING MAGAZINE
NOTE: Always use Josef Kihlberg original staples.
The correct designation is marked on each
stapling head.
1.
Pull the pusher (1) back and lift up the magazine
breech (2). (See Figure 1)
1
2. Insert staple strips (3) from the rear. (See Figure 1)
WARNING! Do not overload the magazine, as
this may damage the pusher when the breech
is closed.
Never release the pusher directly from the rear
when the magazine is empty; carefully guide it
forward by hand.
PAGE 1 OF 15
1-800-295-5510
uline.com
PREPARATION
Figure 1
2
3
Pour le français, consulter les pages 11-15.
ADJUSTING ANVIL
Though the tool is tested carefully before delivery, it may
have seen rough treatment during transport and the
anvil may therefore have to be adjusted.
1.
Slide down a staple (4) by hand until the staple legs
are visible. (See Figure 2)
2. Move the staple towards the anvil (5) until the
staple legs hit the anvil symmetrically. (See Figure 2)
3. If necessary, loosen the screw (6) and center the
anvil to the staple. Lock screw after adjusting.
(See Figure 2)
4. Make a test-stapling in a piece of carton. When
everything is in order, you can start using the tool.
Para en Español, vea páginas 6-10.
Figure 2
4
5
6
0521 IH-3070
Advertisement
Table of Contents

Related Manuals for U-Line H-3070


Summary of Contents for U-Line H-3070
- Page 1 Para en Español, vea páginas 6-10. Pour le français, consulter les pages 11-15. π H-3070 1-800-295-5510 uline.com KIHLBERG PNEUMATIC BOTTOM STAPLER PREPARATION LOADING MAGAZINE ADJUSTING ANVIL NOTE: Always use Josef Kihlberg original staples. Though the tool is tested carefully before delivery, it may...
-
Page 2: Maintenance
PREPARATION CONTINUED NOTE: The stapler does not need lubrication. Figure 3 Connect and adjust the air pressure to 5,0 bars (72 psi) for proper functioning. STAPLING GAP • Maximum: 100 mm • Preset: 95 mm ADJUSTING STAPLING GAP Disconnect the air supply. 2. - Page 3 MAINTENANCE CONTINUED CHANGING FEEDER SPRING CHANGING DRIVER Push out the tension pin (13) and remove the spring (14). Unscrew screws (18). (See Figure 7) (See Figure 5) 2. Loosen the four screws (19) and split the head (20). 2. Unhook the spring from the staple pusher (15). 3.
-
Page 4: Troubleshooting
MAINTENANCE CONTINUED CHANGING THE STAPLING HEAD Figure 9 Loosen the screws (30, 31). (See Figure 9) NOTE: In order to loosen the rear screw (31) the stapling head must be lifted 90°. 2. Mount a new head and make a course lateral adjustment. - Page 5 TROUBLESHOOTING CONTINUED Staples are deformed when inserted. • Check that the stapling head bearing has no play. • Check that the anvil is properly centered. • Check that the driver is not damaged. • Check that the staple channel is clean. Noise level is too high.
- Page 6 π H-3070 800-295-5510 uline.mx ENGRAPADORA NEUMÁTICA KIHLBERG PARA FONDOS DE CAJAS PREPARACIÓN CARGUE EL CARTUCHO AJUSTE EL YUNQUE Aunque la herramienta fue probada cuidadosamente NOTA: Siempre utilice grapas originales Josef antes de enviarse, pudiera haber recibido maltrato Kihlberg. La denominación correcta está...
-
Page 7: Mantenimiento
CONTINUACIÓN DE PREPARACIÓN NOTA: La engrapadora no requiere lubricación. Conecte Diagrama 3 y ajuste la presión del aire a 5,0 barras (72 psi) para funcionamiento apropiado. ESPACIO DE ENGRAPADO • Máximo: 100 mm • Preestablecido: 95 mm AJUSTE EL ESPACIO DE ENGRAPADO Desconecte el suministro de aire. - Page 8 CONTINUACIÓN DE MANTENIMIENTO CAMBIE EL RESORTE DEL ALIMENTADOR CAMBIE EL IMPULSOR Empuje el perno de tensión (13) y retire el resorte (14). Desatornille los tornillos (18). (Vea Diagrama 7) (Vea Diagrama 5) 2. Afloje los cuatro tornillos (19) y separe el cabezal (20). 2.
-
Page 9: Solución De Problemas
CONTINUACIÓN DE MANTENIMIENTO CAMBIE EL CABEZAL DE ENGRAPADO Diagrama 9 1. Afloje los tornillos (30, 31). (Vea Diagrama 9) NOTA: Para poder aflojar el tornillo posterior (31), el cabezal de engrapado debe levantarse a 90°. 2. Coloque un nuevo cabezal y haga el ajuste lateral necesario. - Page 10 CONTINUACIÓN DE SOLUCIÓN DE PROBLEMAS Grapas se deforman cuando se insertan. • Revise que los baleros del cabezal de engrapado no hagan juego. • Revise que el yunque esté centrado apropiadamente. • Revise que el impulsor no esté dañado. • Revise que el canal de las grapas esté limpio. Nivel de ruido es muy alto.
- Page 11 π H-3070 1-800-295-5510 uline.ca AGRAFEUSE DE FOND DE BOÎTE PNEUMATIQUE KIHLBERG PRÉPARATION CHARGEMENT DU MAGASIN RÉGLAGE DE L'ENCLUME Bien que l'outil ait été soigneusement testé avant la REMARQUE: utilisez toujours des agrafes d'origine Josef Kihlberg. La désignation correcte livraison, il peut avoir été manipulé de manière brutale est indiquée sur chaque tête d'agrafage.
-
Page 12: Entretien
PRÉPARATION SUITE REMARQUE: L'agrafeuse n'a pas besoin d'être lubrifiée. Pour Figure 3 un fonctionnement correct, veuillez connecter et ajuster la pression d'air à 5.0 bars (72 lb/po ESPACEMENT DES AGRAFES • Maximum: 100mm • Préréglage: 95mm RÉGLAGE DE L'ESPACEMENT DES AGRAFES Débranchez l'alimentation en air. -
Page 13: Remplacement Du Moteur
ENTRETIEN SUITE REMPLACEMENT DU RESSORT REMPLACEMENT DU MOTEUR DU MÉCANISME D'ALIMENTATION Dévissez les vis (18). (Voir figure 7) Extrayez l'axe de tension (13) et déposez le ressort 2. Desserrez les quatre vis (19) et séparez la tête (20). (14). (Voir figure 5) 3. -
Page 14: Dépannage
ENTRETIEN SUITE REMPLACEMENT DE LA TÊTE D'AGRAFAGE Figure 9 Desserrez les vis (30, 31). (Voir figure 9) REMARQUE: pour desserrer la vis arrière (31) la tête d'agrafage doit être levée à 90°. 2. Montez une tête neuve et procédez à un réglage latéral de course. - Page 15 DÉPANNAGE SUITE Les agrafes sont déformées à l'insertion. • Vérifiez que le roulement de la tête d'agrafage ne présente pas de jeu. • Vérifiez que l'enclume est correctement centrée. • Vérifiez que le moteur n'est pas endommagé. • Vérifiez que le chemin d'agrafes est propre. Le niveau de bruit est trop élevé.
Need help?
Do you have a question about the H-3070 and is the answer not in the manual?
Questions and answers