Advertisement
Quick Links
Advertisement

Related Manuals for Resource Penelope 2 Sofa


Summary of Contents for Resource Penelope 2 Sofa
- Page 1 Assembly Instructions Penelope 2 Sofa...
- Page 2 Do not install the bed on weakened or rotten structures. Warranties for all products purchased from Resource Furniture, LLC are only valid if the product has been properly assembled, Installed by a trained professional, and operated in accordance with the assembly instructions.
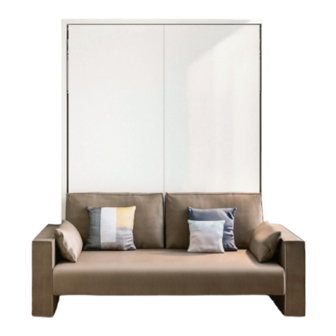
- Page 3 PENELOPE 2 SOFA OVERVIEW PENELOPE 2 SOFA OVERVIEW Thin Arm Wide Arm PENELOPE 2 SOFA MATTRESS SPECIFICATIONS PENELOPE 2 SOFA MATTRESS SPECIFICATIONS Recommended weight: ~ 66 lbs Recommended dimensions: 78 3/4 x 59 x 7” Recommended weight: ~ 66 lbs...
- Page 4 PENELOPE 2 SOFA OVERVIEW PENELOPE 2 SOFA OVERVIEW...
- Page 5 PENELOPE 2 SOFA OVERVIEW PENELOPE 2 SOFA OVERVIEW Note: Bed base comes fully assembled but can be disassembled if needed.
- Page 6 BED BASE ASSEMBLY BED BASE ASSEMBLY Note: Bed base comes fully assembled but can be disassembled if needed.
- Page 7 BED BASE ASSEMBLY - MATTRESS BAR BED BASE ASSEMBLY - MATTRESS BAR Mattress bar must be installed before the bed base is inserted into the structure.
- Page 8 BED BASE ASSEMBLY BED BASE ASSEMBLY Locking system adjustment/synchronization Check and adjust this function prior to installing the bed base! Lower the right lever and verify that the two locking pins at the bottom of the bed base enter equally and symmetrically. Repeat by operating the left lever.
- Page 9 BED BASE ASSEMBLY BED BASE ASSEMBLY A A d d j j u u s s t t t t h h e e u u n n l l o o c c k k i i n n g g c c a a b b l l e e 1 Loosen the locknut using an appropriate wrench.
- Page 10 PENELOPE 2 SOFA COMPONENTS PENELOPE 2 SOFA COMPONENTS CODE QTY. COMPONENTS Right vertical panel Left vertical panel Top horizontal panel Bottom horizontal panel Bed frame Sofa frame Back panels Back panel spline Padded sofa seat Sofa armrests Triangular sofa base plates...
- Page 11 PENELOPE 2 SOFA TOOLS PENELOPE 2 BOARD TOOLS QTY. DESCRIPTION Allen wrench 4 MM Allen wrench 5 MM Allen wrench 6 MM PENELOPE 2 BOARD WALL MOUNTING HARDWARE PENELOPE 2 SOFA CODE QTY. DESCRIPTION WALL MOUNTING HARDWARE Wall anchors supplied anchors are for solid concrete walls only.
- Page 12 PENELOPE 2 SOFA STRUCTURAL HARDWARE PENELOPE 2 SOFA STRUCTURAL HARDWARE CODE QTY. COMPONENT DESCRIPTION 7 x 36 6MA Pins D15 L17 Cam connectors 3.5 x 30 Wood screws for back panels Dowels - for attaching sofa 10 x 60 armrests to structure...
- Page 13 STRUCTURE ASSEMBLY STRUCTURE ASSEMBLY Screw 4 (A) pins into both the (1) right vertical and (2) left vertical panels. Attach the (3) horizontal Screw 4 (A) pins into both the (1) right vertical and (2) left vertical panels. Attach the (3) horizontal top and (4) horizontal bottom panels to the vertical panels by inserting and tightening 8 (B) cams.
- Page 14 OPTIONAL WAND LIGHTING OPTIONAL WAND LIGHTING Headboard must be installed on site before light fixture. Drill 1/2” hole at 10 1/4” above headboard and Headboard must be installed on site before light fixture. Drill 1/2” hole at 10 1/4” above headboard and 1 1/2”...
- Page 15 WALL ANCHORING INSTRUCTIONS WALL ANCHORING INSTRUCTIONS Caution! ! Carefully read pages s 13-17 before anchoring the bed to the wall. It is compulsory to secure the product to intact and strong walls, by no less than 4 wall anchoring points, as well as to place it on leveled floors. 1 0 m m 0 m m...
- Page 16 WALL ANCHORING INSTRUCTIONS After the unit is level and plumb it should be securely attached to the wall using the metal angle mounting brackets as shown in the images below. A proper wall anchor suitable for the wall’s construction must be selected by the contractor or installer. The required washer shown in the images below is not included with the hardware.
- Page 17 WALL ANCHORING INSTRUCTIONS WALL ANCHORING INSTRUCTIONS SHEETROCK SHEETROCK or 1/2” a n d 5 /8” thi c k sheet rock i t i s recommended to use (4) 3/16 strap toggl e s. For 1/2” and 5/8” thick sheetrock it is recommended to use (4) 3/16 strap toggles. Using a 1/2”...
- Page 18 WALL ANCHORING INSTRUCTIONS WALL ANCHORING INSTRUCTIONS METAL STUDS : OPTIONAL METAL STUDS : OPTIONAL Using a 1/2” (13 mm) diameter metal bit, drill into the drywall and the metal studs. Metal Drywall studs Slide the metal channel of the anchor through the hole in the wall, hold the straps together and pull toward you until the channel rests behind the wall.
- Page 19 Put the wood screws #10 x 3 1/2” (89 mm) through the hole of the wall bracket and screw into the center of the studs until the wall bracket is pulled snug against the wall. 2” (50 mm) minimum Dryw Wood stud For any other wall materials please reach out to Resource Furniture.
- Page 20 MATTRESS BAR INSTALLATION MATTRESS BAR INSTALLATION Mattress bar must be installed before the bed base is inserted into the structure. Mattress bar must be installed before the bed base is inserted into the structure. Hex screw REF: P...
- Page 21 BED BASE INSTALLATION BED BASE INSTALLATION BED BASE INSTALLATION At this stage of the installation the bed structure must be securely attached to the wall as described on pages 13-17. At this stage of the installation the bed structure must be securely attached to the wall as described on pages 13-17.
- Page 22 BED BASE INSTALLATION BED BASE INSTALLATION Attaching the bed base to the structure. Attaching the bed base to the structure. Hex screw REF: O...
- Page 23 SOFA BASE INSTALLATION SOFA BASE INSTALLATION Attach the (11) metal sofa plates to the (5) bed frame using 3 (H) hex screws on both sides. Attach the (11) metal sofa plates to the (5) bed frame using 3 (H) hex screws on both sides.
- Page 24 SOFA BASE INSTALLATION SOFA BASE INSTALLATION Attach the (11) triangular sofa base plates to the (6) sofa frame using 1 (H) hex screw Attach the (11) triangular sofa base plates to the (6) sofa frame using 1 (H) hex screw and 1 (I) conical and 1 (I) conical washer on each side.
- Page 25 SOFA BASE INSTALLATION SOFA BASE INSTALLATION Insert 8 (D) dowels into the top four holes on both the left and right vertical panels. Insert and secure Insert 8 (D) dowels into the top four holes on both the left and right vertical panels. Insert and the (F) threaded rods into the lowest hole on both the left and right vertical panels.
- Page 26 SOFA BASE INSTALLATION SOFA BASE INSTALLATION Ensure the bed frame is closed and locked safely upright. Do not attempt to reopen the bed frame until Ensure the bed frame is closed and locked safely upright. Do not attempt to reopen the bed frame until the unit has been anchored to the wall.
- Page 27 SOFA BASE INSTALLATION SOFA BASE INSTALLATION Place the (9) padded seat cushion on the sofa frame, wrapping the excess fabric around the back Place the (9) padded seat cushion on the sofa frame, wrapping the excess fabric around the back of the bed frame (11a) and fastening with velcro (11b).
- Page 28 SOFA BASE INSTALLATION SOFA BASE INSTALLATION Secure the levers at the front of the sofa frame to the armrests using 2 (H) hex screws and 2 (I) Secure the levers at the front of the sofa frame to the armrests using 2 (H) hex screws and 2 (I) conical washers.
- Page 29 HEADBOARD INSTALLATION HEADBOARD INSTALLATION Headboard is optional. Headboard is optional.
- Page 30 HEADBOARD INSTALLATION HEADBOARD INSTALLATION...
- Page 31 BED OPERATION BED OPERATION Opening the Unit. Opening the Unit.
- Page 32 BED OPERATION BED OPERATION Closing the Unit. Opening the Unit.
- Page 33 WARNING PAGE PROVIDED BY MANUFACTURER TRANSFORMING SYSTEM ASSEMBLY AND SAFETY CAREFULLY READ BEFORE PROCEEDING! Follow with care all points of the assembly procedure, as per technical sheets and their sequence showed in the following pages, and all the safety rules indicated. It is compulsory to fasten the product to intact and strong walls, by not less than 4 fixing points, and place it on perfectly levelled floors.
- Page 34 CLEI SYSTEM MATERIAL REQUIREMENTS CLEI SYSTEM - MATERIAL REQUIREMENTS Attention to environmental issues and therefore our commitment to green design are our organization’s competitive advantages. We design and make our products choosing materials that have a low impact on the environment and bearing in mind methods for reducing consumption of materials and waste as well as energy savings.
- Page 35 ResourceFurniture.com...
Need help?
Do you have a question about the Penelope 2 Sofa and is the answer not in the manual?
Questions and answers