Table of Contents
Advertisement
Quick Links
Advertisement
Table of Contents

Subscribe to Our Youtube Channel
Related Manuals for Youshiko YC9467


Summary of Contents for Youshiko YC9467
- Page 1 Youshiko YC9467 PROFESSIONAL WEATHER STATION...
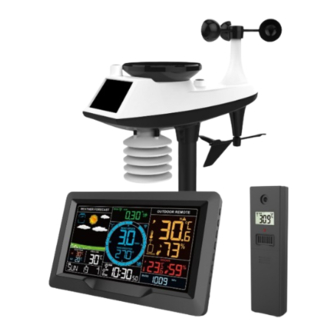
- Page 2 Comes with the following: 1 x YC9467 Weather station Console ( Color Display unit ) + Power supply 1 x Outdoor Multi-combination Sensor with built in Solar Panel ( Model number : YC1120 ) 1 x Sensor mounting kit 1 x User manual...
- Page 3 Features: MSF Radio control time function Perpetual Calendar Up to Year 2099 Two daily alarms Automatic snooze function (OFF or 5~60min) Temperature: — Indoor temperature measurement ranges:0°C (32°F) to 50°C (122°F) — Outdoor temperature measurement ranges: -40°C (-40°F) to70°C (158°F) ...
-
Page 4: Weather Station Appearance
sensor Model no : Temperature |Humidity Wireless Remote Sensor ( Optional YC9318) Battery:2 x LR6 AAA 1.5V F.Y.I.: The wireless remote sensor can work at -30°C to +70°C.Please choose the right battery according to the limit temperature of the wireless sensor: Alkaline zinc manganese battery can work at -20°C to +60°C Polymer lithium ion rechargeable batteries work at -40°C to +70°C. - Page 5 A15: Air pressure A16: Time : Battery low pressure icon RCC Signal Icon Summer time icon High temperature alert icon Alarm 1 icon Low temperature alert icon Alarm 2 icon 24-hour rainfall alert icon Monday-Friday repeat alarm icon Rainfall intensity alert icon Saturday-Sunday repeat alarm Top wind speed alert icon icon...
-
Page 6: Solar Panel
Multi-combination Wireless Remote Sensor Appearance ( YC1120 ) Part D –Exterior D1: Solar panel Rain funnel D3: Wind cups Bubble level D5: Temperature | humidity induction D6: Wind Directional Vane D7: Reset button D8: LED indicator D9: Manual transmit signal button D10: Battery compartment D11:Support rod... - Page 7 the overall battery life. During daytime under the sun, sensor is operating based on power directly coming from the solar panel. When the sun is set, Only after the AA batteries will kick in. Please note : Solar panel does not charge batteries .
-
Page 8: Setup Preparation
E7:“CHANNEL 1 or 2 or 3”switch E8: Temperature |Humidity selection button Before set up For best results: • Remove weather station and sensors from the package and place together on a table or bench, within easy reach. • Keep sensors and weather station 2 to 10 feet for at least 15 minutes after installing batteries and power supply to allow the sensors and station to connect repeatedly. -
Page 9: Quick Setup
After powering on the weather station, ( after or around 3 minutes) will it will soon activate Radio Control automatically enter the RCC timing mode. Clock ( MSF UK & Ireland ). During the process, the display screen will automatically turn off to reduce other interference. After the process (in 7 minutes), the screen will light up again. - Page 10 such extreme circumstances, place the weather station close to the window. Note: The weather station has a radio control clock calibration time function. After power-on, after searching the wireless sensor for 3 minutes or all channels successfully search for the wireless sensor, the weather station will automatically enter the radio control clock timing mode.
- Page 11 Radio control clock (Abbreviation: RCC) timing: After the weather station searches for the wireless sensor after power-on, (up to 3 minutes) will automatically enter the RCC timing mode. The weather station will the RCC signal RC automatically search for the RCC signal for 7 minutes, icon will flash and the backlight will automatically turn off.
- Page 12 Note: After 20 seconds without pressing any button or touch the “ ”location button at any timeto exit the view mode. Alarm and Snooze settings Press and hold the “ ” button for 3 seconds to enter the alarm and snooze setting mode.
- Page 13 The alarm sound when the trigger,press any buttonsexcept the “ ” touch button ortouch and hold the “ ”button for more than 3 seconds to stop the alarm signal. Snooze function: When the time is up to the alarm, touch and release the “ ”touch button, the alarm signal stops, and enter the snooze timing mode.
-
Page 14: Rain Readings | History
the display to wind direction or display as 1 hour top speed Note: WIND SPEED: average speed over the past 30 seconds 1HR TOP SPEED: Highest speed in the past hour WIND DIRECTION: In letters or degrees Note: The conversion is displayed as a wind direction display or 1 hour top speed can only be operated under the main display interface. - Page 15 December 31. TOTAL: The cumulative value of the total run time (no time stamp) since the weather station was started In the mode of viewing rain history, press and hold the “ ” button for 3 seconds to clear all history of rain. Note: The rain reading will reset to 0mm(in).
- Page 16 station within 3 minutes. Note: When adding a new sensor or replacing a sensor (old sensor replacement battery), you need to turn on the sensor power first, then follow the steps above to control the weather station. Note: When the channel icon (the position of the display A15) displays the low voltage icon“...
-
Page 17: Weather Forecast
Note: After 20 seconds without pressing any button or touch the “ ”location button at any timeto exit the settings. Note: Set Outdoor | REMOTE Temperature | Humidity alert, press and release the “ ” button to switch to other channels. (A total of 4 channels: outdoor | CH1 | CH2 | CH3) View and Settings order: 1.Outdoor| remote high temperature... - Page 18 Outdoor sensor collect real-time data and weather station track specific weather-related variables, including changes in temperature, humidity, and barometric pressure to produce a forecast with a personalized accuracy for your location ( which may not be same as Sky or BBC news forecast as there forecast is for very large area .
- Page 19 The Snowstorm icon will only appear if the outdoor temperature (refers to the temperature detected by multiple combined sensors) is below -4°C (+25°F) and the wind speed is above 50 KM / H and the forecast would be rainy or Thunder Rainy. ...
- Page 20 The base of the sensor is screwed to the platform and the support frame.Tighten the large nut that secures the support rod to the base When installing, adjust the sensor body so that the solar panel faces south, otherwise the wind direction will be wrong.
- Page 21 Note: Make sure the wireless sensor is installed within 100 meters of the weather station (empty, unobstructed). According to the thickness of the obstacle between the wireless sensor and the weather station, the distance should be shortened as much as possible (the distance after the wireless signal penetrates the obstacle will be shortened), otherwise the data transmission may be disturbed.
- Page 22 Pro Installation Checkout Note: We suggest you assemble all components of the weather station, including console in one location so you can easily test functionality. After testing, place the outdoor sensor package in the desired location. Note, however, that movement during assembly and movement after assembly can cause the rain sensor to “falsely”...
- Page 23 Please note: You may require a long pole to install the outdoor sensor, Which is not included Supplied in Box: 1 x Youshiko YC9467 Console 1 x Out door 7-in1 Sensor ( Model no : YC1120 ) 1 x Instruction manual...
Need help?
Do you have a question about the YC9467 and is the answer not in the manual?
Questions and answers
Hi my screen display is black I’ve changed the batteries and still no joy. What could the problem be? Thanks